<?xml version="1.0" encoding="utf-8"?><feed xmlns="http://www.w3.org/2005/Atom" ><generator uri="https://jekyllrb.com/" version="4.2.2">Jekyll</generator><link href="https://www.nintorac.dev/feed.xml" rel="self" type="application/atom+xml" /><link href="https://www.nintorac.dev/" rel="alternate" type="text/html" /><updated>2025-04-15T08:47:57+00:00</updated><id>https://www.nintorac.dev/feed.xml</id><title type="html">NintoracAudio</title><subtitle>Random musings, ideas, implementations and experiments in and around the world of AI Audio</subtitle><entry><title type="html">Unified Storage Access in Python Using fsspec</title><link href="https://www.nintorac.dev/data-engineering/2024/12/24/fsspec-fun.html" rel="alternate" type="text/html" title="Unified Storage Access in Python Using fsspec" /><published>2024-12-24T04:22:56+00:00</published><updated>2024-12-24T04:22:56+00:00</updated><id>https://www.nintorac.dev/data-engineering/2024/12/24/fsspec-fun</id><content type="html" xml:base="https://www.nintorac.dev/data-engineering/2024/12/24/fsspec-fun.html"><![CDATA[<p>Here is a neat method I found to make accessing blob
storage extremely painless in the Python data eco-system. It’s especially nice since the tools
it relies on are extremely widely supported. So if that sounds interesting read on.</p>

<p>The code to for to produce this article can be <a href="https://github.com/Nintorac/fsspec-fun/blob/main/article.py">found here</a>, or if you prefer a <code class="language-plaintext highlighter-rouge">.ipynb</code> then <a href="https://github.com/Nintorac/fsspec-fun/blob/main/build/article.ipynb">check here</a></p>

<details>
  <summary>
    <p>A quick note on article format (click to expand)</p>
  </summary>
  <hr />
  <p>This article is a little experimental, I want to be able to produce content with executed Python
it works OK but is a little convoluted. I think I will end up migrating my site platform to MyST or Sphinx in the future to make it easier.</p>

  <p>Check out <a href="https://github.com/Nintorac/fsspec-fun">github.com/Nintorac/fsspec-fun</a> for the sources.</p>

  <p>You should know, when you see a block of Python, the content after it is the output of that bit of code.</p>

  <p>eg. printing to console</p>

  <div class="language-python highlighter-rouge"><div class="highlight"><pre class="highlight"><code><span class="k">print</span><span class="p">(</span><span class="s">"This code is being executed, and the next box is the output</span><span class="se">\n</span><span class="s">it works exactly like it would in a jupyter notebook"</span><span class="p">)</span>
</code></pre></div>  </div>

  <div class="language-plaintext highlighter-rouge"><div class="highlight"><pre class="highlight"><code>This code is being executed, and the next box is the output
it works exactly like it would in a jupyter notebook
</code></pre></div>  </div>

  <p>or displaying a variable directly</p>

  <div class="language-python highlighter-rouge"><div class="highlight"><pre class="highlight"><code><span class="mi">123456</span>
</code></pre></div>  </div>

  <div class="language-plaintext highlighter-rouge"><div class="highlight"><pre class="highlight"><code>123456
</code></pre></div>  </div>

  <hr />
</details>

<h2 id="getting-started">Getting started</h2>

<p>First we are going to install a few dependencies.</p>

<div class="language-python highlighter-rouge"><div class="highlight"><pre class="highlight"><code><span class="err">!</span><span class="n">pip</span> <span class="n">install</span> <span class="o">--</span><span class="n">disable</span><span class="o">-</span><span class="n">pip</span><span class="o">-</span><span class="n">version</span><span class="o">-</span><span class="n">check</span> <span class="o">--</span><span class="n">root</span><span class="o">-</span><span class="n">user</span><span class="o">-</span><span class="n">action</span><span class="o">=</span><span class="n">ignore</span> <span class="o">-</span><span class="n">q</span> \
    <span class="n">fsspec</span> <span class="n">pandas</span>
<span class="kn">import</span> <span class="nn">fsspec</span><span class="p">,</span> <span class="n">pandas</span> <span class="k">as</span> <span class="n">pd</span>
</code></pre></div></div>

<p>fsspec which is the star of the article, and Pandas to demonstrate some of the neat interoperability
(but this works with many other libraries eg DuckDB, Polars..<a href="https://filesystem-spec.readthedocs.io/en/latest/#who-uses-fsspec">etc</a>)</p>

<p>fsspec is a neat little tool that aims to provide a unified interface to files wherever they live,
be that locally, in a zip, on http or even FTP! Heres the full list of <a href="https://filesystem-spec.readthedocs.io/en/latest/api.html#built-in-implementations">built in implementations</a>
and a list of <a href="https://filesystem-spec.readthedocs.io/en/latest/api.html#other-known-implementations">other known implementations</a></p>

<p>For example;</p>

<div class="language-python highlighter-rouge"><div class="highlight"><pre class="highlight"><code><span class="n">fs</span> <span class="o">=</span> <span class="n">fsspec</span><span class="p">.</span><span class="n">filesystem</span><span class="p">(</span><span class="s">'file'</span><span class="p">)</span>
<span class="k">with</span> <span class="n">fs</span><span class="p">.</span><span class="nb">open</span><span class="p">(</span><span class="s">'example_file'</span><span class="p">,</span><span class="s">'w'</span><span class="p">)</span> <span class="k">as</span> <span class="n">f</span><span class="p">:</span>
    <span class="n">f</span><span class="p">.</span><span class="n">write</span><span class="p">(</span><span class="s">'hello'</span><span class="p">)</span>

<span class="err">!</span><span class="n">cat</span> <span class="n">example_file</span>
</code></pre></div></div>

<div class="language-plaintext highlighter-rouge"><div class="highlight"><pre class="highlight"><code>hello
</code></pre></div></div>

<p>Here we create a file named <code class="language-plaintext highlighter-rouge">example_file</code> in the current working directory, write some text into it and then escape to shell to
print the file using cat.</p>

<p>Here’s another example;</p>

<div class="language-python highlighter-rouge"><div class="highlight"><pre class="highlight"><code><span class="n">fs</span> <span class="o">=</span> <span class="n">fsspec</span><span class="p">.</span><span class="n">filesystem</span><span class="p">(</span><span class="s">'memory'</span><span class="p">)</span>
<span class="k">with</span> <span class="n">fs</span><span class="p">.</span><span class="nb">open</span><span class="p">(</span><span class="s">'example_file'</span><span class="p">,</span><span class="s">'w'</span><span class="p">)</span> <span class="k">as</span> <span class="n">f</span><span class="p">:</span>
    <span class="n">f</span><span class="p">.</span><span class="n">write</span><span class="p">(</span><span class="s">'a,b,c</span><span class="se">\n</span><span class="s">1,2,3'</span><span class="p">)</span>

<span class="n">df</span> <span class="o">=</span> <span class="n">pd</span><span class="p">.</span><span class="n">read_csv</span><span class="p">(</span><span class="s">'memory://example_file'</span><span class="p">)</span>
<span class="n">df</span>
</code></pre></div></div>

<div>
  <style scoped="">
    .dataframe tbody tr th:only-of-type {
        vertical-align: middle;
    }

    .dataframe tbody tr th {
        vertical-align: top;
    }

    .dataframe thead th {
        text-align: right;
    }
</style>

  <table border="1" class="dataframe">
  <thead>
    <tr style="text-align: right;">
      <th></th>
      <th>a</th>
      <th>b</th>
      <th>c</th>
    </tr>
  </thead>
  <tbody>
    <tr>
      <th>0</th>
      <td>1</td>
      <td>2</td>
      <td>3</td>
    </tr>
  </tbody>
</table>
</div>

<p>This time we use the ‘memory’ filesystem, an ephemeral in memory filesystem provided by fsspec
out of the box. We write a csv to it, and then use pandas to read the csv directly.</p>

<p>So pandas supports fsspec out of the box!</p>

<h2 id="bucket-storage">Bucket storage</h2>

<p>Ok, lets get a bit more fancy;</p>

<div class="language-python highlighter-rouge"><div class="highlight"><pre class="highlight"><code><span class="err">!</span><span class="n">docker</span> <span class="n">run</span> <span class="o">--</span><span class="n">name</span> <span class="n">nervous_sutherland</span> <span class="o">--</span><span class="n">rm</span> <span class="o">-</span><span class="n">d</span> \
  <span class="o">-</span><span class="n">p</span> <span class="mi">9000</span><span class="p">:</span><span class="mi">9000</span> \
  <span class="o">-</span><span class="n">p</span> <span class="mi">9001</span><span class="p">:</span><span class="mi">9001</span> \
  <span class="o">-</span><span class="n">e</span> <span class="s">"MINIO_ROOT_USER=minio"</span> \
  <span class="o">-</span><span class="n">e</span> <span class="s">"MINIO_ROOT_PASSWORD=123456789"</span> \
  <span class="n">quay</span><span class="p">.</span><span class="n">io</span><span class="o">/</span><span class="n">minio</span><span class="o">/</span><span class="n">minio</span> <span class="n">server</span> <span class="o">/</span><span class="n">data</span> <span class="o">--</span><span class="n">console</span><span class="o">-</span><span class="n">address</span> <span class="s">":9001"</span>
<span class="err">!</span><span class="n">sleep</span> <span class="mi">2</span>
<span class="err">!</span><span class="n">docker</span> <span class="k">exec</span> <span class="n">nervous_sutherland</span> <span class="n">bash</span> <span class="o">-</span><span class="n">c</span> \
    <span class="s">"mc alias set myminio http://localhost:9000 minio 123456789 &amp;&amp; </span><span class="se">\
</span><span class="s">    mc mb myminio/mybucket"</span>

<span class="err">!</span><span class="n">pip</span> <span class="n">install</span> <span class="o">--</span><span class="n">disable</span><span class="o">-</span><span class="n">pip</span><span class="o">-</span><span class="n">version</span><span class="o">-</span><span class="n">check</span> <span class="o">--</span><span class="n">root</span><span class="o">-</span><span class="n">user</span><span class="o">-</span><span class="n">action</span><span class="o">=</span><span class="n">ignore</span> <span class="o">-</span><span class="n">q</span> \
      <span class="n">s3fs</span>
</code></pre></div></div>

<div class="language-plaintext highlighter-rouge"><div class="highlight"><pre class="highlight"><code>3bd79abde39850ba8dcc29028457ff5a64ec37b7db5f5ece167b60a8197e310e


Added `myminio` successfully.


Bucket created successfully `myminio/mybucket`.
</code></pre></div></div>

<p>We started a Minio server as a quick and easy alternative to S3, if you are following along
from home and already have access to S3 then you can use that just as easily!</p>

<p>Then we create a bucket in the minio server called <code class="language-plaintext highlighter-rouge">mybucket</code>.</p>

<p>Finally, we installed <code class="language-plaintext highlighter-rouge">s3fs</code>, this is an fsspec backend that allows you to access any s3 compatiable.
So lets try the last example again, but writing to s3 now;</p>

<div class="language-python highlighter-rouge"><div class="highlight"><pre class="highlight"><code><span class="n">fs</span> <span class="o">=</span> <span class="n">fsspec</span><span class="p">.</span><span class="n">filesystem</span><span class="p">(</span>
    <span class="s">'s3'</span><span class="p">,</span>               <span class="c1"># this setting tells fsspec to use the s3fs package
</span>    <span class="n">key</span> <span class="o">=</span> <span class="s">'minio'</span><span class="p">,</span>
    <span class="n">secret</span> <span class="o">=</span> <span class="s">'123456789'</span><span class="p">,</span>
    <span class="n">endpoint_url</span> <span class="o">=</span> <span class="s">'http://localhost:9000'</span>
<span class="p">)</span>
<span class="k">with</span> <span class="n">fs</span><span class="p">.</span><span class="nb">open</span><span class="p">(</span><span class="s">'mybucket/example_file'</span><span class="p">,</span><span class="s">'w'</span><span class="p">)</span> <span class="k">as</span> <span class="n">f</span><span class="p">:</span>
    <span class="n">f</span><span class="p">.</span><span class="n">write</span><span class="p">(</span><span class="s">'a,b,c</span><span class="se">\n</span><span class="s">1,2,3'</span><span class="p">)</span>

<span class="n">df</span> <span class="o">=</span> <span class="n">pd</span><span class="p">.</span><span class="n">read_csv</span><span class="p">(</span><span class="s">'s3://mybucket/example_file'</span><span class="p">)</span>
<span class="n">df</span>
</code></pre></div></div>

<div class="language-plaintext highlighter-rouge"><div class="highlight"><pre class="highlight"><code>PermissionError: Forbidden
</code></pre></div></div>

<p>Wait, hang on..permission denied?</p>

<p>Ah! when I use <code class="language-plaintext highlighter-rouge">s3://</code> protocol with pandas it is not supplying my custom configuration
so its reaching out to the real s3 with my bogus credentials and so…Forbidden!</p>

<p>The solve?</p>

<div class="language-python highlighter-rouge"><div class="highlight"><pre class="highlight"><code><span class="k">with</span> <span class="n">fs</span><span class="p">.</span><span class="nb">open</span><span class="p">(</span><span class="s">'mybucket/example_file'</span><span class="p">,</span><span class="s">'r'</span><span class="p">)</span> <span class="k">as</span> <span class="n">f</span><span class="p">:</span>
    <span class="n">df</span> <span class="o">=</span> <span class="n">pd</span><span class="p">.</span><span class="n">read_csv</span><span class="p">(</span><span class="n">f</span><span class="p">)</span>
<span class="n">df</span>
</code></pre></div></div>

<div>
  <style scoped="">
    .dataframe tbody tr th:only-of-type {
        vertical-align: middle;
    }

    .dataframe tbody tr th {
        vertical-align: top;
    }

    .dataframe thead th {
        text-align: right;
    }
</style>

  <table border="1" class="dataframe">
  <thead>
    <tr style="text-align: right;">
      <th></th>
      <th>a</th>
      <th>b</th>
      <th>c</th>
    </tr>
  </thead>
  <tbody>
    <tr>
      <th>0</th>
      <td>1</td>
      <td>2</td>
      <td>3</td>
    </tr>
  </tbody>
</table>
</div>

<p>Yuck! All those nice ergonomics are gone, a whole extra line of code..let’s do better!</p>

<h2 id="custom-protocol-defintions">Custom Protocol Defintions</h2>

<p>After forgetting about this problem for some time I came across <code class="language-plaintext highlighter-rouge">UPath</code>, this is another library
from the fsspec project that adds <code class="language-plaintext highlighter-rouge">pathlib.Path</code> capabilites to fsspec endponts. More on that later…
but in the <a href="https://github.com/fsspec/universal_pathlib/blob/3cc0871/README.md">README</a> for this library in an out of context example, we find a hint!</p>

<p>Here is the relevant excerpt;</p>
<pre><code class="language-python3">import fsspec.registry
from fsspec.spec import AbstractFileSystem

class MyProtoFileSystem(AbstractFileSystem):
    protocol = ("myproto",)
    ...  # your custom implementation

fsspec.registry.register_implementation("myproto", MyProtoFileSystem)
</code></pre>

<p>So let’s try something;</p>

<div class="language-python highlighter-rouge"><div class="highlight"><pre class="highlight"><code><span class="kn">from</span> <span class="nn">fsspec</span> <span class="kn">import</span> <span class="n">register_implementation</span>
<span class="kn">from</span> <span class="nn">s3fs</span> <span class="kn">import</span> <span class="n">S3FileSystem</span>

<span class="k">class</span> <span class="nc">MyProtoFileSystem</span><span class="p">(</span><span class="n">S3FileSystem</span><span class="p">):</span>
    <span class="n">protocol</span> <span class="o">=</span> <span class="p">(</span><span class="s">'fsspecfun'</span><span class="p">,)</span> <span class="c1"># Name of the custom protocol
</span>
    <span class="k">def</span> <span class="nf">__init__</span><span class="p">(</span><span class="bp">self</span><span class="p">,</span> <span class="o">*</span><span class="n">args</span><span class="p">,</span> <span class="o">**</span><span class="n">_</span><span class="p">):</span>
        <span class="nb">super</span><span class="p">().</span><span class="n">__init__</span><span class="p">(</span>
            <span class="o">*</span><span class="n">args</span><span class="p">,</span>
            <span class="c1"># Configuration we inject into the base protocol
</span>            <span class="n">key</span> <span class="o">=</span> <span class="s">'minio'</span><span class="p">,</span>
            <span class="n">secret</span> <span class="o">=</span> <span class="s">'123456789'</span><span class="p">,</span>
            <span class="n">endpoint_url</span> <span class="o">=</span> <span class="s">'http://localhost:9000'</span>
        <span class="p">)</span>

<span class="n">register_implementation</span><span class="p">(</span><span class="s">"fsspecfun"</span><span class="p">,</span> <span class="n">MyProtoFileSystem</span><span class="p">)</span> <span class="c1"># register the protocol with fsspec
</span>
<span class="n">df</span> <span class="o">=</span> <span class="n">pd</span><span class="p">.</span><span class="n">read_csv</span><span class="p">(</span><span class="s">'fsspecfun://mybucket/example_file'</span><span class="p">)</span>
<span class="n">df</span>
</code></pre></div></div>

<div>
  <style scoped="">
    .dataframe tbody tr th:only-of-type {
        vertical-align: middle;
    }

    .dataframe tbody tr th {
        vertical-align: top;
    }

    .dataframe thead th {
        text-align: right;
    }
</style>

  <table border="1" class="dataframe">
  <thead>
    <tr style="text-align: right;">
      <th></th>
      <th>a</th>
      <th>b</th>
      <th>c</th>
    </tr>
  </thead>
  <tbody>
    <tr>
      <th>0</th>
      <td>1</td>
      <td>2</td>
      <td>3</td>
    </tr>
  </tbody>
</table>
</div>

<p>Well..it seems to be working but…whats happening here?!</p>

<p>First up we are creating a sub-class of <code class="language-plaintext highlighter-rouge">S3FileSystem</code>, this is the class that we are fetching when we ran
<code class="language-plaintext highlighter-rouge">fsspec.filesystem('s3')</code>, convince yourself like this; <code class="language-plaintext highlighter-rouge">type(fsspec.filesystem('s3'))==S3FileSystem</code>.</p>

<p>This is also the class that implements the fssspec protocol, so our subclass will also implement it!</p>

<p>Then we override this protocol variable..this let’s fsspec know when to use this backend implementation.
eg for the <code class="language-plaintext highlighter-rouge">S3FileSytem</code> this value is <code class="language-plaintext highlighter-rouge">('s3',)</code></p>

<p>Next we override the init function, here we ignore any of the fsspec storage options and inject our own.</p>

<p>Once we have the implementation in place, we register it with fsspec, passing in the protocol name again here
– not sure why it’s configured twice, but they both have to match for things to work.</p>

<p>Finally, we read the csv again, but this time we replace the <code class="language-plaintext highlighter-rouge">s3</code> protocol from the initial attempt with the new one: <code class="language-plaintext highlighter-rouge">fsspecfun</code></p>

<h2 id="custom-protocol-use-cases">Custom Protocol Use cases</h2>

<p>Neat, it works! Let’s take the idea and glam it up a little;</p>

<div class="language-python highlighter-rouge"><div class="highlight"><pre class="highlight"><code><span class="k">def</span> <span class="nf">register_custom_fs_protocol</span><span class="p">(</span><span class="n">protocol</span><span class="p">:</span> <span class="nb">str</span><span class="p">,</span> <span class="n">base_protocol</span><span class="p">:</span> <span class="nb">str</span><span class="p">,</span> <span class="n">storage_options</span><span class="p">:</span> <span class="nb">dict</span><span class="p">[</span><span class="nb">str</span><span class="p">,</span> <span class="nb">str</span><span class="p">],</span> <span class="o">*</span><span class="p">,</span> <span class="n">clobber</span><span class="p">:</span> <span class="nb">bool</span> <span class="o">=</span> <span class="bp">False</span><span class="p">):</span>
    <span class="s">"""Register a custom fsspec protocol that applies some storage configuration."""</span>
    <span class="n">overwrite_protocol</span> <span class="o">=</span> <span class="n">protocol</span>

    <span class="k">class</span> <span class="nc">MyProtoFileSystem</span><span class="p">(</span><span class="nb">type</span><span class="p">(</span><span class="n">fsspec</span><span class="p">.</span><span class="n">filesystem</span><span class="p">(</span><span class="n">base_protocol</span><span class="p">))):</span>
        <span class="n">protocol</span> <span class="o">=</span> <span class="p">(</span><span class="n">overwrite_protocol</span><span class="p">,)</span>

        <span class="k">def</span> <span class="nf">__init__</span><span class="p">(</span><span class="bp">self</span><span class="p">,</span> <span class="o">*</span><span class="n">args</span><span class="p">,</span> <span class="o">**</span><span class="n">_</span><span class="p">):</span>  <span class="c1"># noqa: N804
</span>            <span class="nb">super</span><span class="p">().</span><span class="n">__init__</span><span class="p">(</span><span class="o">*</span><span class="n">args</span><span class="p">,</span> <span class="o">**</span><span class="n">storage_options</span><span class="p">)</span>

    <span class="n">fsspec</span><span class="p">.</span><span class="n">register_implementation</span><span class="p">(</span><span class="n">protocol</span><span class="p">,</span> <span class="n">MyProtoFileSystem</span><span class="p">,</span> <span class="n">clobber</span><span class="p">)</span>
</code></pre></div></div>

<p>In this new version we create the handler class on the fly, you can base it off any fsspec implementation
(<a href="https://filesystem-spec.readthedocs.io/en/latest/api.html#other-known-implementations">full list here</a>) and you can 
give the protocol whatever name you like.</p>

<p>So let’s use it to register some custom protocols - to demonstrate this I’ll deploy another minio server, and we will backup the example file from the original server to the new one.</p>

<div class="language-python highlighter-rouge"><div class="highlight"><pre class="highlight"><code><span class="err">!</span><span class="n">docker</span> <span class="n">run</span> <span class="o">--</span><span class="n">name</span> <span class="n">chirpy_donkey</span> <span class="o">--</span><span class="n">rm</span> <span class="o">-</span><span class="n">d</span> \
  <span class="o">-</span><span class="n">p</span> <span class="mi">9002</span><span class="p">:</span><span class="mi">9000</span> \
  <span class="o">-</span><span class="n">p</span> <span class="mi">9003</span><span class="p">:</span><span class="mi">9001</span> \
  <span class="o">-</span><span class="n">e</span> <span class="s">"MINIO_ROOT_USER=minio"</span> \
  <span class="o">-</span><span class="n">e</span> <span class="s">"MINIO_ROOT_PASSWORD=987654321"</span> \
  <span class="n">quay</span><span class="p">.</span><span class="n">io</span><span class="o">/</span><span class="n">minio</span><span class="o">/</span><span class="n">minio</span> <span class="n">server</span> <span class="o">/</span><span class="n">data</span> <span class="o">--</span><span class="n">console</span><span class="o">-</span><span class="n">address</span> <span class="s">":9001"</span>
<span class="err">!</span><span class="n">sleep</span> <span class="mi">2</span>
<span class="err">!</span><span class="n">docker</span> <span class="k">exec</span> <span class="n">chirpy_donkey</span> <span class="n">bash</span> <span class="o">-</span><span class="n">c</span> \
    <span class="s">"mc alias set myminio http://localhost:9000 minio 987654321 &amp;&amp; </span><span class="se">\
</span><span class="s">    mc mb myminio/mybucket"</span>
</code></pre></div></div>

<div class="language-plaintext highlighter-rouge"><div class="highlight"><pre class="highlight"><code>b935861911a5d1d0ec55e47766d23dfc571aa0dd6764fb1810522fd694ede1ad


Added `myminio` successfully.
Bucket created successfully `myminio/mybucket`.
</code></pre></div></div>

<p><a id="infra"></a>
Here is a quick diagram to try to illustrate the architecture of the infrastructure at this point.
It is rendered a bit more nicely in the repo, <a href="https://github.com/Nintorac/fsspec-fun/blob/main/build/article.md#infra">here</a></p>

<p><img class="mermaid" src="https://mermaid.ink/svg/eyJjb2RlIjoiZ3JhcGggTFJcbnN1YmdyYXBoIFwiQ29udGFpbmVyIChuZXJ2b3VzX3N1dGhlcmxhbmQpICMzMjtcIlxuQltNaW5pbyBTZXJ2ZXIgMV1cbkIxW1wiUG9ydCA5MDAwIC0gUzMgQVBJICAjMzI7XCJdXG5CMltcIlBvcnQgOTAwMSAtIENvbnNvbGUgIzMyO1wiXVxuQjNbPGltZyBoZWlnaHQ9XCI0MHB4XCIgd2lkdGg9XCI0MHB4XCIgc3JjPSdkYXRhOmltYWdlL3N2Zyt4bWw7YmFzZTY0LFBITjJaeUI0Yld4dWN6MGlhSFIwY0RvdkwzZDNkeTUzTXk1dmNtY3ZNakF3TUM5emRtY2lJSFpwWlhkQ2IzZzlJakFnTUNBeU1EQWdNakF3SWo0S0lDQThJUzB0SUVKaFkydG5jbTkxYm1RZ1kybHlZMnhsSUMwdFBnb2dJRHhqYVhKamJHVWdZM2c5SWpFd01DSWdZM2s5SWpFd01DSWdjajBpT0RBaUlHWnBiR3c5SWlORE56SXdNekFpTHo0S0lDQUtJQ0E4SVMwdElFSjFZMnRsZENCaWIyUjVJQzBnYlc5eVpTQmpkWEoyWldRZ1lXNWtJR0oxWTJ0bGRDMXNhV3RsSUMwdFBnb2dJRHh3WVhSb0lHUTlJZ29nSUNBZ1RUWXdJRGN3Q2lBZ0lDQkROakFnTnpBc0lERXdNQ0EyTUN3Z01UUXdJRGN3Q2lBZ0lDQk1NVE13SURFME1Bb2dJQ0FnUXpFek1DQXhOREFzSURFd01DQXhOVEFzSURjd0lERTBNQW9nSUNBZ1dnb2dJQ0lnWm1sc2JEMGlkMmhwZEdVaUlITjBjbTlyWlQwaUl6TXpNek16TXlJZ2MzUnliMnRsTFhkcFpIUm9QU0l5SWk4K0NpQWdDaUFnUENFdExTQlViM0FnWld4c2FYQnpaU0JtYjNJZ1luVmphMlYwSUc5d1pXNXBibWNnTFMwK0NpQWdQR1ZzYkdsd2MyVWdZM2c5SWpFd01DSWdZM2s5SWpjd0lpQnllRDBpTkRBaUlISjVQU0l4TUNJZ1ptbHNiRDBpZDJocGRHVWlJSE4wY205clpUMGlJek16TXpNek15SWdjM1J5YjJ0bExYZHBaSFJvUFNJeUlpOCtDaUFnQ2lBZ1BDRXRMU0JQWW1wbFkzUWdjM1J2Y21GblpTQnplVzFpYjJ4eklDMGdZMlZ1ZEdWeVpXUWdZVzVrSUhkcGRHZ2djR1Z5YzNCbFkzUnBkbVVnTFMwK0NpQWdQSEpsWTNRZ2VEMGlNVEExSWlCNVBTSTVNQ0lnZDJsa2RHZzlJakV5SWlCb1pXbG5hSFE5SWpFeUlpQm1hV3hzUFNJak16TXpNek16SWlCMGNtRnVjMlp2Y20wOUluTnJaWGRZS0MweE1Da2lMejRLSUNBOGNtVmpkQ0I0UFNJeE1qVWlJSGs5SWprd0lpQjNhV1IwYUQwaU1USWlJR2hsYVdkb2REMGlNVElpSUdacGJHdzlJaU16TXpNek16TWlJSFJ5WVc1elptOXliVDBpYzJ0bGQxZ29MVEV3S1NJdlBnb2dJRHh5WldOMElIZzlJakV3TlNJZ2VUMGlNVEV3SWlCM2FXUjBhRDBpTVRJaUlHaGxhV2RvZEQwaU1USWlJR1pwYkd3OUlpTXpNek16TXpNaUlIUnlZVzV6Wm05eWJUMGljMnRsZDFnb0xURXdLU0l2UGdvZ0lEeHlaV04wSUhnOUlqRXlOU0lnZVQwaU1URXdJaUIzYVdSMGFEMGlNVElpSUdobGFXZG9kRDBpTVRJaUlHWnBiR3c5SWlNek16TXpNek1pSUhSeVlXNXpabTl5YlQwaWMydGxkMWdvTFRFd0tTSXZQZ29nSUFvZ0lEd2hMUzBnVFdsdVNVOGdkR1Y0ZENBdExUNEtJQ0E4ZEdWNGRDQjRQU0l4TURBaUlIazlJakUzTUNJZ2RHVjRkQzFoYm1Ob2IzSTlJbTFwWkdSc1pTSWdabTl1ZEMxbVlXMXBiSGs5SWtGeWFXRnNJaUJtYjI1MExYTnBlbVU5SWpFMElpQm1hV3hzUFNKM2FHbDBaU0krVFdsdVNVODhMM1JsZUhRK0Nqd3ZjM1puUGc9PScgLz4gbXlidWNrZXRdXG5CIC0tPiBCMlxuQiAtLT4gQjNcbkIgLS0-IEIxXG5lbmRcbnN1YmdyYXBoIFwiQ29udGFpbmVyIChjaGlycHlfZG9ua2V5KSAjMzI7XCJcbkNbTWluaW8gU2VydmVyIDJdXG5DMVtcIlBvcnQgOTAwMiAtIFMzIEFQSSAjMzI7XCJdXG5DMltcIlBvcnQgOTAwMyAtIENvbnNvbGUgIzMyO1wiXVxuQzNbPGltZyBoZWlnaHQ9XCI0MHB4XCIgd2lkdGg9XCI0MHB4XCIgc3JjPSdkYXRhOmltYWdlL3N2Zyt4bWw7YmFzZTY0LFBITjJaeUI0Yld4dWN6MGlhSFIwY0RvdkwzZDNkeTUzTXk1dmNtY3ZNakF3TUM5emRtY2lJSFpwWlhkQ2IzZzlJakFnTUNBeU1EQWdNakF3SWo0S0lDQThJUzB0SUVKaFkydG5jbTkxYm1RZ1kybHlZMnhsSUMwdFBnb2dJRHhqYVhKamJHVWdZM2c5SWpFd01DSWdZM2s5SWpFd01DSWdjajBpT0RBaUlHWnBiR3c5SWlORE56SXdNekFpTHo0S0lDQUtJQ0E4SVMwdElFSjFZMnRsZENCaWIyUjVJQzBnYlc5eVpTQmpkWEoyWldRZ1lXNWtJR0oxWTJ0bGRDMXNhV3RsSUMwdFBnb2dJRHh3WVhSb0lHUTlJZ29nSUNBZ1RUWXdJRGN3Q2lBZ0lDQkROakFnTnpBc0lERXdNQ0EyTUN3Z01UUXdJRGN3Q2lBZ0lDQk1NVE13SURFME1Bb2dJQ0FnUXpFek1DQXhOREFzSURFd01DQXhOVEFzSURjd0lERTBNQW9nSUNBZ1dnb2dJQ0lnWm1sc2JEMGlkMmhwZEdVaUlITjBjbTlyWlQwaUl6TXpNek16TXlJZ2MzUnliMnRsTFhkcFpIUm9QU0l5SWk4K0NpQWdDaUFnUENFdExTQlViM0FnWld4c2FYQnpaU0JtYjNJZ1luVmphMlYwSUc5d1pXNXBibWNnTFMwK0NpQWdQR1ZzYkdsd2MyVWdZM2c5SWpFd01DSWdZM2s5SWpjd0lpQnllRDBpTkRBaUlISjVQU0l4TUNJZ1ptbHNiRDBpZDJocGRHVWlJSE4wY205clpUMGlJek16TXpNek15SWdjM1J5YjJ0bExYZHBaSFJvUFNJeUlpOCtDaUFnQ2lBZ1BDRXRMU0JQWW1wbFkzUWdjM1J2Y21GblpTQnplVzFpYjJ4eklDMGdZMlZ1ZEdWeVpXUWdZVzVrSUhkcGRHZ2djR1Z5YzNCbFkzUnBkbVVnTFMwK0NpQWdQSEpsWTNRZ2VEMGlNVEExSWlCNVBTSTVNQ0lnZDJsa2RHZzlJakV5SWlCb1pXbG5hSFE5SWpFeUlpQm1hV3hzUFNJak16TXpNek16SWlCMGNtRnVjMlp2Y20wOUluTnJaWGRZS0MweE1Da2lMejRLSUNBOGNtVmpkQ0I0UFNJeE1qVWlJSGs5SWprd0lpQjNhV1IwYUQwaU1USWlJR2hsYVdkb2REMGlNVElpSUdacGJHdzlJaU16TXpNek16TWlJSFJ5WVc1elptOXliVDBpYzJ0bGQxZ29MVEV3S1NJdlBnb2dJRHh5WldOMElIZzlJakV3TlNJZ2VUMGlNVEV3SWlCM2FXUjBhRDBpTVRJaUlHaGxhV2RvZEQwaU1USWlJR1pwYkd3OUlpTXpNek16TXpNaUlIUnlZVzV6Wm05eWJUMGljMnRsZDFnb0xURXdLU0l2UGdvZ0lEeHlaV04wSUhnOUlqRXlOU0lnZVQwaU1URXdJaUIzYVdSMGFEMGlNVElpSUdobGFXZG9kRDBpTVRJaUlHWnBiR3c5SWlNek16TXpNek1pSUhSeVlXNXpabTl5YlQwaWMydGxkMWdvTFRFd0tTSXZQZ29nSUFvZ0lEd2hMUzBnVFdsdVNVOGdkR1Y0ZENBdExUNEtJQ0E4ZEdWNGRDQjRQU0l4TURBaUlIazlJakUzTUNJZ2RHVjRkQzFoYm1Ob2IzSTlJbTFwWkdSc1pTSWdabTl1ZEMxbVlXMXBiSGs5SWtGeWFXRnNJaUJtYjI1MExYTnBlbVU5SWpFMElpQm1hV3hzUFNKM2FHbDBaU0krVFdsdVNVODhMM1JsZUhRK0Nqd3ZjM1puUGc9PScgLz4gbXlidWNrZXRdXG5DIC0tPiBDMVxuQyAtLT4gQzJcbkMgLS0-IEMzXG5lbmRcbkMxIDwtLT58dGFyZ2V0Oi8vIHByb3RvY29sfCBBXG5CMSA8LS0-fHNvdXJjZTovLyBwcm90b2NvbHwgQVtDbGllbnQgQ29kZV1cbmNsYXNzRGVmIHNlcnZlciBmaWxsOiNmOWYsc3Ryb2tlOiMzMzMsc3Ryb2tlLXdpZHRoOjRweDtcbmNsYXNzIEIsQyBzZXJ2ZXI7IiwibWVybWFpZCI6bnVsbH0" /></p>

<p>So with both the servers deployed and ready, let’s register the <code class="language-plaintext highlighter-rouge">source</code> and <code class="language-plaintext highlighter-rouge">target</code> protocol to use in the backup scenario.</p>

<div class="language-python highlighter-rouge"><div class="highlight"><pre class="highlight"><code><span class="c1"># register `source` protocol that connects to the minio instance
</span><span class="n">register_custom_fs_protocol</span><span class="p">(</span>
    <span class="s">'source'</span><span class="p">,</span>
    <span class="s">'s3'</span><span class="p">,</span>
    <span class="p">{</span><span class="s">'key'</span> <span class="p">:</span> <span class="s">'minio'</span><span class="p">,</span> <span class="s">'secret'</span> <span class="p">:</span> <span class="s">'123456789'</span><span class="p">,</span> <span class="s">'endpoint_url'</span> <span class="p">:</span> <span class="s">'http://localhost:9000'</span><span class="p">}</span>
<span class="p">)</span>
<span class="c1"># register `target` protocol that connects to the real s3
</span><span class="n">register_custom_fs_protocol</span><span class="p">(</span>
    <span class="s">'target'</span><span class="p">,</span>
    <span class="s">'s3'</span><span class="p">,</span> 
    <span class="p">{</span><span class="s">'key'</span> <span class="p">:</span> <span class="s">'minio'</span><span class="p">,</span> <span class="s">'secret'</span> <span class="p">:</span> <span class="s">'987654321'</span><span class="p">,</span> <span class="s">'endpoint_url'</span> <span class="p">:</span> <span class="s">'http://localhost:9002'</span><span class="p">}</span>
<span class="p">)</span>
</code></pre></div></div>

<p>And finally we can run the backup.</p>

<p>This may seem a bit weird that we open the file and then use a <code class="language-plaintext highlighter-rouge">with</code> block,
you can read the docs <a href="https://filesystem-spec.readthedocs.io/en/latest/features.html#openfile-instances">here</a> to better understand what’s happening.</p>

<div class="language-python highlighter-rouge"><div class="highlight"><pre class="highlight"><code><span class="n">source</span> <span class="o">=</span> <span class="n">fsspec</span><span class="p">.</span><span class="nb">open</span><span class="p">(</span><span class="s">'source://mybucket/example_file'</span><span class="p">)</span>
<span class="n">target</span> <span class="o">=</span> <span class="n">fsspec</span><span class="p">.</span><span class="nb">open</span><span class="p">(</span><span class="s">'target://mybucket/backup_file'</span><span class="p">,</span> <span class="s">'wb'</span><span class="p">)</span>

<span class="k">with</span> <span class="p">(</span><span class="n">source</span> <span class="k">as</span> <span class="n">source_f</span><span class="p">,</span> <span class="n">target</span> <span class="k">as</span> <span class="n">target_f</span><span class="p">):</span>
    <span class="n">target_f</span><span class="p">.</span><span class="n">write</span><span class="p">(</span><span class="n">source_f</span><span class="p">.</span><span class="n">read</span><span class="p">())</span>

<span class="n">df</span> <span class="o">=</span> <span class="n">pd</span><span class="p">.</span><span class="n">read_csv</span><span class="p">(</span><span class="s">'target://mybucket/backup_file'</span><span class="p">)</span>
<span class="n">df</span>
</code></pre></div></div>

<div>
  <style scoped="">
    .dataframe tbody tr th:only-of-type {
        vertical-align: middle;
    }

    .dataframe tbody tr th {
        vertical-align: top;
    }

    .dataframe thead th {
        text-align: right;
    }
</style>

  <table border="1" class="dataframe">
  <thead>
    <tr style="text-align: right;">
      <th></th>
      <th>a</th>
      <th>b</th>
      <th>c</th>
    </tr>
  </thead>
  <tbody>
    <tr>
      <th>0</th>
      <td>1</td>
      <td>2</td>
      <td>3</td>
    </tr>
  </tbody>
</table>
</div>

<h2 id="closing-thoughts">Closing Thoughts</h2>

<p>So we learned how to use fsspsec to provide a unified access model to many types of filesystems (S3, GCS, FTP, HTTP, etc)
that is useable by a diverse set of analytics libraries (DuckDB, Polars, Pandas, etc.).</p>

<p>Then we learned how to extend fsspec to inject credentials and configuration into the clients for the filesystems, 
hopefully that can help reduce some boilerplate in your code and cleaner analytics pipelines!</p>

<p>Overall I think the folks working on the fsspec project are doing a great job of implementing a unified storage layer for Python. Go have an
explore of <a href="https://github.com/fsspec">github.com/fsspec</a> to learn more about this project!</p>

<p>And that’s about all I have to show..hope you learned something useful!</p>

<hr />
<details>
  <summary>
    <p>Cleanup and dependencies</p>
  </summary>

  <div class="language-python highlighter-rouge"><div class="highlight"><pre class="highlight"><code><span class="err">!</span><span class="n">docker</span> <span class="n">stop</span> <span class="n">chirpy_donkey</span> <span class="n">nervous_sutherland</span>
<span class="err">!</span><span class="n">pip</span> <span class="nb">list</span> <span class="o">--</span><span class="nb">format</span><span class="o">=</span><span class="n">freeze</span>
</code></pre></div>  </div>

  <div class="language-plaintext highlighter-rouge"><div class="highlight"><pre class="highlight"><code>chirpy_donkey
nervous_sutherland


aiobotocore==2.15.2
aiohappyeyeballs==2.4.3
aiohttp==3.11.7
aioitertools==0.12.0
aiosignal==1.3.1
asttokens==2.4.1
attrs==24.2.0
beautifulsoup4==4.12.3
bleach==6.2.0
botocore==1.35.36
cffi==1.17.1
comm==0.2.2
debugpy==1.6.7
decorator==5.1.1
defusedxml==0.7.1
duckdb==1.1.3
exceptiongroup==1.2.2
executing==2.1.0
fastjsonschema==2.21.0
frozenlist==1.5.0
fsspec==2024.10.0
idna==3.10
importlib_metadata==8.5.0
ipykernel==6.29.5
ipython==8.29.0
jedi==0.19.2
Jinja2==3.1.4
jmespath==1.0.1
jsonschema==4.23.0
jsonschema-specifications==2024.10.1
jupyter_client==8.6.3
jupyter_core==5.7.2
jupyterlab_pygments==0.3.0
jupytext==1.16.4
markdown-it-py==3.0.0
MarkupSafe==3.0.2
matplotlib-inline==0.1.7
mdit-py-plugins==0.4.2
mdurl==0.1.2
mistune==3.0.2
multidict==6.1.0
nbclient==0.10.1
nbconvert==7.16.4
nbformat==5.10.4
nest_asyncio==1.6.0
numpy==2.1.3
packaging==24.2
pandas==2.2.3
pandocfilters==1.5.1
parso==0.8.4
pexpect==4.9.0
pickleshare==0.7.5
pip==24.2
platformdirs==4.3.6
prompt_toolkit==3.0.48
propcache==0.2.0
psutil==5.9.0
ptyprocess==0.7.0
pure_eval==0.2.3
pycparser==2.22
pygit2==1.16.0
Pygments==2.18.0
python-dateutil==2.9.0.post0
pytz==2024.2
PyYAML==6.0.2
pyzmq==25.1.2
referencing==0.35.1
rpds-py==0.21.0
s3fs==2024.10.0
setuptools==75.1.0
six==1.16.0
soupsieve==2.6
stack-data==0.6.2
tinycss2==1.4.0
tornado==6.4.1
traitlets==5.14.3
typing_extensions==4.12.2
tzdata==2024.2
universal_pathlib==0.2.5
urllib3==2.2.3
wcwidth==0.2.13
webencodings==0.5.1
wheel==0.44.0
wrapt==1.17.0
yarl==1.18.0
zipp==3.21.0
</code></pre></div>  </div>

</details>]]></content><author><name></name></author><category term="data-engineering" /><summary type="html"><![CDATA[Here is a neat method I found to make accessing blob storage extremely painless in the Python data eco-system. It’s especially nice since the tools it relies on are extremely widely supported. So if that sounds interesting read on.]]></summary></entry><entry><title type="html">Streaming Tar Files in Python</title><link href="https://www.nintorac.dev/data-eng,python/2024/11/06/tar-stream.html" rel="alternate" type="text/html" title="Streaming Tar Files in Python" /><published>2024-11-06T05:20:00+00:00</published><updated>2024-11-06T05:20:00+00:00</updated><id>https://www.nintorac.dev/data-eng,python/2024/11/06/tar-stream</id><content type="html" xml:base="https://www.nintorac.dev/data-eng,python/2024/11/06/tar-stream.html"><![CDATA[<p>A project that I have been working on required some functionality to do the following; fetch a compressed tar archive from the internet, extract it, do some munging on the files and then dump it out to blob storage. In the interest of efficiency I didn’t want to have to download the files, save to to disk and then extract before beginning to process them. Instead I opted to stream the download, and then decompress, munge and dump on the fly.</p>

<p>The story today wont involve any munging or dumping, sorry folks. instead we are just looking to fetch a file, decompress on the fly and iterate over the extracted files.</p>

<p>The first archive I was interested in consuming was a <code class="language-plaintext highlighter-rouge">.tar.gz</code>, so I cooked up a quick function to do the work.</p>

<div class="language-python highlighter-rouge"><div class="highlight"><pre class="highlight"><code><span class="kn">from</span> <span class="nn">pathlib</span> <span class="kn">import</span> <span class="n">Path</span>
<span class="kn">import</span> <span class="nn">tarfile</span>

<span class="k">def</span> <span class="nf">iter_tar_gz</span><span class="p">(</span><span class="n">tar_bytes</span><span class="p">):</span>

    <span class="n">tfile</span> <span class="o">=</span> <span class="n">tarfile</span><span class="p">.</span><span class="nb">open</span><span class="p">(</span><span class="n">fileobj</span><span class="o">=</span><span class="n">tar_bytes</span><span class="p">,</span> <span class="n">mode</span><span class="o">=</span><span class="s">'r|gz'</span><span class="p">)</span>

    <span class="k">for</span> <span class="n">t</span> <span class="ow">in</span> <span class="n">tfile</span><span class="p">:</span>
        
        <span class="k">if</span> <span class="ow">not</span> <span class="n">t</span><span class="p">.</span><span class="n">isfile</span><span class="p">():</span> <span class="k">continue</span>
        <span class="n">path</span> <span class="o">=</span> <span class="n">Path</span><span class="p">(</span><span class="n">t</span><span class="p">.</span><span class="n">path</span><span class="p">)</span>
        <span class="n">f</span> <span class="o">=</span> <span class="n">tfile</span><span class="p">.</span><span class="n">extractfile</span><span class="p">(</span><span class="n">t</span><span class="p">)</span>
        <span class="k">yield</span> <span class="n">path</span><span class="p">,</span> <span class="n">f</span>
</code></pre></div></div>

<p>Pretty good, this generator will produce tuples of the filename and file descriptor from which the bytes of the function can be read. Now it’s simple case of supplying this function with a stream and we’re good.</p>

<div class="language-python highlighter-rouge"><div class="highlight"><pre class="highlight"><code><span class="kn">import</span> <span class="nn">requests</span>

<span class="n">archive_url</span> <span class="o">=</span> <span class="s">"https://github.com/torvalds/linux/archive/refs/tags/v6.12-rc6.tar.gz"</span>
<span class="n">r</span> <span class="o">=</span> <span class="n">requests</span><span class="p">.</span><span class="n">get</span><span class="p">(</span><span class="n">archive_url</span><span class="p">,</span> <span class="n">stream</span><span class="o">=</span><span class="bp">True</span><span class="p">)</span>

<span class="k">for</span> <span class="n">path</span><span class="p">,</span> <span class="n">f</span> <span class="ow">in</span> <span class="n">iter_tar_gz</span><span class="p">(</span><span class="n">r</span><span class="p">.</span><span class="n">raw</span><span class="p">):</span>
	<span class="n">do_work</span><span class="p">(</span><span class="n">path</span><span class="p">,</span> <span class="n">f</span><span class="p">)</span>
</code></pre></div></div>

<p>Everything good here, we can stream the contents of the archive file by file.</p>

<p>I went back to working on some other things and after some time came across another archive that I wanted to fetch in a similar fashion. This time the archive was bz2 compressed however, so I would need to modify my approach.</p>

<p>After checking the <a href="https://docs.python.org/3/library/tarfile.html" class="web-link">tar file docs</a> I saw setting the mode simply to <code class="language-plaintext highlighter-rouge">r</code> would allow my function to transparently decompress lzma, gzip and bzip2.</p>

<div class="language-python highlighter-rouge"><div class="highlight"><pre class="highlight"><code><span class="kn">from</span> <span class="nn">pathlib</span> <span class="kn">import</span> <span class="n">Path</span>
<span class="kn">import</span> <span class="nn">requests</span>
<span class="kn">import</span> <span class="nn">tarfile</span>

<span class="k">def</span> <span class="nf">iter_tar_gz</span><span class="p">(</span><span class="n">tar_bytes</span><span class="p">):</span>

    <span class="n">tfile</span> <span class="o">=</span> <span class="n">tarfile</span><span class="p">.</span><span class="nb">open</span><span class="p">(</span><span class="n">fileobj</span><span class="o">=</span><span class="n">tar_bytes</span><span class="p">)</span>

    <span class="k">for</span> <span class="n">t</span> <span class="ow">in</span> <span class="n">tfile</span><span class="p">:</span>
        
        <span class="k">if</span> <span class="ow">not</span> <span class="n">t</span><span class="p">.</span><span class="n">isfile</span><span class="p">():</span> <span class="k">continue</span>
        <span class="n">path</span> <span class="o">=</span> <span class="n">Path</span><span class="p">(</span><span class="n">t</span><span class="p">.</span><span class="n">path</span><span class="p">)</span>
        <span class="n">f</span> <span class="o">=</span> <span class="n">tfile</span><span class="p">.</span><span class="n">extractfile</span><span class="p">(</span><span class="n">t</span><span class="p">)</span>

        <span class="k">yield</span> <span class="n">path</span><span class="p">,</span> <span class="n">f</span>

<span class="n">archive_url</span> <span class="o">=</span> <span class="s">"https://anaconda.org/pytorch/pytorch/2.5.1/download/win-64/pytorch-2.5.1-py3.12_cuda11.8_cudnn9_0.tar.bz2"</span>

<span class="n">r</span> <span class="o">=</span> <span class="n">requests</span><span class="p">.</span><span class="n">get</span><span class="p">(</span><span class="n">archive_url</span><span class="p">,</span> <span class="n">stream</span><span class="o">=</span><span class="bp">True</span><span class="p">)</span>

<span class="k">for</span> <span class="n">path</span><span class="p">,</span> <span class="n">f</span> <span class="ow">in</span> <span class="n">iter_tar_gz</span><span class="p">(</span><span class="n">r</span><span class="p">.</span><span class="n">raw</span><span class="p">):</span>
	<span class="n">do_work</span><span class="p">(</span><span class="n">path</span><span class="p">,</span> <span class="n">f</span><span class="p">)</span>
</code></pre></div></div>

<p>I’ll fix the name at a later date, but the meat of the fix is in, but here comes the problem :(</p>

<div class="language-python highlighter-rouge"><div class="highlight"><pre class="highlight"><code><span class="n">File</span> <span class="o">~/</span><span class="n">miniconda3</span><span class="o">/</span><span class="n">envs</span><span class="o">/</span><span class="n">midi</span><span class="o">-</span><span class="n">etl</span><span class="o">-</span><span class="n">new</span><span class="o">/</span><span class="n">lib</span><span class="o">/</span><span class="n">python3</span><span class="p">.</span><span class="mi">11</span><span class="o">/</span><span class="n">_compression</span><span class="p">.</span><span class="n">py</span><span class="p">:</span><span class="mi">29</span><span class="p">,</span> <span class="ow">in</span> <span class="n">BaseStream</span><span class="p">.</span><span class="n">_check_can_seek</span><span class="p">(</span><span class="bp">self</span><span class="p">)</span>
     <span class="mi">26</span>     <span class="k">raise</span> <span class="n">io</span><span class="p">.</span><span class="n">UnsupportedOperation</span><span class="p">(</span><span class="s">"Seeking is only supported "</span>
     <span class="mi">27</span>                                   <span class="s">"on files open for reading"</span><span class="p">)</span>
     <span class="mi">28</span> <span class="k">if</span> <span class="ow">not</span> <span class="bp">self</span><span class="p">.</span><span class="n">seekable</span><span class="p">():</span>
<span class="o">---&gt;</span> <span class="mi">29</span>     <span class="k">raise</span> <span class="n">io</span><span class="p">.</span><span class="n">UnsupportedOperation</span><span class="p">(</span><span class="s">"The underlying file object "</span>
     <span class="mi">30</span>                                   <span class="s">"does not support seeking"</span><span class="p">)</span>

<span class="n">UnsupportedOperation</span><span class="p">:</span> <span class="n">The</span> <span class="n">underlying</span> <span class="nb">file</span> <span class="nb">object</span> <span class="n">does</span> <span class="ow">not</span> <span class="n">support</span> <span class="n">seeking</span>
</code></pre></div></div>
<p>(if anyone knows how to properly syntax highlight Python errors in markdown let me know!)</p>

<p>Seek not allowed here, hmm that’s weird, for a couple reasons..</p>

<ol>
  <li>Why does bzip2 need seek?</li>
  <li>Why doesn’t gzip?</li>
  <li>They use the same underlying object, and that is not seekable..so how does gzip support seek?</li>
</ol>

<p>My first thought was that the issue might be a lack of support for range requests at the archive’s host. However, after checking some alternate <code class="language-plaintext highlighter-rouge">.tar.bz2</code>s, I discovered that this was not the case.</p>

<p>Next, I had a look at the seeking behavior;</p>

<div class="language-python highlighter-rouge"><div class="highlight"><pre class="highlight"><code><span class="kn">import</span> <span class="nn">gzip</span><span class="p">,</span> <span class="n">bz2</span>
<span class="n">bz_url</span> <span class="o">=</span> <span class="s">"https://anaconda.org/pytorch/pytorch/2.5.1/download/win-64/pytorch-2.5.1-py3.12_cuda11.8_cudnn9_0.tar.bz2"</span>
<span class="n">gz_url</span> <span class="o">=</span> <span class="s">"https://github.com/torvalds/linux/archive/refs/tags/v6.12-rc6.tar.gz"</span>

<span class="k">def</span> <span class="nf">can_seek</span><span class="p">(</span><span class="n">f</span><span class="p">,</span> <span class="n">n</span><span class="p">):</span>
    <span class="k">try</span><span class="p">:</span>
        <span class="n">f</span><span class="p">.</span><span class="n">seek</span><span class="p">(</span><span class="n">n</span><span class="p">)</span>
        <span class="k">return</span> <span class="s">"can"</span>
    <span class="k">except</span><span class="p">:</span>
        <span class="k">return</span> <span class="s">"cant"</span>


<span class="k">with</span> <span class="p">(</span>
    <span class="n">requests</span><span class="p">.</span><span class="n">get</span><span class="p">(</span><span class="n">gz_url</span><span class="p">,</span> <span class="n">stream</span><span class="o">=</span><span class="bp">True</span><span class="p">).</span><span class="n">raw</span> <span class="k">as</span> <span class="n">gz_</span><span class="p">,</span>
    <span class="n">gzip</span><span class="p">.</span><span class="nb">open</span><span class="p">(</span><span class="n">gz_</span><span class="p">)</span> <span class="k">as</span> <span class="n">gz</span><span class="p">,</span>
    <span class="n">requests</span><span class="p">.</span><span class="n">get</span><span class="p">(</span><span class="n">bz_url</span><span class="p">,</span> <span class="n">stream</span><span class="o">=</span><span class="bp">True</span><span class="p">).</span><span class="n">raw</span> <span class="k">as</span> <span class="n">bz_</span><span class="p">,</span>
    <span class="n">bz2</span><span class="p">.</span><span class="nb">open</span><span class="p">(</span><span class="n">bz_</span><span class="p">)</span> <span class="k">as</span> <span class="n">bz</span>
<span class="p">):</span>
    
    <span class="k">print</span><span class="p">(</span><span class="sa">f</span><span class="s">"gz is seekable: </span><span class="si">{</span><span class="n">gz</span><span class="p">.</span><span class="n">seekable</span><span class="p">()</span><span class="si">}</span><span class="s">"</span><span class="p">)</span>
    <span class="k">print</span><span class="p">(</span><span class="sa">f</span><span class="s">"bz is seekable: </span><span class="si">{</span><span class="n">bz</span><span class="p">.</span><span class="n">seekable</span><span class="p">()</span><span class="si">}</span><span class="s">"</span><span class="p">)</span>

    <span class="k">print</span><span class="p">(</span><span class="sa">f</span><span class="s">"gz </span><span class="si">{</span><span class="n">can_seek</span><span class="p">(</span><span class="n">gz</span><span class="p">,</span> <span class="mi">10</span><span class="p">)</span><span class="si">}</span><span class="s"> seek forward"</span><span class="p">)</span>
    <span class="k">print</span><span class="p">(</span><span class="sa">f</span><span class="s">"bz </span><span class="si">{</span><span class="n">can_seek</span><span class="p">(</span><span class="n">bz</span><span class="p">,</span> <span class="mi">10</span><span class="p">)</span><span class="si">}</span><span class="s"> seek forward"</span><span class="p">)</span>

    <span class="k">print</span><span class="p">(</span><span class="sa">f</span><span class="s">"gz </span><span class="si">{</span><span class="n">can_seek</span><span class="p">(</span><span class="n">gz</span><span class="p">,</span> <span class="mi">0</span><span class="p">)</span><span class="si">}</span><span class="s"> seek backward"</span><span class="p">)</span>
    <span class="k">print</span><span class="p">(</span><span class="sa">f</span><span class="s">"bz </span><span class="si">{</span><span class="n">can_seek</span><span class="p">(</span><span class="n">bz</span><span class="p">,</span> <span class="mi">0</span><span class="p">)</span><span class="si">}</span><span class="s"> seek backward"</span><span class="p">)</span>
</code></pre></div></div>

<p>Which gives;</p>

<div class="language-plaintext highlighter-rouge"><div class="highlight"><pre class="highlight"><code>gz is seekable: True
bz is seekable: False
gz can seek forward
bz cant seek forward
gz cant seek backward
bz cant seek backward
</code></pre></div></div>

<p>So that’s interesting, gzip seems to have implemented some limited seek functionality, does that mean my streaming <code class="language-plaintext highlighter-rouge">.tar.bz2</code> dreams are dead? Let us see!</p>

<p>I did some significant web hunting and couldn’t find much in the way of information, lots on streaming decompression but they all only ever came from disk where seek is supported, so not useful to me.</p>

<p>After much digging I eventually found <a href="https://pypi.org/project/conda_package_streaming/" class="web-link">conda-package-streaming</a> and on PyPi there is an example that implies they can stream Conda packages and these happen to be <code class="language-plaintext highlighter-rouge">.tar.bz2</code>, so maybe I can look there for clues.</p>

<p>I followed the code path and compared for differences, these are the things I found and tested, in order of checking;</p>

<ol>
  <li>Session is used rather than requests directly and the headers are different. <a href="https://github.com/conda/conda-package-streaming/blob/a22d78c/conda_package_streaming/url.py#L78" class="web-link">here</a>
    <div class="language-python highlighter-rouge">
<div class="highlight"><pre class="highlight"><code><span class="n">session</span> <span class="o">=</span> <span class="n">requests</span><span class="p">.</span><span class="n">Session</span><span class="p">()</span>
<span class="n">session</span><span class="p">.</span><span class="n">headers</span><span class="p">[</span><span class="s">"User-Agent"</span><span class="p">]</span> <span class="o">=</span> <span class="s">"conda-package-streaming/0.1.0"</span>
<span class="n">response</span> <span class="o">=</span> <span class="n">session</span><span class="p">.</span><span class="n">get</span><span class="p">(</span><span class="n">url</span><span class="p">,</span> <span class="n">stream</span><span class="o">=</span><span class="bp">True</span><span class="p">,</span> <span class="n">headers</span><span class="o">=</span><span class="p">{</span><span class="s">"Connection"</span><span class="p">:</span> <span class="s">"close"</span><span class="p">})</span>
</code></pre></div>    </div>
  </li>
  <li>The stream is decompressed using bz2, so tar doesn’t handle the decompression <a href="https://github.com/conda/conda-package-streaming/blob/a22d78c42692cf5d081e88873fd25b57c9ea1dce/conda_package_streaming/package_streaming.py#L148" class="web-link">here</a>
    <div class="language-python highlighter-rouge">
<div class="highlight"><pre class="highlight"><code><span class="n">reader</span> <span class="o">=</span> <span class="n">bz2</span><span class="p">.</span><span class="nb">open</span><span class="p">(</span><span class="n">fileobj</span> <span class="ow">or</span> <span class="n">filename</span><span class="p">,</span> <span class="n">mode</span><span class="o">=</span><span class="s">"rb"</span><span class="p">)</span>
</code></pre></div>    </div>
  </li>
  <li>The tarfile mode and encoding are different <a href="https://github.com/conda/conda-package-streaming/blob/a22d78c42692cf5d081e88873fd25b57c9ea1dce/conda_package_streaming/package_streaming.py#L83" class="web-link">here</a>
    <div class="language-python highlighter-rouge">
<div class="highlight"><pre class="highlight"><code><span class="k">with</span> <span class="n">tarfile_open</span><span class="p">(</span><span class="n">fileobj</span><span class="o">=</span><span class="n">fileobj</span><span class="p">,</span> <span class="n">mode</span><span class="o">=</span><span class="s">"r|"</span><span class="p">,</span> <span class="n">encoding</span><span class="o">=</span><span class="n">encoding</span><span class="p">)</span> <span class="k">as</span> <span class="n">tar</span>
</code></pre></div>    </div>
  </li>
</ol>

<p>And there we see it, must be the encoding right?</p>

<p>No, turns out if you read just a little further into the <a href="https://docs.python.org/3/library/tarfile.html" class="web-link">tar file docs</a>, you’ll see there is a wealth of information on consuming streams and the magic to achieving that is to set the mode to <code class="language-plaintext highlighter-rouge">r|</code>. You might also notice this was used in the very first iteration of <code class="language-plaintext highlighter-rouge">iter_tar_gz</code>!</p>

<p>The docs show you can allow for transparent stream decompression using <code class="language-plaintext highlighter-rouge">r|*</code>, this will have tarfile detect which compression is in use, so with that and a bit of typing to round things off, here’s the final function;</p>

<div class="language-python highlighter-rouge"><div class="highlight"><pre class="highlight"><code><span class="kn">from</span> <span class="nn">pathlib</span> <span class="kn">import</span> <span class="n">Path</span>
<span class="kn">import</span> <span class="nn">tarfile</span>
<span class="kn">from</span> <span class="nn">typing</span> <span class="kn">import</span> <span class="n">Iterable</span><span class="p">,</span> <span class="n">Tuple</span>
<span class="kn">import</span> <span class="nn">typing</span>

<span class="k">class</span> <span class="nc">BinaryFileLike</span><span class="p">(</span><span class="n">typing</span><span class="p">.</span><span class="n">Protocol</span><span class="p">):</span>
    <span class="k">def</span> <span class="nf">read</span><span class="p">()</span> <span class="o">-&gt;</span> <span class="nb">bytes</span><span class="p">:</span>
        <span class="p">...</span>

<span class="n">TarFiles</span> <span class="o">=</span> <span class="n">Iterable</span><span class="p">[</span><span class="n">Tuple</span><span class="p">[</span><span class="n">Path</span><span class="p">,</span> <span class="n">BinaryFileLike</span><span class="p">]]</span>

<span class="k">def</span> <span class="nf">iter_tar_stream</span><span class="p">(</span><span class="n">tar_stream</span><span class="p">:</span> <span class="n">BinaryFileLike</span><span class="p">)</span> <span class="o">-&gt;</span> <span class="n">TarFiles</span><span class="p">:</span>

    <span class="n">tfile</span> <span class="o">=</span> <span class="n">tarfile</span><span class="p">.</span><span class="nb">open</span><span class="p">(</span><span class="n">fileobj</span><span class="o">=</span><span class="n">tar_stream</span><span class="p">,</span> <span class="n">mode</span><span class="o">=</span><span class="s">'r|*'</span><span class="p">)</span>

    <span class="k">for</span> <span class="n">t</span> <span class="ow">in</span> <span class="n">tfile</span><span class="p">:</span>
        
        <span class="k">if</span> <span class="ow">not</span> <span class="n">t</span><span class="p">.</span><span class="n">isfile</span><span class="p">():</span> <span class="k">continue</span>
        <span class="n">path</span> <span class="o">=</span> <span class="n">Path</span><span class="p">(</span><span class="n">t</span><span class="p">.</span><span class="n">path</span><span class="p">)</span>
        <span class="n">f</span> <span class="o">=</span> <span class="n">tfile</span><span class="p">.</span><span class="n">extractfile</span><span class="p">(</span><span class="n">t</span><span class="p">)</span>
        <span class="k">yield</span> <span class="n">path</span><span class="p">,</span> <span class="n">f</span>
</code></pre></div></div>

<p>There’s nothing like spending several hours looking around the Internet to avoid 5 minutes of reading the docs! On the plus side I see <code class="language-plaintext highlighter-rouge">conda-package-streaming</code> setting the user agent and that seems like a good idea to adopt….also that thing going on in the seeking exploration script with the chained <code class="language-plaintext highlighter-rouge">with</code>s :)</p>]]></content><author><name></name></author><category term="data-eng,python" /><summary type="html"><![CDATA[A project that I have been working on required some functionality to do the following; fetch a compressed tar archive from the internet, extract it, do some munging on the files and then dump it out to blob storage. In the interest of efficiency I didn’t want to have to download the files, save to to disk and then extract before beginning to process them. Instead I opted to stream the download, and then decompress, munge and dump on the fly.]]></summary></entry><entry><title type="html">Using DuckDB+dbt, FastAPI for Real-Time Analytics</title><link href="https://www.nintorac.dev/data-eng,duckdb,fastapi,dbt/2024/06/28/duckapi.html" rel="alternate" type="text/html" title="Using DuckDB+dbt, FastAPI for Real-Time Analytics" /><published>2024-06-28T05:20:00+00:00</published><updated>2024-06-28T05:20:00+00:00</updated><id>https://www.nintorac.dev/data-eng,duckdb,fastapi,dbt/2024/06/28/duckapi</id><content type="html" xml:base="https://www.nintorac.dev/data-eng,duckdb,fastapi,dbt/2024/06/28/duckapi.html"><![CDATA[<p>In this post I’ll demonstrate how to use DuckDB, an in memory SQL engine, optimized to perform on big data within your laptop, to serve a real-time analytics use case, served by FastAPI and using dbt as the data build tool to manage the pipeline functionality.</p>

<p>DuckDB is the component that will actually be performing all the work, it is a fast (<a href="https://duckdb.org/2024/06/26/benchmarks-over-time.html" class="web-link">and getting faster</a>) in memory database that uses a dialect based on Postgres, the Python client has some nice fancy features that we will take advantage of in this article.</p>

<p>dbt is a tool used to perform the transform in Extract Load Transform (ELT) it allows you to write out a set of SQL queries and deploy them into a database and several other excellent quality of life features that bring SQL into the 21st century with respect to the Software Development Life-Cycle (SDLC). In this project it will be used to deploy a set of views to a DuckDB database file that the API will consume.</p>

<p>FastAPI is a great REST API server for Python, it integrates well with pydantic, allowing you to write fast and well typed APIs quickly and efficiently. We will POST the source data to this endpoint which it will use to invoke duckdb to execute the pipeline defined using dbt.</p>

<h2 id="walkthrough">Walkthrough</h2>

<p>The repository can be found here <a href="https://github.com/Nintorac/duckapi" class="web-link">github.com/Nintorac/duckapi</a>, you can follow along there. I assume some familiarity with all of the tools involved, and just talk about the specific patterns implemented here that make it interesting.</p>
<h3 id="data">Data</h3>

<p>In this contrived example of an analytics workload we take a dataset with two columns, group_id, and event_value, (naming could have been better there). Let’s interpret the <code class="language-plaintext highlighter-rouge">group_id</code> column as a key to identify a populations of animals, and the <code class="language-plaintext highlighter-rouge">event_value</code> as the number of new babies born in a season, (the season being redacted for confidentiality purposes.)</p>

<p>Here is an example of how the data could look.</p>

<table>
  <thead>
    <tr>
      <th>group_id (Animal groups)</th>
      <th>event_value (# newborn animals)</th>
    </tr>
  </thead>
  <tbody>
    <tr>
      <td>🦆</td>
      <td>13</td>
    </tr>
    <tr>
      <td>🐇</td>
      <td>8</td>
    </tr>
    <tr>
      <td>🐰</td>
      <td>2</td>
    </tr>
    <tr>
      <td>🐰</td>
      <td>5</td>
    </tr>
    <tr>
      <td>🦆</td>
      <td>3</td>
    </tr>
    <tr>
      <td>🐇</td>
      <td>23</td>
    </tr>
    <tr>
      <td>🐇</td>
      <td>1</td>
    </tr>
    <tr>
      <td>🦆</td>
      <td>17</td>
    </tr>
    <tr>
      <td>🐰</td>
      <td>5</td>
    </tr>
  </tbody>
</table>

<p>And on this dataset we will calculate various statistics, for example the total newborn animals over all seasons for each group, the histogram heights for number of births per group, the histogram heights for the number birth in total etc.</p>

<h3 id="dbt">dbt</h3>

<p>In dbt we handle a few things</p>

<ol>
  <li>Set up some example data</li>
  <li>Define a set of analyses that compute statistics on the input data</li>
  <li>Some glue queries to setup the analysis and combine the results</li>
  <li>Configure the analyses to be deployed as views</li>
  <li>Configure dbt to use duckdb as its datastore</li>
  <li>Deploy the pipeline to the database!</li>
</ol>

<h4 id="example-data">Example data</h4>
<p>To set up the example data we use <a href="https://docs.getdbt.com/docs/build/seeds" class="web-link">dbt seeds</a>, this allows us to deploy a local CSV file into the database, any CSV’s we put in the seeds folder (<code class="language-plaintext highlighter-rouge">duckapi_dbt/seeds</code>) will be written into the database. In here we also create a <code class="language-plaintext highlighter-rouge">schema.yml</code> file which allows us to add documentation, tests and other information. We use it to type the supplied columns, though not strictly necessary, (DuckDB will auto-detect the types anyway) it is often good to be explicit.</p>

<h4 id="define-analysis-queries">Define analysis queries</h4>
<p>Next we define a set of analyses that we want to perform on the dataset (<code class="language-plaintext highlighter-rouge">duckapi_dbt/models/analyses</code>), the actual work being done here will vary from use case to use case, and in this example we just demonstrate collecting various statistics about the data. Lets have a look at one of the analyses.
<code class="language-plaintext highlighter-rouge">duckapi_dbt/models/analyses/group_sums.sql</code></p>

<div class="language-sql highlighter-rouge"><div class="highlight"><pre class="highlight"><code><span class="k">select</span>
    <span class="n">group_id</span>
    <span class="p">,</span> <span class="k">sum</span><span class="p">(</span><span class="n">event_value</span><span class="p">)</span> <span class="k">as</span> <span class="n">value_sum</span>
<span class="k">from</span> <span class="p">{{</span> <span class="k">ref</span><span class="p">(</span><span class="s1">'group_event_values'</span><span class="p">)</span> <span class="p">}}</span>
<span class="k">group</span> <span class="k">by</span> <span class="n">group_id</span>
</code></pre></div></div>

<p>This query simply calculates the sum of the <code class="language-plaintext highlighter-rouge">event_value</code> column, grouped by the <code class="language-plaintext highlighter-rouge">group_id</code>, in the context of the animals example this amounts to calculating the total number of baby animals per animal group. The rest of the analyses follow a similar pattern, as you can see all of the analysis is simply some SQL.</p>
<h4 id="glue-it-together">Glue it together</h4>
<p>Now lets look at the glue that lets us hang this all together, first we have <code class="language-plaintext highlighter-rouge">duckapi_dbt/models/group_event_values.sql</code>, this is a simple <code class="language-plaintext highlighter-rouge">select * from example_data</code>, essentially just copying the data from the seed table into this view. This will be the source view for all the analysis that are implemented. Later on we will replace this view with a new one that supplies the data from a user request.</p>

<p>Then there is <code class="language-plaintext highlighter-rouge">duckapi_dbt/models/analysis.sql</code>, this query collates all the different analyses as separate columns, each of these columns will be a complex datatype, this is the final data structure that we will be returning from the API.</p>

<p>Here is the DDL (if we were to deploy this as a table)</p>

<div class="language-sql highlighter-rouge"><div class="highlight"><pre class="highlight"><code><span class="k">CREATE</span> <span class="k">TABLE</span> <span class="n">dev</span><span class="p">.</span><span class="n">main</span><span class="p">.</span><span class="n">analysis</span> <span class="p">(</span>
    <span class="n">group_sums</span> <span class="n">STRUCT</span><span class="p">(</span>
        <span class="n">group_id</span> <span class="nb">VARCHAR</span><span class="p">,</span>
        <span class="n">value_sum</span> <span class="n">HUGEINT</span>
    <span class="p">)[],</span>
    <span class="n">group_sets</span> <span class="n">STRUCT</span><span class="p">(</span>
        <span class="n">group_id</span> <span class="nb">VARCHAR</span><span class="p">,</span>
        <span class="n">group_value_set</span> <span class="nb">INTEGER</span><span class="p">[]</span>
    <span class="p">)[],</span>
    <span class="n">group_event_value_histogram</span> <span class="n">STRUCT</span><span class="p">(</span>
        <span class="n">group_id</span> <span class="nb">VARCHAR</span><span class="p">,</span>
        <span class="n">event_value</span> <span class="nb">INTEGER</span><span class="p">,</span>
        <span class="n">group_event_value_count</span> <span class="nb">BIGINT</span>
    <span class="p">)[],</span>
    <span class="n">group_histogram</span> <span class="n">STRUCT</span><span class="p">(</span>
        <span class="n">group_id</span> <span class="nb">VARCHAR</span><span class="p">,</span>
        <span class="n">group_count</span> <span class="nb">BIGINT</span>
    <span class="p">)[],</span>
    <span class="n">hist_event_values</span> <span class="n">STRUCT</span><span class="p">(</span>
        <span class="n">event_value</span> <span class="nb">INTEGER</span><span class="p">,</span>
        <span class="n">event_value_count</span> <span class="nb">BIGINT</span>
    <span class="p">)[],</span>
    <span class="n">hist_group_event_values</span> <span class="n">STRUCT</span><span class="p">(</span>
        <span class="n">group_id</span> <span class="nb">VARCHAR</span><span class="p">,</span>
        <span class="n">event_value</span> <span class="nb">INTEGER</span><span class="p">,</span>
        <span class="n">group_event_value_count</span> <span class="nb">BIGINT</span>
    <span class="p">)[],</span>
    <span class="n">hist_groups</span> <span class="n">STRUCT</span><span class="p">(</span>
        <span class="n">group_id</span> <span class="nb">VARCHAR</span><span class="p">,</span>
        <span class="n">group_count</span> <span class="nb">BIGINT</span>
    <span class="p">)[]</span>
<span class="p">);</span>
</code></pre></div></div>

<h4 id="configure-as-view">Configure as view</h4>
<p>One last thing to do before we can produce the database is to configure how we want the various parts of the analyses to the database. In this case, everything will be deployed as views, so we edit <code class="language-plaintext highlighter-rouge">duckapi_dbt/dbt_project.yml</code> to look like this</p>

<div class="language-yaml highlighter-rouge"><div class="highlight"><pre class="highlight"><code><span class="na">models</span><span class="pi">:</span>
  <span class="na">duckapi_dbt</span><span class="pi">:</span>
    <span class="na">+materialized</span><span class="pi">:</span> <span class="s">view</span>
</code></pre></div></div>

<p>This will deploy all models in the dbt project as views in DuckDB.</p>

<h4 id="configure-the-dbt-duckdb-adapater">Configure the dbt-duckdb adapater</h4>

<p>Not much to see here, and if you setup your dbt project using <code class="language-plaintext highlighter-rouge">dbt init</code> then this will be created for you. This is configured using <code class="language-plaintext highlighter-rouge">duckapi_dbt/profiles.yml</code>, normally dbt will store this at <code class="language-plaintext highlighter-rouge">~/.dbt/profiles.yml</code> however we want this file under version control along with the rest of the project so we write it here instead. (Check out the <code class="language-plaintext highlighter-rouge">.env</code> file to understand how we are able to use this <code class="language-plaintext highlighter-rouge">profiles.yml</code> seamlessly).</p>

<p>I do recommend reading through the <a href="https://github.com/duckdb/dbt-duckdb" class="web-link"><code class="language-plaintext highlighter-rouge">dbt-duckdb</code> documentation</a> on this adapter, as with all the configuration options it is a really powerful way to configure your DuckDB connection!</p>

<h4 id="deploy-the-pipeline">Deploy the pipeline</h4>

<p>With that all done, we can generate the database, this is done with a simple <code class="language-plaintext highlighter-rouge">dbt build</code> which will add the seed data to the database, deploy the views and run any tests we’ve defined.</p>

<p>If you do this you’ll notice the test is failing, the issue is non-deterministic order of query results, I leave turning it green as a pointless exercise to the reader.</p>

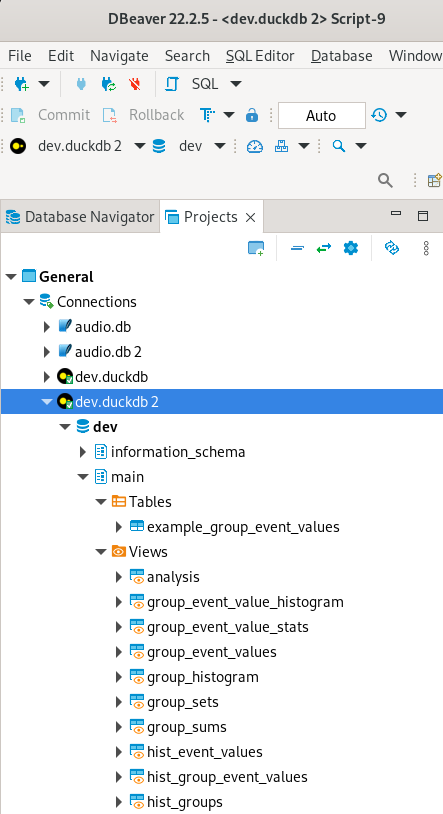
<p>Having run the command you will now see that you have a file name <code class="language-plaintext highlighter-rouge">dev.duckdb</code> that has been created. I encourage you to dive into it. I use <a href="https://dbeaver.io/download/" class="web-link">DBeaver</a> for this.</p>

<p><span class="embed-image-wrapper"><img class="embed-image" src="/assets/duckapi/dbeaver_views.png"></span></p>

<h3 id="fastapi">FastAPI</h3>

<p>FastAPI component is simple enough to fit in a few lines, so here it is verbatim.</p>

<div class="language-python highlighter-rouge"><div class="highlight"><pre class="highlight"><code><span class="k">class</span> <span class="nc">GroupEventValue</span><span class="p">(</span><span class="n">BaseModel</span><span class="p">):</span>
    <span class="n">group_id</span><span class="p">:</span> <span class="nb">str</span>
    <span class="n">event_value</span><span class="p">:</span> <span class="nb">int</span>

<span class="n">Entries</span> <span class="o">=</span> <span class="nb">list</span><span class="p">[</span><span class="n">GroupEventValue</span>

<span class="o">@</span><span class="n">app</span><span class="p">.</span><span class="n">post</span><span class="p">(</span><span class="s">"/analyse_data/"</span><span class="p">)</span>
<span class="k">async</span> <span class="k">def</span> <span class="nf">analyse_data</span><span class="p">(</span><span class="n">entries</span><span class="p">:</span> <span class="n">Entries</span><span class="p">):</span>
    
    <span class="k">if</span> <span class="nb">len</span><span class="p">(</span><span class="n">entries</span><span class="p">)</span><span class="o">==</span><span class="mi">0</span><span class="p">:</span>
        <span class="k">return</span> <span class="p">[]</span>
    
    <span class="c1"># Run the datapipeline over the list of entries
</span>    <span class="n">entries_adapter</span> <span class="o">=</span> <span class="n">TypeAdapter</span><span class="p">(</span><span class="n">Entries</span><span class="p">)</span>
    <span class="n">group_event_values_df</span> <span class="o">=</span> <span class="n">pd</span><span class="p">.</span><span class="n">DataFrame</span><span class="p">(</span><span class="n">entries_adapter</span><span class="p">.</span><span class="n">dump_python</span><span class="p">(</span><span class="n">entries</span><span class="p">))</span>
     
    <span class="n">duck</span> <span class="o">=</span> <span class="n">duckdb</span><span class="p">.</span><span class="n">connect</span><span class="p">(</span><span class="s">'dev.duckdb'</span><span class="p">)</span>
    <span class="n">t</span> <span class="o">=</span> <span class="n">duck</span><span class="p">.</span><span class="n">begin</span><span class="p">()</span>

    <span class="c1"># heart of the method
</span>    <span class="c1"># replace view of the example data
</span>    <span class="n">t</span><span class="p">.</span><span class="n">execute</span><span class="p">(</span><span class="s">'create or replace view group_event_values as </span><span class="se">\
</span><span class="s">        select group_id, event_value::int event_value from group_event_values_df'</span><span class="p">)</span>
    <span class="c1"># fetch results based on data from group_event_values_df
</span>    <span class="n">result</span> <span class="o">=</span> <span class="n">t</span><span class="p">.</span><span class="n">query</span><span class="p">(</span><span class="s">'select * from analysis'</span><span class="p">).</span><span class="n">to_df</span><span class="p">().</span><span class="n">to_json</span><span class="p">(</span><span class="n">orient</span><span class="o">=</span><span class="s">'records'</span><span class="p">)</span>
    
    <span class="n">t</span><span class="p">.</span><span class="n">rollback</span><span class="p">()</span> <span class="c1"># roll back transaction to leave db in a good state
</span>    
    <span class="k">return</span> <span class="n">Response</span><span class="p">(</span><span class="n">content</span><span class="o">=</span><span class="nb">str</span><span class="p">(</span><span class="n">result</span><span class="p">),</span> <span class="n">media_type</span><span class="o">=</span><span class="s">'application/json'</span><span class="p">)</span>
</code></pre></div></div>

<p>We define the expected data type of the input using pydantic, this is the <code class="language-plaintext highlighter-rouge">GroupEventValue</code> class, we actually expect a list of these so we create a type <code class="language-plaintext highlighter-rouge">Entries</code> to represent this.</p>

<p>Then we define a POST endpoint at <code class="language-plaintext highlighter-rouge">/analyse_data</code> which accepts the <code class="language-plaintext highlighter-rouge">Entries</code> datatype. This endpoint expects a JSON payload that matches the structure of <code class="language-plaintext highlighter-rouge">Entries</code>, FastAPI does the work of validating the inputs behind the scenes and delivers us the instantiated <code class="language-plaintext highlighter-rouge">Entries</code> data.</p>

<p>Next we use the handy <code class="language-plaintext highlighter-rouge">TypeAdapter</code> to turn our <code class="language-plaintext highlighter-rouge">Entries</code> object, which is a list of <code class="language-plaintext highlighter-rouge">GroupEventValue</code>s into a pure Python object, and create a Pandas DataFrame from the resulting list, this will be the input data the the pipeline.</p>

<p>Now we instantiate the DuckDB connection, this probably isn’t best practice and wouldn’t work for concurrent requests, but improving this is another exercise left to the reader. From this we create a transaction, since we don’t want to actually alter the database and will use this only to rollback the changes we make in later steps.</p>

<p>Finally, for the heart of the solution, we first replace the <code class="language-plaintext highlighter-rouge">group_event_values</code> view (which you’ll remember from before, copies the example data and is the source table for all the analyses), we will replace this with a view over the DataFrame we just created (using the magic of DuckDB’s ability to <a href="https://duckdb.org/2021/05/14/sql-on-pandas.html" class="web-link">query Pandas directly in Python</a>).</p>

<p>Then we simply query the <code class="language-plaintext highlighter-rouge">analysis</code> table, since we have replaced the example data with the request data in the database using the <code class="language-plaintext highlighter-rouge">create or replace view</code> directive, the output from this query is now the analyses based on the data from the request! We dump this query result into JSON and return it. Simples!(?)</p>
<h3 id="trying-things-out">Trying things out</h3>

<p>First edit the <code class="language-plaintext highlighter-rouge">.env</code> file so that <code class="language-plaintext highlighter-rouge">PROJECT_ROOT</code> var is pointing to the root of this repository.</p>

<p>Then, (assuming you already have conda installed),</p>

<div class="language-bash highlighter-rouge"><div class="highlight"><pre class="highlight"><code>conda create <span class="nt">-n</span> duckapi <span class="nv">python</span><span class="o">=</span>3.10 <span class="nt">-y</span>
conda activate duckapi
pip <span class="nb">install </span>poetry
make install_dev
make <span class="nb">test</span>
</code></pre></div></div>

<p>If the tests pass then your environment is configured correctly and you are ready to go!</p>

<p>Now run <code class="language-plaintext highlighter-rouge">dbt build</code> to produce the database that the API will use to execute the data pipeline.</p>

<p>With that in place you can run the API using <code class="language-plaintext highlighter-rouge">make run_api</code></p>

<p>Now we can run our analysis for the animals example.</p>

<div class="language-bash highlighter-rouge"><div class="highlight"><pre class="highlight"><code>curl <span class="nt">-s</span> <span class="nt">-X</span> POST <span class="nt">-H</span> <span class="s2">"Content-Type: application/json"</span> <span class="se">\</span>
<span class="nt">-d</span> <span class="s1">'[{"group_id": "🦆", "event_value": 13}, {"group_id": "🐇", "event_value": 8}, {"group_id": "🐰", "event_value": 2}, {"group_id": "🐰", "event_value": 5}, {"group_id": "🦆", "event_value": 3}, {"group_id": "🐇", "event_value": 23}, {"group_id": "🐇", "event_value": 1}, {"group_id": "🦆", "event_value": 17}, {"group_id": "🐰", "event_value": 5}]'</span> http://localhost:8000/analyse_data/
</code></pre></div></div>
<p>Response:</p>
<details>
  <div class="language-json highlighter-rouge">
<div class="highlight"><pre class="highlight"><code><span class="p">[</span><span class="w">
  </span><span class="p">{</span><span class="w">
    </span><span class="nl">"group_sums"</span><span class="p">:</span><span class="w"> </span><span class="p">[</span><span class="w">
      </span><span class="p">{</span><span class="w">
        </span><span class="nl">"group_id"</span><span class="p">:</span><span class="w"> </span><span class="s2">"🐇"</span><span class="p">,</span><span class="w">
        </span><span class="nl">"value_sum"</span><span class="p">:</span><span class="w"> </span><span class="mi">32</span><span class="w">
      </span><span class="p">},</span><span class="w">
      </span><span class="p">{</span><span class="w">
        </span><span class="nl">"group_id"</span><span class="p">:</span><span class="w"> </span><span class="s2">"🐰"</span><span class="p">,</span><span class="w">
        </span><span class="nl">"value_sum"</span><span class="p">:</span><span class="w"> </span><span class="mi">12</span><span class="w">
      </span><span class="p">},</span><span class="w">
      </span><span class="p">{</span><span class="w">
        </span><span class="nl">"group_id"</span><span class="p">:</span><span class="w"> </span><span class="s2">"🦆"</span><span class="p">,</span><span class="w">
        </span><span class="nl">"value_sum"</span><span class="p">:</span><span class="w"> </span><span class="mi">33</span><span class="w">
      </span><span class="p">}</span><span class="w">
    </span><span class="p">],</span><span class="w">
    </span><span class="nl">"group_sets"</span><span class="p">:</span><span class="w"> </span><span class="p">[</span><span class="w">
      </span><span class="p">{</span><span class="w">
        </span><span class="nl">"group_id"</span><span class="p">:</span><span class="w"> </span><span class="s2">"🐰"</span><span class="p">,</span><span class="w">
        </span><span class="nl">"group_value_set"</span><span class="p">:</span><span class="w"> </span><span class="p">[</span><span class="w">
          </span><span class="mi">5</span><span class="p">,</span><span class="w">
          </span><span class="mi">2</span><span class="w">
        </span><span class="p">]</span><span class="w">
      </span><span class="p">},</span><span class="w">
      </span><span class="p">{</span><span class="w">
        </span><span class="nl">"group_id"</span><span class="p">:</span><span class="w"> </span><span class="s2">"🐇"</span><span class="p">,</span><span class="w">
        </span><span class="nl">"group_value_set"</span><span class="p">:</span><span class="w"> </span><span class="p">[</span><span class="w">
          </span><span class="mi">8</span><span class="p">,</span><span class="w">
          </span><span class="mi">23</span><span class="p">,</span><span class="w">
          </span><span class="mi">1</span><span class="w">
        </span><span class="p">]</span><span class="w">
      </span><span class="p">},</span><span class="w">
      </span><span class="p">{</span><span class="w">
        </span><span class="nl">"group_id"</span><span class="p">:</span><span class="w"> </span><span class="s2">"🦆"</span><span class="p">,</span><span class="w">
        </span><span class="nl">"group_value_set"</span><span class="p">:</span><span class="w"> </span><span class="p">[</span><span class="w">
          </span><span class="mi">3</span><span class="p">,</span><span class="w">
          </span><span class="mi">17</span><span class="p">,</span><span class="w">
          </span><span class="mi">13</span><span class="w">
        </span><span class="p">]</span><span class="w">
      </span><span class="p">}</span><span class="w">
    </span><span class="p">],</span><span class="w">
    </span><span class="nl">"group_event_value_histogram"</span><span class="p">:</span><span class="w"> </span><span class="p">[</span><span class="w">
      </span><span class="p">{</span><span class="w">
        </span><span class="nl">"group_id"</span><span class="p">:</span><span class="w"> </span><span class="s2">"🐇"</span><span class="p">,</span><span class="w">
        </span><span class="nl">"event_value"</span><span class="p">:</span><span class="w"> </span><span class="mi">1</span><span class="p">,</span><span class="w">
        </span><span class="nl">"group_event_value_count"</span><span class="p">:</span><span class="w"> </span><span class="mi">1</span><span class="w">
      </span><span class="p">},</span><span class="w">
      </span><span class="p">{</span><span class="w">
        </span><span class="nl">"group_id"</span><span class="p">:</span><span class="w"> </span><span class="s2">"🦆"</span><span class="p">,</span><span class="w">
        </span><span class="nl">"event_value"</span><span class="p">:</span><span class="w"> </span><span class="mi">17</span><span class="p">,</span><span class="w">
        </span><span class="nl">"group_event_value_count"</span><span class="p">:</span><span class="w"> </span><span class="mi">1</span><span class="w">
      </span><span class="p">},</span><span class="w">
      </span><span class="p">{</span><span class="w">
        </span><span class="nl">"group_id"</span><span class="p">:</span><span class="w"> </span><span class="s2">"🦆"</span><span class="p">,</span><span class="w">
        </span><span class="nl">"event_value"</span><span class="p">:</span><span class="w"> </span><span class="mi">13</span><span class="p">,</span><span class="w">
        </span><span class="nl">"group_event_value_count"</span><span class="p">:</span><span class="w"> </span><span class="mi">1</span><span class="w">
      </span><span class="p">},</span><span class="w">
      </span><span class="p">{</span><span class="w">
        </span><span class="nl">"group_id"</span><span class="p">:</span><span class="w"> </span><span class="s2">"🐇"</span><span class="p">,</span><span class="w">
        </span><span class="nl">"event_value"</span><span class="p">:</span><span class="w"> </span><span class="mi">8</span><span class="p">,</span><span class="w">
        </span><span class="nl">"group_event_value_count"</span><span class="p">:</span><span class="w"> </span><span class="mi">1</span><span class="w">
      </span><span class="p">},</span><span class="w">
      </span><span class="p">{</span><span class="w">
        </span><span class="nl">"group_id"</span><span class="p">:</span><span class="w"> </span><span class="s2">"🐇"</span><span class="p">,</span><span class="w">
        </span><span class="nl">"event_value"</span><span class="p">:</span><span class="w"> </span><span class="mi">23</span><span class="p">,</span><span class="w">
        </span><span class="nl">"group_event_value_count"</span><span class="p">:</span><span class="w"> </span><span class="mi">1</span><span class="w">
      </span><span class="p">},</span><span class="w">
      </span><span class="p">{</span><span class="w">
        </span><span class="nl">"group_id"</span><span class="p">:</span><span class="w"> </span><span class="s2">"🐰"</span><span class="p">,</span><span class="w">
        </span><span class="nl">"event_value"</span><span class="p">:</span><span class="w"> </span><span class="mi">2</span><span class="p">,</span><span class="w">
        </span><span class="nl">"group_event_value_count"</span><span class="p">:</span><span class="w"> </span><span class="mi">1</span><span class="w">
      </span><span class="p">},</span><span class="w">
      </span><span class="p">{</span><span class="w">
        </span><span class="nl">"group_id"</span><span class="p">:</span><span class="w"> </span><span class="s2">"🦆"</span><span class="p">,</span><span class="w">
        </span><span class="nl">"event_value"</span><span class="p">:</span><span class="w"> </span><span class="mi">3</span><span class="p">,</span><span class="w">
        </span><span class="nl">"group_event_value_count"</span><span class="p">:</span><span class="w"> </span><span class="mi">1</span><span class="w">
      </span><span class="p">},</span><span class="w">
      </span><span class="p">{</span><span class="w">
        </span><span class="nl">"group_id"</span><span class="p">:</span><span class="w"> </span><span class="s2">"🐰"</span><span class="p">,</span><span class="w">
        </span><span class="nl">"event_value"</span><span class="p">:</span><span class="w"> </span><span class="mi">5</span><span class="p">,</span><span class="w">
        </span><span class="nl">"group_event_value_count"</span><span class="p">:</span><span class="w"> </span><span class="mi">2</span><span class="w">
      </span><span class="p">}</span><span class="w">
    </span><span class="p">],</span><span class="w">
    </span><span class="nl">"group_histogram"</span><span class="p">:</span><span class="w"> </span><span class="p">[</span><span class="w">
      </span><span class="p">{</span><span class="w">
        </span><span class="nl">"group_id"</span><span class="p">:</span><span class="w"> </span><span class="s2">"🐇"</span><span class="p">,</span><span class="w">
        </span><span class="nl">"group_count"</span><span class="p">:</span><span class="w"> </span><span class="mi">3</span><span class="w">
      </span><span class="p">},</span><span class="w">
      </span><span class="p">{</span><span class="w">
        </span><span class="nl">"group_id"</span><span class="p">:</span><span class="w"> </span><span class="s2">"🦆"</span><span class="p">,</span><span class="w">
        </span><span class="nl">"group_count"</span><span class="p">:</span><span class="w"> </span><span class="mi">3</span><span class="w">
      </span><span class="p">},</span><span class="w">
      </span><span class="p">{</span><span class="w">
        </span><span class="nl">"group_id"</span><span class="p">:</span><span class="w"> </span><span class="s2">"🐰"</span><span class="p">,</span><span class="w">
        </span><span class="nl">"group_count"</span><span class="p">:</span><span class="w"> </span><span class="mi">3</span><span class="w">
      </span><span class="p">}</span><span class="w">
    </span><span class="p">],</span><span class="w">
    </span><span class="nl">"hist_event_values"</span><span class="p">:</span><span class="w"> </span><span class="p">[</span><span class="w">
      </span><span class="p">{</span><span class="w">
        </span><span class="nl">"event_value"</span><span class="p">:</span><span class="w"> </span><span class="mi">13</span><span class="p">,</span><span class="w">
        </span><span class="nl">"event_value_count"</span><span class="p">:</span><span class="w"> </span><span class="mi">1</span><span class="w">
      </span><span class="p">},</span><span class="w">
      </span><span class="p">{</span><span class="w">
        </span><span class="nl">"event_value"</span><span class="p">:</span><span class="w"> </span><span class="mi">8</span><span class="p">,</span><span class="w">
        </span><span class="nl">"event_value_count"</span><span class="p">:</span><span class="w"> </span><span class="mi">1</span><span class="w">
      </span><span class="p">},</span><span class="w">
      </span><span class="p">{</span><span class="w">
        </span><span class="nl">"event_value"</span><span class="p">:</span><span class="w"> </span><span class="mi">3</span><span class="p">,</span><span class="w">
        </span><span class="nl">"event_value_count"</span><span class="p">:</span><span class="w"> </span><span class="mi">1</span><span class="w">
      </span><span class="p">},</span><span class="w">
      </span><span class="p">{</span><span class="w">
        </span><span class="nl">"event_value"</span><span class="p">:</span><span class="w"> </span><span class="mi">23</span><span class="p">,</span><span class="w">
        </span><span class="nl">"event_value_count"</span><span class="p">:</span><span class="w"> </span><span class="mi">1</span><span class="w">
      </span><span class="p">},</span><span class="w">
      </span><span class="p">{</span><span class="w">
        </span><span class="nl">"event_value"</span><span class="p">:</span><span class="w"> </span><span class="mi">1</span><span class="p">,</span><span class="w">
        </span><span class="nl">"event_value_count"</span><span class="p">:</span><span class="w"> </span><span class="mi">1</span><span class="w">
      </span><span class="p">},</span><span class="w">
      </span><span class="p">{</span><span class="w">
        </span><span class="nl">"event_value"</span><span class="p">:</span><span class="w"> </span><span class="mi">5</span><span class="p">,</span><span class="w">
        </span><span class="nl">"event_value_count"</span><span class="p">:</span><span class="w"> </span><span class="mi">2</span><span class="w">
      </span><span class="p">},</span><span class="w">
      </span><span class="p">{</span><span class="w">
        </span><span class="nl">"event_value"</span><span class="p">:</span><span class="w"> </span><span class="mi">17</span><span class="p">,</span><span class="w">
        </span><span class="nl">"event_value_count"</span><span class="p">:</span><span class="w"> </span><span class="mi">1</span><span class="w">
      </span><span class="p">},</span><span class="w">
      </span><span class="p">{</span><span class="w">
        </span><span class="nl">"event_value"</span><span class="p">:</span><span class="w"> </span><span class="mi">2</span><span class="p">,</span><span class="w">
        </span><span class="nl">"event_value_count"</span><span class="p">:</span><span class="w"> </span><span class="mi">1</span><span class="w">
      </span><span class="p">}</span><span class="w">
    </span><span class="p">],</span><span class="w">
    </span><span class="nl">"hist_group_event_values"</span><span class="p">:</span><span class="w"> </span><span class="p">[</span><span class="w">
      </span><span class="p">{</span><span class="w">
        </span><span class="nl">"group_id"</span><span class="p">:</span><span class="w"> </span><span class="s2">"🐇"</span><span class="p">,</span><span class="w">
        </span><span class="nl">"event_value"</span><span class="p">:</span><span class="w"> </span><span class="mi">1</span><span class="p">,</span><span class="w">
        </span><span class="nl">"group_event_value_count"</span><span class="p">:</span><span class="w"> </span><span class="mi">1</span><span class="w">
      </span><span class="p">},</span><span class="w">
      </span><span class="p">{</span><span class="w">
        </span><span class="nl">"group_id"</span><span class="p">:</span><span class="w"> </span><span class="s2">"🦆"</span><span class="p">,</span><span class="w">
        </span><span class="nl">"event_value"</span><span class="p">:</span><span class="w"> </span><span class="mi">17</span><span class="p">,</span><span class="w">
        </span><span class="nl">"group_event_value_count"</span><span class="p">:</span><span class="w"> </span><span class="mi">1</span><span class="w">
      </span><span class="p">},</span><span class="w">
      </span><span class="p">{</span><span class="w">
        </span><span class="nl">"group_id"</span><span class="p">:</span><span class="w"> </span><span class="s2">"🐇"</span><span class="p">,</span><span class="w">
        </span><span class="nl">"event_value"</span><span class="p">:</span><span class="w"> </span><span class="mi">23</span><span class="p">,</span><span class="w">
        </span><span class="nl">"group_event_value_count"</span><span class="p">:</span><span class="w"> </span><span class="mi">1</span><span class="w">
      </span><span class="p">},</span><span class="w">
      </span><span class="p">{</span><span class="w">
        </span><span class="nl">"group_id"</span><span class="p">:</span><span class="w"> </span><span class="s2">"🐇"</span><span class="p">,</span><span class="w">
        </span><span class="nl">"event_value"</span><span class="p">:</span><span class="w"> </span><span class="mi">8</span><span class="p">,</span><span class="w">
        </span><span class="nl">"group_event_value_count"</span><span class="p">:</span><span class="w"> </span><span class="mi">1</span><span class="w">
      </span><span class="p">},</span><span class="w">
      </span><span class="p">{</span><span class="w">
        </span><span class="nl">"group_id"</span><span class="p">:</span><span class="w"> </span><span class="s2">"🐰"</span><span class="p">,</span><span class="w">
        </span><span class="nl">"event_value"</span><span class="p">:</span><span class="w"> </span><span class="mi">2</span><span class="p">,</span><span class="w">
        </span><span class="nl">"group_event_value_count"</span><span class="p">:</span><span class="w"> </span><span class="mi">1</span><span class="w">
      </span><span class="p">},</span><span class="w">
      </span><span class="p">{</span><span class="w">
        </span><span class="nl">"group_id"</span><span class="p">:</span><span class="w"> </span><span class="s2">"🦆"</span><span class="p">,</span><span class="w">
        </span><span class="nl">"event_value"</span><span class="p">:</span><span class="w"> </span><span class="mi">3</span><span class="p">,</span><span class="w">
        </span><span class="nl">"group_event_value_count"</span><span class="p">:</span><span class="w"> </span><span class="mi">1</span><span class="w">
      </span><span class="p">},</span><span class="w">
      </span><span class="p">{</span><span class="w">
        </span><span class="nl">"group_id"</span><span class="p">:</span><span class="w"> </span><span class="s2">"🦆"</span><span class="p">,</span><span class="w">
        </span><span class="nl">"event_value"</span><span class="p">:</span><span class="w"> </span><span class="mi">13</span><span class="p">,</span><span class="w">
        </span><span class="nl">"group_event_value_count"</span><span class="p">:</span><span class="w"> </span><span class="mi">1</span><span class="w">
      </span><span class="p">},</span><span class="w">
      </span><span class="p">{</span><span class="w">
        </span><span class="nl">"group_id"</span><span class="p">:</span><span class="w"> </span><span class="s2">"🐰"</span><span class="p">,</span><span class="w">
        </span><span class="nl">"event_value"</span><span class="p">:</span><span class="w"> </span><span class="mi">5</span><span class="p">,</span><span class="w">
        </span><span class="nl">"group_event_value_count"</span><span class="p">:</span><span class="w"> </span><span class="mi">2</span><span class="w">
      </span><span class="p">}</span><span class="w">
    </span><span class="p">],</span><span class="w">
    </span><span class="nl">"hist_groups"</span><span class="p">:</span><span class="w"> </span><span class="p">[</span><span class="w">
      </span><span class="p">{</span><span class="w">
        </span><span class="nl">"group_id"</span><span class="p">:</span><span class="w"> </span><span class="s2">"🦆"</span><span class="p">,</span><span class="w">
        </span><span class="nl">"group_count"</span><span class="p">:</span><span class="w"> </span><span class="mi">3</span><span class="w">
      </span><span class="p">},</span><span class="w">
      </span><span class="p">{</span><span class="w">
        </span><span class="nl">"group_id"</span><span class="p">:</span><span class="w"> </span><span class="s2">"🐇"</span><span class="p">,</span><span class="w">
        </span><span class="nl">"group_count"</span><span class="p">:</span><span class="w"> </span><span class="mi">3</span><span class="w">
      </span><span class="p">},</span><span class="w">
      </span><span class="p">{</span><span class="w">
        </span><span class="nl">"group_id"</span><span class="p">:</span><span class="w"> </span><span class="s2">"🐰"</span><span class="p">,</span><span class="w">
        </span><span class="nl">"group_count"</span><span class="p">:</span><span class="w"> </span><span class="mi">3</span><span class="w">
      </span><span class="p">}</span><span class="w">
    </span><span class="p">]</span><span class="w">
  </span><span class="p">}</span><span class="w">
</span><span class="p">]</span><span class="w">
</span></code></pre></div>  </div>

</details>

<p>I’ve also added <code class="language-plaintext highlighter-rouge">make make_request</code> and <code class="language-plaintext highlighter-rouge">make make_request_pretty</code> which will run the curl for you and show you the results, use the pretty version if you have <code class="language-plaintext highlighter-rouge">jq</code> installed.</p>

<h2 id="potential-improvements">Potential Improvements</h2>

<p>dbt provides a Python API, so in theory it should be possible to more tightly integrate dbt into this pattern. However the Python API seeems to be mostly a wrapper around the CLI so some more advanced ideas I had do not seem possible at present. For instance there doesn’t seem to be a way to pass the database client object into dbt when calling dbt from within Python.</p>

<p>If this capability was possible, it could be used to process more complex pipelines, users would be able to control the materialisation strategy of different sub-analysis components, which can be needed in memory intensive pipelines, example data would no longer be needed since the users real data could provide the initial schema, and the user could make use of macros to define dynamic pipelines, i.e being able to enable/disable different pieces of analysis based on user flags, or use dbt macros for data dependent transforms.</p>

<h2 id="conclusion">Conclusion</h2>

<p>I can see it having utility when you have a data pipeline that can be used offline or online. Using this method would allow you to use the exact same transformations without having to rewrite anything and maintain consistency between two different pipeline implementations.</p>

<p>Want a challenge? Try to get this setup working in Spark!</p>

<p>I am not sure whether this is useful or not, or how well it will scale but I thought it was a fun thought exercise at least. Hope you found this interesting!</p>]]></content><author><name></name></author><category term="data-eng,duckdb,fastapi,dbt" /><summary type="html"><![CDATA[In this post I’ll demonstrate how to use DuckDB, an in memory SQL engine, optimized to perform on big data within your laptop, to serve a real-time analytics use case, served by FastAPI and using dbt as the data build tool to manage the pipeline functionality.]]></summary></entry><entry><title type="html">Train Log: s4-dx7-vc-fir-00</title><link href="https://www.nintorac.dev/train-log,music,dx7,s4,vc/2024/02/09/s4-dx7-vc-fir-00.html" rel="alternate" type="text/html" title="Train Log: s4-dx7-vc-fir-00" /><published>2024-02-09T02:00:00+00:00</published><updated>2024-02-09T02:00:00+00:00</updated><id>https://www.nintorac.dev/train-log,music,dx7,s4,vc/2024/02/09/s4-dx7-vc-fir-00</id><content type="html" xml:base="https://www.nintorac.dev/train-log,music,dx7,s4,vc/2024/02/09/s4-dx7-vc-fir-00.html"><![CDATA[<p>Check over here for the <a href="https://github.com/Nintorac/s4_dx7/tree/v0.0.1" class="web-link">code</a> for the <a href="https://github.com/Nintorac/s4_dx7/releases/tag/v0.0.1" class="web-link">release</a> that goes along with this discussion.</p>

<p>The <a href="http://bobbyblues.recup.ch/yamaha_dx7/dx7_description.html" class="web-link">Yamaha DX7</a> is a classic synth from the 80s, and while it was a masterpiece in its day, it’s starting to show its age, a few of the issues I’m seeing
a) You can’t run one in a datacentre - everyone knows cloud is the future
c) FM..so last century - the future is DL baby
d) MIDI input - sometimes you just wanna break free of those clumsy MIDI controllers</p>

<p>So after back-filling the requirements to the thing I already implemented…what are we doing here today? We’re going to use Deep Learning (DL) to create model to approximate the function of the DX7. Given the beefy requirements needed to train audio models the cloud is a must so tick that box. Finally, transforming the raw MIDI sequence directly to audio would imply quite a bit of extra complexity, since there is no trivial mapping between the MIDI messages index and the real time value in seconds, a simpler solution is to render the MIDI using a sine-wave generator, thus resulting in a simple problem of transforming one soundwave into another.</p>

<p>A sine-wave generator might be possible to implement (probably?) but I am lazy, so instead I constructed a DX7 patch that is as close as possible…So if you want to get really technical were training a DX7 <a href="https://paperswithcode.com/task/voice-conversion" class="web-link">voice conversion (VC)</a> model. I hope you can all follow :|</p>
<h2 id="dataset">Dataset</h2>

<p>For the dataset we will use 2.5 second audio clips generated by <a href="https://asb2m10.github.io/dexed/" class="web-link">Dexed</a>, a Yamaha DX7 emulator. To drive the synth we will pull 4 beat melodies from the <a href="https://colinraffel.com/projects/lmd/" class="web-link">Lakh dataset</a>. I have previously extracted the notes for this dataset and saved them to <a href="https://huggingface.co/datasets/nintorac/midi_etl" class="web-link">nintorac/midi_etl</a> on Hugging Face. At time of writing only 2/16 partitions have been generated, however this still gives around 80 million individual note events. we will, however, need to do some processing to get them into a form in which they can be read by Dexed.</p>

<p>The following is a rough overview of the data transformation pipeline.</p>

<ol>
  <li>aggregate into 4 beat phrases</li>
  <li>gather statistics over those filters</li>
  <li>produce a filter over phrases to remove items that aren’t melodies</li>
  <li>synthesize the phrases using the two voices</li>
</ol>

<p>1-3 are simple and can be done with a few simple SQL transforms and about 5 minutes of processing, check out the implementation over on Github at <a href="https://github.com/Nintorac/s4_dx7/tree/main/s4_dx7_dbt/models" class="web-link">Nintorac/s4_dx7/s4_dx7_dbt/models</a>. The files of interest are <code class="language-plaintext highlighter-rouge">phrase_stats</code> and the <code class="language-plaintext highlighter-rouge">phrase_stats_sub</code> subfolder, <code class="language-plaintext highlighter-rouge">melodies</code> and <code class="language-plaintext highlighter-rouge">4_beat_phrases</code>.</p>

<p>Step 4 however is a little more nuanced, a single 2.5 second sample from the dataset takes about 0.5 second to synthesize, and the output is a 44KHz, 16-bit raw audio waveform lasting 2.5s, it consumes 220.5 kilobytes, we could compress to reduce this number but that is another trade-off as the compression process would increase the processing time and either not be super effective or decrease the quality, at this size just 4,535 samples per GB. Not to mention the combinatorial effects of different bit rates, sampling rates.</p>

<p>To work around this we produce the MIDI as a JSON string as an offline preprocessing step, and then online in the training data loader we perform the synthesis. Luckily synthesis is easily parallelised. This gives us the flexibility to choose the synthesis parameters at runtime and reduces storage requirements at the expense of a more complex dataloader.</p>
<h3 id="model-architecture">Model architecture</h3>

<p>In this first attempt we want to simplify as much as possible, for that we will model the DX7 as a <a href="https://en.wikipedia.org/wiki/Finite_impulse_response" class="web-link">Finite Impulse Response (FIR)</a> filter. A FIR filter is characterised by the fact that the output of the filter can only depend on its current and previous inputs. This as opposed to an Infinite <a href="https://en.wikipedia.org/wiki/Infinite_impulse_response" class="web-link">Impulse Response (IIR)</a> filter where the output of the filter is also used as an input creating a feedback mechanism.</p>

<p><span class="embed-image-wrapper"><img class="embed-image" src="/assets/s4-dx7-vc-fir-00/fir_diagram.png"></span></p>
<p><a href="https://commons.wikimedia.org/wiki/File:FIR_Filter.svg" class="web-link">Wikipedia</a></p>

<p>So for the <code class="language-plaintext highlighter-rouge">x[n]</code> this represents our input signal, the one we defined to be approximately a sine wave at the given frequency, and <code class="language-plaintext highlighter-rouge">y[n]</code> is the target voice signal which is some other voice patch I chose that sounded interesting. (quick note…not totally sure if its valid to describe the network in this way but I think it holds, would be keen for feedback if anyone thinks otherwise, a <a href="https://github.com/Nintorac/s4_dx7/issues" class="web-link">Github issue</a> would be the best avenue)</p>

<p>How will we implement <code class="language-plaintext highlighter-rouge">b</code>? Lets go max-hype and choose a State Space Model (SSM), these have been in the limelight as the potential transformer killer and audio is a killer to a transformers (performance) so lets check it out! Lets also quickly define <code class="language-plaintext highlighter-rouge">y_hat</code> as the output of the SSM, i.e \(b_N(x)=\hat{y}≈y\)</p>

<p>SSMs, which come from the dynamical systems branch of mathematics, are a special kind of function that can be represented in three different ways.</p>

<p><span class="embed-image-wrapper"><img class="embed-image" src="/assets/s4-dx7-vc-fir-00/ssm_properties.png"></span></p>
<p><a href="https://www.youtube.com/watch?v=OpJMn8T7Z34" class="web-link">Structured State Space Models for Deep Sequence Modeling (Albert Gu, CMU) - Youtube</a></p>

<p>The continuous representation while not useful for any applications in my mind right now, does provide a nice theoretical framework to work from since natural audio is a continuous process. Such a prior being built into the network reduces the data requirements.</p>

<p>The recurrent representation would allow for real time application of the filter, again in theory useful, in practice audio implementations in hardware do not work that way and require a bit more work for the network to be hardware-aligned.</p>

<p>Finally the convolution representation, this facilitates efficient training since all steps of the sequence can be calculated in parallel. This is ideal for training since the fewer serial operations we have in the network graph the more data we can throw through it and the faster we’ll have our models. And as a hint to the problem presented in the previous paragraph, it’s also the way real-time software filters are typically implemented.</p>

<p>SSMs by themselves are unstable and difficult or impossible to train, but <a href="https://arxiv.org/abs/2111.00396" class="web-link">Structured State Space Sequence (S4) models</a>  (see also <a href="https://srush.github.io/annotated-s4/" class="web-link">The Annotated S4</a>) comes along to fix that by defining specific initialisation methods that put the models in a regime where the are much more susceptible to learning. These are the first SSM models to perform well, however they have a property known as linear time-invariance, this is an issue since for example they are incapable of <a href="http://ai.stanford.edu/blog/understanding-incontext/" class="web-link">in-context learning</a> (in theory, maybe if it was big enough??). Since the computation from input to output is time-invariant or the same for all time steps it is unable to change its behavior based on prior inputs.</p>

<p><a href="https://arxiv.org/abs/2312.00752" class="web-link">Mamba</a> solves this problem by including some input conditional computation step to each time
step, usually this would blow up memory requirements but they implement some neat hardware aware tricks to make it possible.</p>

<p>I ended up choosing the S4 model since I wanted to test some intuitions on how the linear in variance would make the model respond when it has only only a linear response to the past, specifically I am wondering if the model will generalize to polyphony&gt;1 when it has only been trained on melodies. Also it is conceptually and computationally simpler.</p>

<p>This video is extremely good at providing a lot of the foundations needed to understand these models, I highly recommend it!!
<a href="https://www.youtube.com/watch?v=8Q_tqwpTpVU" class="web-link">Mamba and S4 Explained: Architecture, Parallel Scan, Kernel Fusion, Recurrent, Convolution, Math - Umar Jamil</a></p>
<h2 id="training-regimen">Training Regimen</h2>
<p>For the most part (all of it) the S4 code was stolen from the <a href="https://github.com/state-spaces/s4" class="web-link">official implementation</a> , to this I hacked in the previously described dataset and used the <code class="language-plaintext highlighter-rouge">+experiment=audio/sashimi-sc09</code> preset. All the default training options were used.</p>

<p>The dataset was limited to the first 20k samples (since the dataset contained 18100 samples this has no effect). The synthesis parameters consisted of the sample rate at 8000 and the bit rate at 8. The batch size was configured at 14 as this was the largest that could fit on the GPU. Gradient accumulation was set to 2, resulting in an effective batch size of 28 (more or less?).</p>

<p>The model was trained for &gt;100k steps and manually stopped since gains were plateauing and results were good enough™</p>

<p>Training took ~4 days with an approximate time per batch of 1.3 seconds.</p>
<h2 id="training-details">Training details</h2>

<p>Training was performed using a Lambda Labs A10 instance, the final cost of the training session came in at $65AUD($42USD).</p>

<p>I was unable to find any carbon usage information from Lambda Labs, so can’t comment on that.</p>

<p>The best I can get at the point is to observe the GPU power usage, as reported by Weights and Biases, and on rough estimation of 90 hours of training @ 140W mean consumption results in  12.6kWh, which is about dead on the energy density of 1L of petrol. Since we don’t know the consumption of the machine itself lets assume ~560W which conveniently puts us at 5L petrol consumed to train.</p>

<p>Here is a list of countries where the per capita energy consumption matches the energy consumption needed to train this model. It’s not totally clear and I had a bit of a hunt for the answer…but I hope this is daily usage not yearly.</p>
<p><span class="embed-image-wrapper"><img class="embed-image" src="/assets/s4-dx7-vc-fir-00/co2_map.png"></span></p>
<p><a href="https://ourworldindata.org/energy" class="web-link">source</a></p>

<p>Through another lens though which to view this usage is via that of CEO-Jet-Hours (CJ/h) in which case were clocking in at between 1/730 and 1/820 CJ/h (<a href="https://en.wikipedia.org/wiki/Cessna_Citation_Longitude" class="web-link">cruisng fuel usage</a> at <a href="https://en.wikipedia.org/wiki/Energy_density" class="web-link">energy density of petrol</a>) at cruise.</p>

<p>According to the <a href="https://www.drivingtests.co.nz/resources/fuel-co2-calculator-carbon-dioxide-emissions-in-kg/" class="web-link">drivingtests.nz</a>, 1kg of petrol would release 2.3Kg carbon, next carbon offsets on the European Carbon Credit Market are going for €60/tonne. So we need around <code class="language-plaintext highlighter-rouge">5*2.3*60/1000=0.69</code> so 0.69c (lol) to offset the train. I’ve tried to make this all worst-case scenario here and hope the energy sources are a little cleaner than that. I’ve purchased some native seeds and spread them around to relieve <del>the impact</del> my conscience.</p>

<p>Anyway, guilty sidetrack over, lets move on.</p>
<h2 id="results">Results</h2>

<p>Here are the loss curves for the model, the trainer loss is nice and smooth. The <code class="language-plaintext highlighter-rouge">test/accuracy</code> you would expect to be a bit choppy as it’s very sensitive to minor perturbations in model output. The step observed at ~70k steps was a result of the learning rate dropping.</p>

<p><span class="embed-image-wrapper"><img class="embed-image" src="/assets/s4-dx7-vc-fir-00/loss_trainer.png"></span></p>

<p><span class="embed-image-wrapper"><img class="embed-image" src="/assets/s4-dx7-vc-fir-00/loss_1_acc.png"></span></p>

<p><span class="embed-image-wrapper"><img class="embed-image" src="/assets/s4-dx7-vc-fir-00/loss_10_acc.png"></span></p>

<p><span class="embed-image-wrapper"><img class="embed-image" src="/assets/s4-dx7-vc-fir-00/loss_bpb.png"></span></p>
<h2 id="evaluation">Evaluation</h2>
<p>Work to be done here, there are large range of visualizations I would like to see here and producing them all will take time and effort, which feels wasted on a broken model (details on that in the Bugs section), instead here are some ad-hoc visuals and some explanations.</p>

<p>Below is a graph of the transformations for this model/dataset. Each of the nodes is a type of data, each of the edges is a function. You can hover over the edges to see a representation of that nodes data, these are images, audio streams or in the case of the MIDI node a file download.</p>

<p>If you find it difficult to see a plot for a node pan the graph scene so the node is in the top right of the page. Best viewed on a PC but kind of works on mobile too. Clicking through the to the link will make it much bigger.</p>

<iframe src="https://dx7.nintoracaudio.dev/s4-dx7-vc-fir-00/transform_graph" width="100%" height="500px"></iframe>
<p><a href="https://dx7.nintoracaudio.dev/s4-dx7-vc-fir-00/transform_graph" class="web-link">Click here to see the full screen application</a></p>
<h3 id="node-descriptions">Node descriptions</h3>
<ul>
  <li>MIDI - the MIDI file that defines the sequence of notes</li>
  <li>Source Signal - the MIDI rendered in the source voice</li>
  <li>Target Signal - the MIDI rendered in the target voice</li>
  <li>Corrupt Source Signal - the source signal, corrupted to match the implementation used to train this model</li>
  <li>Corrupt Target Signal - the target signal, corrupted to match the implementation used to train this model</li>
  <li>Clean Source Generated Signal - the generated signal when using the real source signal, the source signal is out of distribution (OOD) and the output does not show any structure. Interesting that it chooses silence in this situation over noise</li>
  <li>Corrupted Source Generated Signal - the generated signal when using corrupted data as the input, this is what is was trained on, it matches quite closely with the Corrupt Target Signal</li>
</ul>

<p>I was pretty happy with the way the above turned out though it was an extremely manual process so given some automation these types of visuals could make a great debugging tool. See the <a href="https://github.com/Nintorac/s4_dx7/blob/main/notebooks/dataflow.py" class="web-link">code to produce it here</a></p>

<p>Finally, here is a mel-spectrogram depicting signal found by subtracting the models target signal from the models outputs (<code class="language-plaintext highlighter-rouge">y-y_hat</code>), as you can see there are noise peaks across the full spectrum at regular intervals. This example is the same as the one used in the prior visual. These noise peaks coincide with note changes, these would hopefully be fully alleviated by removing the auto regressive offset (described in the bugs section), and at the least will be reduced.</p>
<p><span class="embed-image-wrapper"><img class="embed-image" src="/assets/s4-dx7-vc-fir-00/loss_mel_spec.png"></span></p>
<h2 id="bugs">Bugs</h2>
<p>Here are a list of issues that I noticed after training, note these issues have been left in place for posterity in the <a href="https://github.com/Nintorac/s4_dx7/releases/tag/v0.0.1" class="web-link">source release</a> associated with this post.</p>
<ul>
  <li>The polyphony calculation has an off by 1 error 
       The polyphony is being calculated as the maximum number of notes occurring at the same time as a given note. This comes out at 1 for each of the notes if they occur simultaneously. As such the model was trained on all midi tracks with exactly polyphony of 2 instead of melodies. 
       This would likely have a large impact and make the problem much harder to solve, since it now needs to learn what all combination of notes sound like, we limit the note range from A0 to C8, this gives 87 uniques notes and therefore the space we need to learn, ignoring temporal dependencies, is now <code class="language-plaintext highlighter-rouge">87 Choose 2 = 3741</code> rather than 87 which it would have been otherwise.</li>
  <li>Both the source and target signals were rendered three times per dataset iteration
      The GPU was maxed out for most of the training run, so it did not result in too much of an issue. However this likely would have resulted in larger warmup times between epochs. The upside of this though is it goes to show how much headroom the dataset has over the model, which is to say the dataset should be able to scale to much larger models smoothly.</li>
  <li>The source and target signals are auto-regressively shifted
    <ul>
      <li>This probably doesn’t harm anything, but it will mean that the model will take at minimum one sample to react to changes in the source signal (eg. a new note is start), in practice there is likely little perceptual difference between these two. On the plus side there is likely free gains to be had removing this offset.</li>
    </ul>
  </li>
  <li>The dataset was limited to only source MIDI files who’s ID (i.e file hash) began with a ‘f’
      At time of training only e and f are available anyway, so we basically halved the dataset size. There was some level of overfitting observed which a larger dataset may help to mitigate.</li>
  <li>The dataset was incorrectly calculating the bit crushing, this also resulted in the waveform offsetting and truncating at 1
      This essentially results in a bit-rate reduction of 2x for the bit-crush off by 1, and another 2x since half the waveform is removed. Although for the second point I’m not so sure since the DX7 is so regular in the waveform its generating (at least for the patches from this experiment)</li>
</ul>
<p><span class="embed-image-wrapper"><img class="embed-image" src="/assets/s4-dx7-vc-fir-00/corrupted_waveform.png"></span></p>
<p>Waveform visualizations of the corrupted target signal used during training.</p>

<h2 id="some-other-scattered-notes">Some other scattered notes</h2>
<h3 id="improvements">Improvements</h3>
<p>Apart from fixing the bugs, here are a few things to fix for the next round</p>
<ul>
  <li>Smaller network
    <ul>
      <li>Both in time and size
        <ul>
          <li>time to the maximum note duration + the release duration
            <ul>
              <li>release duration is how long the note lasts after release</li>
              <li>the chosen target patch was chosen to have short release</li>
            </ul>
          </li>
          <li>Will start small and work my way up</li>
        </ul>
      </li>
    </ul>
  </li>
  <li>Define the train test split in the data pipeline</li>
  <li>Implement some kind of double buffering around the dataloader
    <ul>
      <li>Lots of utilisation drops between epochs as dataloaders spool up.</li>
      <li>Would be cool if there was a setting to warmup the concurrency here,
        <ul>
          <li>early concurrency creates too many jobs which fight for resources, later stage pipelines jobs get starved out and it takes some time to clear the early stages resulting in a fast spool up</li>
          <li>we could alleviate if there was a way to prioritise jobs a the partition level</li>
          <li>if we let the initial partition complete before launching further jobs that would likely be enough as well, at least for my use cases</li>
        </ul>
      </li>
    </ul>
  </li>
  <li>Some refactoring to ensure all transform paths are using the same core logic
    <ul>
      <li>At the same time, swap out self implemented transforms for library alternates. i.e how I could have avoided training on the wrong data</li>
    </ul>
  </li>
</ul>

<h3 id="future-directions">Future Directions</h3>
<p>These are ideas for improvements and experiments that I don’t plan for yet but think would be interesting, likely to be geared towards more beautiful solutions rather than practical ones ;)</p>
<ul>
  <li>Continuous inputs
    <ul>
      <li>Using something like <a href="https://bmild.github.io/fourfeat/" class="web-link">Fourier Features</a> should do the trick here</li>
      <li>Simplifies the data pipeline</li>
      <li>Supports arbitrary bit rates without architectural changes</li>
    </ul>
  </li>
  <li>Continuous outputs
    <ul>
      <li>Simplifies the data pipeline</li>
      <li>A better prior than the current categorical targets since we are targeting a continuous variable</li>
      <li>Arbitrary bit rates</li>
    </ul>
  </li>
</ul>

<h2 id="closing-thoughts">Closing thoughts</h2>
<p>I’m a bit sad about the data corruption, I had visualized the spectrograms and listened to the samples prior to training, I suspected something was amiss but didn’t dig enough and hadn’t added the waveform plots as a visualisation method.</p>

<p>Other than that I am feeling quietly confident, this model has very little issues learning this transform and I’m feeling good about it’s ability to generalise to multiple voices.</p>

<p>I can produce 2.5 seconds of audio in ~1 second and increasing the batch size doesn’t have much effect so we have a real time factor (RTF) &lt; 1 when using the convolutional form, is pretty fast. 
However, since we produce 2.5s@8000hz  this is an effective buffer window of 20,000 samples, resulting in very high latency. If we scale this down to a more normal processing buffer window size of 256/512 its not clear that we would be so lucky..and that’s assuming that you can chain sub-kernels of the full SSM filter which is not totally clear!</p>

<p>Finally, in terms of affordability things have come a long way, when I wrote my DX7 patch generator V100s were at $2.55/hr (Salt Lake City in October 2000
<a href="https://cloud.google.com/skus/sku-groups/on-demand-v100-gpus" class="web-link">[1]/</a> <a href="https://cloud.google.com/skus/?currency=USD&amp;filter=62C4-2E27-F233&amp;hl=en" class="web-link">[2]/</a>). With more limited capability and memory compared to the A10 the training would have taken longer, and I would have needed to train on one of the big cloud providers who dig you with all kinds of other associated costs, eg the machine needed to run the GPU. I would roughly estimate ~10x at reduction in cost over that time.</p>

<p>Also, shoutout to <a href="https://lambdalabs.com/" class="web-link">Lambda Labs</a> the real MVP here, transparent pricing and no issues in my experience! Though I will say it is a bit difficult to work without a persistent machine image and availability can be a bit hit or miss though. Maybe that’s a good thing, the temptation to deploy an 8xA100 is high! (not sponsored content)</p>

<p>Anyway keen to explore more! There’s a lot to get into!</p>]]></content><author><name></name></author><category term="train-log,music,dx7,s4,vc" /><summary type="html"><![CDATA[Check over here for the code for the release that goes along with this discussion.]]></summary></entry><entry><title type="html">The RADDD Stack</title><link href="https://www.nintorac.dev/data-eng,music,dx7/2023/12/15/raddd-stack.html" rel="alternate" type="text/html" title="The RADDD Stack" /><published>2023-12-15T18:20:00+00:00</published><updated>2023-12-15T18:20:00+00:00</updated><id>https://www.nintorac.dev/data-eng,music,dx7/2023/12/15/raddd-stack</id><content type="html" xml:base="https://www.nintorac.dev/data-eng,music,dx7/2023/12/15/raddd-stack.html"><![CDATA[<p>In this article I will describe how to produce an all local data platform using the RADDD data stack (everyone’s talking about it, promise), the stack consists of 4 layers that work together to provide a fast, tunable platform that can scale to production seamlessly.</p>

<p>I will also provide a reference implementation in a follow up article that will first perform some simple SQL transformations of a source dataset before getting down into Python to render a years worth of audio in two days on a laptop.</p>

<h2 id="stack">Stack</h2>

<p>Here’s a quick diagram to show how everything ties together</p>

<p><img src="/assets/raddd-stack/raddd-architecture.jpg" alt="A diagram of the RADDD architecture"></p>

<h3 id="ray">Ray</h3>
<p><a href="https://docs.ray.io/en/latest/index.html" class="web-link">Ray</a> allows us to scale arbitrary Python computations and provides an extremely simple interface to trivially parallelise those annoying jobs that we cant do in our database management system (DBMS). Crucially Ray will allow  scaling of compute heavy tasks beyond the level of your laptop if the need were ever to arise, but at the same time it still runs brilliantly even on a single machine.</p>
<h3 id="arrow">Arrow</h3>
<p>Arrow is an interchange format that uses a columnar memory structure (more on that later) that allows for zero-copy transfer of data between processes. On a high level, this is achieved by passing a pointer around, rather than the entire data structure. This saves a lot of time spent copying memory needlessly since, critically, these pointers are shared between threads, and so can safely be passed between process boundaries (unlike for eg a Pandas dataframe that would need to be copied in this situation)</p>
<h3 id="duckdb">DuckDB</h3>
<p>DuckDB is a vector database optimized for fast online analytical processing (OLAP) operations. Buzzwords aplenty, let’s unpack that. A vector database is one in which the query engine will read the column as a list (i.e vector) of values that are all sequential in memory, this make it a columnar format, like Arrow. Online transaction processing (OLTP) databases, in contrast, store data in a row-major fashion which assumes the full row will want to be read into memory, this results in many CPU cache misses when performing computations on entire columns.</p>

<p>DuckDB is also compatible with many other database technologies, so not only is it useful for analytics, is also useful as a data engineering tool to facilitate moving data from point a to point b. For instance, you can attach to an SQLite (or <a href="https://github.com/duckdb/postgres_scanner/pull/111" class="web-link">Postgres</a> now) DB and write your outputs there, or to a Parquet file, in your local or any <a href="https://filesystem-spec.readthedocs.io/en/latest/" class="web-link">FSSpec</a> compatible filesystem.</p>

<p>Finally DuckDB has tight Python integrations, allowing for wizardry where you can <a href="https://duckdb.org/docs/api/python/overview.html#dataframes" class="web-link">select various data frames within scope by name and run arbitrary computations</a> on them, or run Python functions over either the entire vector or value by value. Unfortunately this functionality is currently limited to a single thread and does not like to be involved with the  <code class="language-plaintext highlighter-rouge">multiprocess</code> library and there is some time until there is a DuckDB solution. In the meantime we could use Ray to run operation in parallel. Since both DuckDB and Ray are tightly integrated with Arrow, this whole pipeline should incur no or minimal serialization overhead</p>

<h3 id="dbt">DBT</h3>
<p>DBT is utilised to build pipelines, this can take the form of either Python or SQL models. DBT integrates extremely well with DuckDB and the adapter is extremely configurable allowing you to setup DuckDB exactly how you need it to get data where it needs to be. DBT is essentially a collection of template SQL queries and Python functions that define a computation graph.</p>

<p>The DuckDB adapter is one of few that allow for Python models, but since DuckDB is just running locally on your system it’s easy to just use your local environment to perform this work. The adapter delivers the data as a DuckDBPyRelation object, which can easily be used in downstream Python computation in that will be demonstrated in the implementation.</p>

<h3 id="dagster">Dagster</h3>
<p>Beyond a certain scale some of these transforms will overflow the bounds of your memory, <a href="http://softwareengineeringdaily.com/wp-content/uploads/2022/03/SED1439-DuckDB-with-Hannes-Muhleisen.pdf" class="web-link">DuckDB is getting better at handling that</a> but it’s still a big performance hit to try to process the entire database in a single query. So, it will be necessary to break some of these tasks up into more manageable chunks or partitions. This creates the problem of managing the partitions that have been created and ensuring all dependent data is in the right place. For this we turn to Dagster, which we is used to as the orchestrator in the RADDD stack.</p>

<p>In Dagster, a software-defined asset is a concept that represents a piece of data or a computation that produces data within the system. It allows you to define, schedule, partition and monitor data workflows and will help to make sure all the data is processed and help you to track that.</p>

<p>Dagster integrates easily with DBT and allows you to use a DBT project to automatically define software-defined assets in Dagster, and it is a small amount of configuration to facilitate partitioning.</p>

<h2 id="implementation">Implementation</h2>

<p>For a reference implementation we will select a use case that will demonstrate a range of transforms some of which can be achieved directly in SQL and some which need more complex transforms which require a more general purpose programming language to solve.</p>

<p>In this case we take a somewhat pre-processed dataset derived from the Lakh MIDI dataset. The source dataset has been processed into a list of notes, represented as <code class="language-plaintext highlighter-rouge">track_id</code>, <code class="language-plaintext highlighter-rouge">start_time</code>, <code class="language-plaintext highlighter-rouge">duration</code>, <code class="language-plaintext highlighter-rouge">velocity</code> and <code class="language-plaintext highlighter-rouge">note</code>. <code class="language-plaintext highlighter-rouge">start_time</code> and <code class="language-plaintext highlighter-rouge">duration</code> are floats represented in beats (meaning we would need to choose a BPM to calculate their real time), <code class="language-plaintext highlighter-rouge">velocity</code> represents how hard the note was struck, while <code class="language-plaintext highlighter-rouge">note</code> represents the MIDI pitch number both of these are 7-bit integers i.e 128 values.</p>

<p>The task is to extract all 4-beat phrases from the notes and then render them into FLAC using a synthesizer. Extracting the list of 4-beat phrases is a simple transform involving some simple math and grouping. Rendering audio and transcoding to FLAC will require a bit more, for that we follow a running theme of this site and use the <a href="https://en.wikipedia.org/wiki/Yamaha_DX7" class="web-link">Yamaha
DX7</a> to synthesize the audio, and without a cloud attached farm of them to use for the task we fall back to Dexed, a free DX7 emulator, this is hosted in a Python function using <a href="https://spotify.github.io/pedalboard/" class="web-link">Pedalboard from Spotify</a></p>

<p>One of the requirements of this project is for it to run on a decent laptop, 16-cores and 32Gb memory in this case but the architecture will allow this to be tunable. You would quickly run out of memory if you tried to do this all at once, so the implementation also demonstrates partitioning and producing results in batches.</p>

<p>A full write-up and the code for the implementation is <a href="/data-eng,music,dx7/2023/12/15/raddd-stack-impl.html" class="web-link">available here</a> and the code is at <a href="https://github.com/Nintorac/raddd_dx7_stack" class="web-link">github.com/Nintorac/raddd_dx7_stack</a></p>

<p>Beware! This is running in a Google Cloud Run and can be slow on the first load, please be patient! For a random sample refresh on this page <a href="https://dx7.nintoracaudio.dev/phrases/0" class="web-link">dx7.nintoracaudio.dev/phrases/0</a>, or you can choose a specific sample by setting a number greater than 0 in the above URL. eg <a href="https://dx7.nintoracaudio.dev/phrases/99" class="web-link">dx7.nintoracaudio.dev/phrases/99</a></p>
<h2 id="result">Result</h2>
<p>How does it perform? Well the default number of partitions was picked to run on my 16 thread, 32GB memory machine and it can produce a single partition in 3m20s on average. For the entire 800 partitions that will take about 1.8 days to produce.</p>

<p>Each partition has exactly 8521 phrases (which is a bit suspicious since the partition is based on the <code class="language-plaintext highlighter-rouge">midi_id</code>, but lets ignore that).  Each phrase is 5 seconds of audio rendered which results in a total rendered time of 11.8 hours which gives a real-time factor (RTF) of 212.4 which seems pretty good.</p>

<p>For the entire dataset this is 11.8 hours * 800 which comes to just over 1 year of audio and that’s only 1/8th of the data available in Lakh.</p>

<h2 id="conclusions">Conclusions</h2>
<p>We’ve demonstrated a lightweight fast and scaleable data stack that can run on a laptop, it is left as a future exercise to see how gracefully it will scale to larger workloads but that may come up if I feel motivated.</p>

<p>While there are a lot of tools and concepts to grok here they come together to provide a way to efficiently write complex pipelines. There is minimal boilerplate and you can just focus on writing the business logic. Things like IO and data storage are handled automatically, work by default and are configurable when the need arises. eg We can write jobs to preload data into sqlite, Postgres, Parquet using just DuckDB.</p>

<p>There’s a lot more to figure out here, automatic UDF registration, how to define the business logic in its own library and have DBT reference that directly but its a rich and versatile stack and I hope to see if anyone can show any cool applications!</p>]]></content><author><name></name></author><category term="data-eng,music,dx7" /><summary type="html"><![CDATA[In this article I will describe how to produce an all local data platform using the RADDD data stack (everyone’s talking about it, promise), the stack consists of 4 layers that work together to provide a fast, tunable platform that can scale to production seamlessly.]]></summary></entry><entry><title type="html">The RADDD Stack: Implementation</title><link href="https://www.nintorac.dev/data-eng,music,dx7/2023/12/15/raddd-stack-impl.html" rel="alternate" type="text/html" title="The RADDD Stack: Implementation" /><published>2023-12-15T18:20:00+00:00</published><updated>2023-12-15T18:20:00+00:00</updated><id>https://www.nintorac.dev/data-eng,music,dx7/2023/12/15/raddd-stack-impl</id><content type="html" xml:base="https://www.nintorac.dev/data-eng,music,dx7/2023/12/15/raddd-stack-impl.html"><![CDATA[<p>Today I will describe how to produce an all local data platform using the RADDD data stack (everyone’s talking about it, promise), the stack consists of 4 layers that work together to provide a fast, tunable platform that can scale to production seamlessly.</p>

<p>For a more detailed description of the stack see the accompanying article <a href="/data-eng,music,dx7/2023/12/15/raddd-stack.html" class="web-link">found here</a></p>

<p>If you just want to see what we actually produce from this pipeline go checkout this site where I render the melspectrogram and a player for the audio sample. Beware! This is running in a Google Cloud Run and can be slow on the first load!</p>

<p>For a random sample refresh on this page <a href="https://dx7.nintoracaudio.dev/phrases/0" class="web-link">dx7.nintoracaudio.dev/phrases/0</a>, or you can choose a specific sample by setting a number greater than 0 in the above URL. eg <a href="https://dx7.nintoracaudio.dev/phrases/99" class="web-link">dx7.nintoracaudio.dev/phrases/99</a></p>

<h2 id="stack">Stack</h2>

<p>Here’s a quick diagram to show how everything ties together</p>

<p><img src="/assets/raddd-stack/raddd-architecture.jpg" alt="A diagram of the RADDD architecture"></p>

<h2 id="problem-space">Problem Space</h2>
<p>For this example we are going to explore the Lakh Dataset and work on building an application that can reliably reproduce a synthesized audio dataset. I am going to break out an old favorite of mine <a href="https://asb2m10.github.io/dexed/" class="web-link">Dexed</a> to use as the synthesizer and <a href="https://spotify.github.io/pedalboard/" class="web-link">Spotify’s Pedalboard</a> as the VST host.</p>

<p>As source data I have pulled a table <code class="language-plaintext highlighter-rouge">detailed_notes</code>, that is derived from the Lakh dataset, you’ll have to trust me on its origin, maybe I’ll write about it sometime.</p>

<div class="language-plaintext highlighter-rouge"><div class="highlight"><pre class="highlight"><code>CREATE TABLE lakh_dataset.midi_music.detailed_notes (
	midi_id VARCHAR, -- hexidecimal uuid of the MIDI song
	track_id VARCHAR, -- hexidecimal uuid of the MIDI track
	message_id VARCHAR, -- hexidecimal uuid the MIDI message
	start_time DOUBLE, -- start time in beats of the note
	duration DOUBLE, -- duration in beats of the note
	velocity BIGINT, -- the MIDI velocity of the note
	note BIGINT, -- the MIDI pitch of the note
	set_type VARCHAR, -- train, test or validate
	p VARCHAR -- first hex char of the midi_id
);
</code></pre></div></div>
<p>The code to create them for this is <a href="https://gitlab.com/nintorac-audio/midi_etl" class="web-link">available here</a> but is in somewhat of a state and not documented.</p>
<h2 id="plan">Plan</h2>
<ol>
  <li>Acquire source data</li>
  <li>Initial DBT configuration
    <ol>
      <li>Configure profile to load dataset Parquet files as tables</li>
      <li>Configure project to register source tables</li>
    </ol>
  </li>
  <li>Write SQL DBT models to extract 4 beat samples
    <ol>
      <li>Build note objects to group midi message information</li>
      <li>Aggregate notes into 4 beat groupings</li>
    </ol>
  </li>
  <li>Write a Python UDF for DuckDB
    <ol>
      <li>Accept an Arrow array of 4 beat MIDI samples</li>
      <li>Use Ray to batch the array and perform the work function
        <ol>
          <li>Consume each 4 beat sample of MIDI messages</li>
          <li>Use Dexed and Pedalboard to render the beats</li>
          <li>Transcode to lossless compressed FLAC format</li>
          <li>Returns sample</li>
        </ol>
      </li>
      <li>Collated results back into an Arrow</li>
      <li>Return arrow array</li>
    </ol>
  </li>
  <li>Write a Python DBT model
    <ol>
      <li>Subquery the DuckDB relation to only process a partition of the 4 beat samples</li>
      <li>Register the UDF</li>
      <li>Execute the function over the notes list</li>
      <li>Save the results into the renders catalog</li>
    </ol>
  </li>
  <li>Configure Dagster
    <ol>
      <li>Load the SQL models as regular Assets</li>
      <li>Load the Python model as a partitioned asset</li>
      <li>Define the Partitions</li>
      <li>Configure the Python model to be incremental</li>
    </ol>
  </li>
</ol>

<h2 id="implementation">Implementation</h2>
<p>NOTE: Before we go too deep don’t take these code snippets as total gospel, the narratives match but the final code may be slightly different, see the <a href="https://github.com/Nintorac/raddd_dx7_stack.git" class="web-link">repo here</a> for the fully functioning version.</p>

<p>To begin you will need to create your an environment in which you can work in. For me, my go-to is to use conda.  Assuming you’ve already got it installed you should then  run the following commands</p>

<div class="language-bash highlighter-rouge"><div class="highlight"><pre class="highlight"><code>conda create <span class="nt">-n</span> raddd <span class="nv">python</span><span class="o">=</span>3.11.2
conda activate raddd
</code></pre></div></div>
<p>Note: we specifically need 3.11.2 for this, any higher and the VST fails to load, and &lt;3.11 gives an error because of the input type definition when registering the UDF.</p>
<h3 id="initial-dbt-configuration">Initial DBT configuration</h3>
<p>To configure DBT first we will need to install some packages, for this we will need <code class="language-plaintext highlighter-rouge">dbt-core</code> and <code class="language-plaintext highlighter-rouge">dbt-duckdb</code> which will install the core DBT libraries as well as the DuckDB adapter.</p>

<div class="language-bash highlighter-rouge"><div class="highlight"><pre class="highlight"><code>pip <span class="nb">install </span>dbt-core dbt-duckdb
</code></pre></div></div>

<p>With that done, we initiate a new project named <code class="language-plaintext highlighter-rouge">raddd_dbt</code> with the following command, when asked to select which database you would like to use choose DuckDB</p>

<div class="language-bash highlighter-rouge"><div class="highlight"><pre class="highlight"><code>dbt init raddd_dbt
</code></pre></div></div>

<p>At this point you should see a new folder created with the <code class="language-plaintext highlighter-rouge">raddd_dbt</code> name and it should look like this.</p>

<p><img src="/assets/raddd-stack/dbt_output.png" alt="dbt folder structure"></p>

<p>Next we will delete the <code class="language-plaintext highlighter-rouge">raddd_dbt/models/example</code> folder and create a <code class="language-plaintext highlighter-rouge">sources.yml</code> under <code class="language-plaintext highlighter-rouge">raddd_dbt/models</code>, the contents of that file are as follows;</p>

<div class="language-yaml highlighter-rouge"><div class="highlight"><pre class="highlight"><code><span class="na">sources</span><span class="pi">:</span>
  <span class="pi">-</span> <span class="na">name</span><span class="pi">:</span> <span class="s">midi</span>
    <span class="na">meta</span><span class="pi">:</span>
      <span class="na">external_location</span><span class="pi">:</span> <span class="s2">"</span><span class="s">../data/{name}.parquet"</span>
    <span class="na">tables</span><span class="pi">:</span>
      <span class="pi">-</span> <span class="na">name</span><span class="pi">:</span> <span class="s">detailed_notes</span>
</code></pre></div></div>

<p>And one final piece of setup, we will modify the <code class="language-plaintext highlighter-rouge">raddd_dbt</code> profile to save the DuckDB database in a location of our choosing, in this case we want to keep all our outputs in the <code class="language-plaintext highlighter-rouge">data</code> folder. First create the file <code class="language-plaintext highlighter-rouge">raddd_dbt/profiles.yml</code> and then set it’s contents to the following. Note: the path in the profile is relative to where you are running DBT from so we modify it to look like this.</p>

<div class="language-yaml highlighter-rouge"><div class="highlight"><pre class="highlight"><code><span class="na">raddd_dbt</span><span class="pi">:</span>
  <span class="na">outputs</span><span class="pi">:</span>
    <span class="na">dev</span><span class="pi">:</span>
      <span class="na">type</span><span class="pi">:</span> <span class="s">duckdb</span>
      <span class="na">path</span><span class="pi">:</span> <span class="s">../data/dev.duckdb</span>
      <span class="na">threads</span><span class="pi">:</span> <span class="m">1</span>
  <span class="na">target</span><span class="pi">:</span> <span class="s">dev</span>
</code></pre></div></div>

<p>The external location tells the <code class="language-plaintext highlighter-rouge">dbt-duckdb</code> adapter to look in a specific location for the sources and the <code class="language-plaintext highlighter-rouge">{name}</code> in the path will get substituted with the table name at runtime, see the <a href="https://github.com/duckdb/dbt-duckdb" class="web-link"><code class="language-plaintext highlighter-rouge">dbt-duckdb</code></a> documentation for more information</p>

<p>To make sure everything is working we will cd into the <code class="language-plaintext highlighter-rouge">raddd_dbt</code> folder and use the following command <code class="language-plaintext highlighter-rouge">dbt run --profiles-dir .</code>. You should see some output that mentions there are 4 sources in the project. eg</p>
<div class="language-plaintext highlighter-rouge"><div class="highlight"><pre class="highlight"><code>02:51:24  Found 4 sources, 0 exposures, 0 metrics, 391 macros, 0 groups, 0 semantic models
</code></pre></div></div>
<h3 id="acquire-source-data">Acquire source data</h3>
<p>Now before going any further we need some data, we could write a data pipeline that would download the Lakh dataset directly from the source and calculate all the notes but that’s not the point of this so instead lets use some I prepared earlier, they can be found at <a href="https://huggingface.co/datasets/nintorac/midi_etl" class="web-link"><code class="language-plaintext highlighter-rouge">nintorac/midi_etl</code> </a>. The table there contains all notes from a subset of Lakh, each row contains the pitch, velocity, start time and duration which define the note as well as the track_id which allows us to pull out full tracks with a simple grouping.</p>

<p>To source the data we’re going to use a neat trick afforded by dbt-duckdb and DuckDB, first <code class="language-plaintext highlighter-rouge">dbt-duckdb</code> allows us to use <a href="https://docs.getdbt.com/reference/source-configs" class="web-link">DBT source configurations</a> to <a href="https://github.com/duckdb/dbt-duckdb#reading-from-external-files" class="web-link">configure source tables to use</a>DuckDB’s capability to <a href="https://duckdb.org/docs/extensions/httpfs.html" class="web-link">query parquets directly from any https</a> endpoint.</p>

<p>To configure that simply edit <code class="language-plaintext highlighter-rouge">raddd_dbt/models/sources.yml</code> to be the following;</p>
<div class="language-yaml highlighter-rouge"><div class="highlight"><pre class="highlight"><code><span class="na">sources</span><span class="pi">:</span>
  <span class="pi">-</span> <span class="na">name</span><span class="pi">:</span> <span class="s">midi</span>
    <span class="na">tables</span><span class="pi">:</span>
      <span class="pi">-</span> <span class="na">name</span><span class="pi">:</span> <span class="s">detailed_notes</span>
        <span class="na">meta</span><span class="pi">:</span>
          <span class="na">external_location</span><span class="pi">:</span> <span class="pi">|</span>
            <span class="s">read_parquet(</span>
              <span class="s">[              </span>
                <span class="s">'https://huggingface.co/datasets/nintorac/midi_etl/resolve/main/lakh/detailed_notes/p=f/data_0.parquet',</span>
                <span class="s">'https://huggingface.co/datasets/nintorac/midi_etl/resolve/main/lakh/detailed_notes/p=e/data_0.parquet'</span>
              <span class="s">]</span>
            <span class="s">)</span>
</code></pre></div></div>
<p>The <code class="language-plaintext highlighter-rouge">external_location</code> is simply a query that will be rendered into place. It will be processed by DBT so you can include any jinja or macros in here if you have more complex needs!</p>

<p>Note: if you want to do some analysis on the <code class="language-plaintext highlighter-rouge">detailed_notes</code> table yourself, you may want to clone it locally first eg make a model with <code class="language-plaintext highlighter-rouge">select * from {{ source('midi', 'detailed_notes') }}</code> and configure it to materialise as a table.</p>

<h3 id="write-sql-dbt-models-to-extract-4-beat-samples">Write SQL DBT models to extract 4 beat samples</h3>
<p>Now we are ready to define our query, the table we have to work with gives us <code class="language-plaintext highlighter-rouge">detailed_notes</code> which provides the <code class="language-plaintext highlighter-rouge">start_time</code> and <code class="language-plaintext highlighter-rouge">duration</code> (measured in beats) as well as the <code class="language-plaintext highlighter-rouge">track_id</code>. First we create a struct that maps all the necessary information to construct a MIDI note into a single struct, as well as calculating the bucket (which 4 beat section of the track) that note falls into. Finally we do a simple <code class="language-plaintext highlighter-rouge">group by</code> over the bucket and perform a list aggregation over the <code class="language-plaintext highlighter-rouge">note</code> struct.</p>

<p>We should convert the beat basis notes onto a real time basis, to do this we calculate the real time value as <code class="language-plaintext highlighter-rouge">time*(60/bpm)</code>, so if we want 60BPM, then we must multiply all time values by <code class="language-plaintext highlighter-rouge">time * 60/60 = time * 1</code>. Hmm, guess it’s on a real time basis already, nothing to do here.</p>

<p>Here is the query,  which should be written to <code class="language-plaintext highlighter-rouge">raddd_dbt/models/4_beat_phrases.sql</code>.</p>

<pre><code class="language-SQL">with note_dicts as (
	SELECT
		floor(e.start_time/4) bucket
		, e.track_id
		, {
			'start_time': round(e.start_time-bucket, 2)
			, 'duration': round(e.duration, 2)
			, 'velocity': e.velocity
			, 'note': e.note
		} note
	FROM {{ source('midi', 'detailed_notes') }} e
	order by e.track_id, e.start_time, e.note, e.duration, e.velocity asc
)
select bucket, track_id, list(note) notes from note_dicts
group by bucket, track_id
</code></pre>

<p>One important thing to note in this file is <code class="language-plaintext highlighter-rouge">{{ source('midi', 'detailed_notes') }}</code> which doesn’t look much like the SQL you know and love. Here we are providing a template string that DBT will detect and replace with the appropriate information, specifically we are referncing the <code class="language-plaintext highlighter-rouge">detailed_notes</code> table from the source database <code class="language-plaintext highlighter-rouge">midi</code> we declared earlier in <code class="language-plaintext highlighter-rouge">sources.yml</code>.</p>

<p>At this stage you should be able to deploy this table to the DuckDB database with <code class="language-plaintext highlighter-rouge">dbt run --profiles-dir .</code> but we’ll skip that for now and do it in a later stage.</p>

<h3 id="write-a-python-udf-for-duckdb">Write a Python UDF for DuckDB</h3>
<p>This section has a few moving parts, but lets start with a definition for a user-defined functions (UDF), that is a function that will be executed by your database process that is written in the language of your choice, in this case we’re using DuckDB to call Python code.</p>

<p>So, onto the business logic, that is turning the notes list into a FLAC file. For that we are going to need two extra libraries, namely <code class="language-plaintext highlighter-rouge">pedalboard</code> which hosts the synthesizer plugin (VST),  <code class="language-plaintext highlighter-rouge">mido</code> which is a low level library to play to create MIDI and <code class="language-plaintext highlighter-rouge">pydub</code> which handles transcoding the raw waveform down to FLAC. Let’s install them;</p>

<div class="language-bash highlighter-rouge"><div class="highlight"><pre class="highlight"><code>pip <span class="nb">install </span>pydub pedalboard mido
</code></pre></div></div>

<p>We’re also going to need to download the VST, you can find it on the <a href="https://github.com/asb2m10/dexed/releases/tag/v0.9.6" class="web-link">Dexed release page</a> and on that page you should download and unzip the <code class="language-plaintext highlighter-rouge">dexed-0.9.6-lnx.zip</code> archive. Once extracted create a new folder at the root of the directory named <code class="language-plaintext highlighter-rouge">instruments</code> and copy the <code class="language-plaintext highlighter-rouge">Dexed.vst3</code> sub-folder into it.</p>

<p>Next we need to do the following steps;
	1. Turn the notes list into a set of MIDI events
	2. Load the Dexed VST into a pedalboard instrument
	3. Render the midi notes with the instrument
	4. Transcode the raw waveform into FLAC</p>

<p>Here’s the code</p>
<div class="language-python highlighter-rouge"><div class="highlight"><pre class="highlight"><code><span class="k">def</span> <span class="nf">to_midi</span><span class="p">(</span><span class="n">notes</span><span class="p">:</span> <span class="n">List</span><span class="p">[</span><span class="nb">dict</span><span class="p">],</span> <span class="n">transpose</span><span class="p">:</span><span class="nb">int</span><span class="o">=</span><span class="mi">0</span><span class="p">)</span><span class="o">-&gt;</span><span class="n">List</span><span class="p">[</span><span class="n">mido</span><span class="p">.</span><span class="n">Message</span><span class="p">]:</span>
	<span class="c1"># the note's are represented as start_time, duration. But MIDI needs note_on, note_off tuples, so each note event will produce two MIDI messages
</span>    <span class="k">return</span> <span class="nb">list</span><span class="p">(</span><span class="n">chain</span><span class="p">(</span><span class="o">*</span><span class="p">[</span>
            <span class="p">(</span><span class="n">Message</span><span class="p">(</span><span class="s">'note_on'</span><span class="p">,</span> <span class="n">time</span><span class="o">=</span><span class="n">note</span><span class="p">[</span><span class="s">'start_time'</span><span class="p">],</span> <span class="n">note</span><span class="o">=</span><span class="n">note</span><span class="p">[</span><span class="s">'note'</span><span class="p">]</span><span class="o">+</span><span class="n">transpose</span><span class="p">,</span> <span class="n">velocity</span><span class="o">=</span><span class="n">note</span><span class="p">[</span><span class="s">'velocity'</span><span class="p">]),</span> 
             <span class="n">Message</span><span class="p">(</span><span class="s">'note_off'</span><span class="p">,</span> <span class="n">time</span><span class="o">=</span><span class="n">note</span><span class="p">[</span><span class="s">'start_time'</span><span class="p">]</span><span class="o">+</span><span class="n">note</span><span class="p">[</span><span class="s">'duration'</span><span class="p">],</span> <span class="n">note</span><span class="o">=</span><span class="n">note</span><span class="p">[</span><span class="s">'note'</span><span class="p">]</span><span class="o">+</span><span class="n">transpose</span><span class="p">,</span> <span class="n">velocity</span><span class="o">=</span><span class="mi">0</span><span class="p">)</span>
             <span class="p">)</span> <span class="k">for</span> <span class="n">note</span> <span class="ow">in</span> <span class="n">notes</span><span class="p">]))</span>

<span class="k">def</span> <span class="nf">render_notes_list</span><span class="p">(</span><span class="n">notes</span><span class="p">:</span> <span class="n">List</span><span class="p">[</span><span class="nb">dict</span><span class="p">])</span><span class="o">-&gt;</span><span class="nb">bytes</span><span class="p">:</span>
    <span class="n">instrument</span> <span class="o">=</span> <span class="n">load_plugin</span><span class="p">(</span><span class="s">"../instruments/dexed-0.9.6-lnx/Dexed.vst3"</span><span class="p">)</span>

	<span class="n">notes</span> <span class="o">=</span> <span class="n">to_midi</span><span class="p">(</span><span class="n">notes</span><span class="p">)</span>
	<span class="n">x</span> <span class="o">=</span> <span class="n">instrument</span><span class="p">(</span>
        <span class="n">notes</span><span class="p">,</span>
        <span class="n">duration</span><span class="o">=</span><span class="mi">5</span><span class="p">,</span> <span class="c1"># render 5 seconds of audio
</span>        <span class="n">sample_rate</span><span class="o">=</span><span class="n">sample_rate</span><span class="p">,</span> <span class="ow">and</span> <span class="n">included</span> <span class="n">some</span> <span class="n">tracing</span> <span class="n">information</span><span class="p">,</span> 
	<span class="p">)</span>

	<span class="n">x</span> <span class="o">=</span> <span class="n">pydub</span><span class="p">.</span><span class="n">AudioSegment</span><span class="p">(</span>
		<span class="n">x</span><span class="p">.</span><span class="n">tobytes</span><span class="p">(),</span>
		<span class="n">frame_rate</span><span class="o">=</span><span class="n">sample_rate</span><span class="p">,</span>
		<span class="n">sample_width</span><span class="o">=</span><span class="n">x</span><span class="p">.</span><span class="n">dtype</span><span class="p">.</span><span class="n">itemsize</span><span class="p">,</span>
		<span class="n">channels</span><span class="o">=</span><span class="mi">2</span>
	<span class="p">)</span>
	<span class="k">with</span> <span class="n">NamedTemporaryFile</span><span class="p">(</span><span class="s">'rb+'</span><span class="p">)</span> <span class="k">as</span> <span class="n">f</span><span class="p">:</span>
		<span class="n">x</span> <span class="o">=</span> <span class="n">x</span><span class="p">.</span><span class="n">export</span><span class="p">(</span><span class="n">f</span><span class="p">.</span><span class="n">name</span><span class="p">,</span> <span class="nb">format</span><span class="o">=</span><span class="s">'flac'</span><span class="p">)</span>
		<span class="n">x</span> <span class="o">=</span> <span class="n">f</span><span class="p">.</span><span class="n">read</span><span class="p">()</span>

	<span class="k">return</span> <span class="n">x</span>
</code></pre></div></div>

<p>Great, we can render a single list of notes into a FLAC, but there are a few issues. For one we have to reinitialise the VST instrument for every notes list, this introduces needless overheads. Secondly, we plan to use <code class="language-plaintext highlighter-rouge">type='arrow'</code> based UDF for DuckDB, this means that the input to our function will take a vector of notes lists (a list of list of notes, where the inner list defines the 4 beats of the track and the outer list is a batch of such sections), For the moment DuckDB will only process one such vector at a time, this leaves only one core on our machines sated for work and the others going hungry. So we must implement the parallelisation ourselves and to do this we utilise Ray.</p>

<p>So first install Ray, we will also need pyarrow and pandas for this step so install those too;</p>

<div class="language-bash highlighter-rouge"><div class="highlight"><pre class="highlight"><code>pip <span class="nb">install </span>ray pyarrow pandas
</code></pre></div></div>

<p>Then without further ado, here’s the modified code.</p>

<div class="language-python highlighter-rouge"><div class="highlight"><pre class="highlight"><code><span class="kn">from</span> <span class="nn">itertools</span> <span class="kn">import</span> <span class="n">chain</span>
<span class="kn">from</span> <span class="nn">tempfile</span> <span class="kn">import</span> <span class="n">NamedTemporaryFile</span>
<span class="kn">from</span> <span class="nn">typing</span> <span class="kn">import</span> <span class="n">List</span>

<span class="kn">from</span> <span class="nn">mido</span> <span class="kn">import</span> <span class="n">Message</span>
<span class="kn">from</span> <span class="nn">pedalboard</span> <span class="kn">import</span> <span class="n">load_plugin</span>
<span class="kn">from</span> <span class="nn">tqdm</span> <span class="kn">import</span> <span class="n">tqdm</span>
<span class="kn">import</span> <span class="nn">pydub</span>
<span class="kn">import</span> <span class="nn">ray</span>
<span class="kn">import</span> <span class="nn">pyarrow</span> <span class="k">as</span> <span class="n">pa</span>
<span class="kn">import</span> <span class="nn">duckdb</span>


<span class="n">SAMPLE_RATE</span> <span class="o">=</span> <span class="mi">22050</span>

<span class="k">def</span> <span class="nf">to_midi</span><span class="p">(</span><span class="n">notes</span><span class="p">:</span> <span class="n">List</span><span class="p">[</span><span class="nb">dict</span><span class="p">],</span> <span class="n">transpose</span><span class="p">:</span><span class="nb">int</span><span class="o">=</span><span class="mi">0</span><span class="p">)</span><span class="o">-&gt;</span><span class="n">List</span><span class="p">[</span><span class="n">Message</span><span class="p">]:</span>    
	<span class="c1"># the note's are represented as start_time, duration. 
</span>    <span class="c1"># But MIDI needs note_on, note_off tuples, 
</span>    <span class="c1"># so each note event will produce two MIDI messages
</span>    <span class="k">return</span> <span class="nb">list</span><span class="p">(</span><span class="n">chain</span><span class="p">(</span><span class="o">*</span><span class="p">[</span>
            <span class="p">(</span><span class="n">Message</span><span class="p">(</span><span class="s">'note_on'</span><span class="p">,</span> <span class="n">time</span><span class="o">=</span><span class="n">note</span><span class="p">[</span><span class="s">'start_time'</span><span class="p">],</span> <span class="n">note</span><span class="o">=</span><span class="n">note</span><span class="p">[</span><span class="s">'note'</span><span class="p">]</span><span class="o">+</span><span class="n">transpose</span><span class="p">,</span> <span class="n">velocity</span><span class="o">=</span><span class="n">note</span><span class="p">[</span><span class="s">'velocity'</span><span class="p">]),</span> 
             <span class="n">Message</span><span class="p">(</span><span class="s">'note_off'</span><span class="p">,</span> <span class="n">time</span><span class="o">=</span><span class="n">note</span><span class="p">[</span><span class="s">'start_time'</span><span class="p">]</span><span class="o">+</span><span class="n">note</span><span class="p">[</span><span class="s">'duration'</span><span class="p">],</span> <span class="n">note</span><span class="o">=</span><span class="n">note</span><span class="p">[</span><span class="s">'note'</span><span class="p">]</span><span class="o">+</span><span class="n">transpose</span><span class="p">,</span> <span class="n">velocity</span><span class="o">=</span><span class="mi">0</span><span class="p">)</span>
             <span class="p">)</span> <span class="k">for</span> <span class="n">note</span> <span class="ow">in</span> <span class="n">notes</span><span class="p">]))</span>


<span class="o">@</span><span class="n">ray</span><span class="p">.</span><span class="n">remote</span>
<span class="k">def</span> <span class="nf">process_chunk</span><span class="p">(</span><span class="n">notes</span><span class="p">:</span> <span class="n">List</span><span class="p">[</span><span class="n">List</span><span class="p">[</span><span class="nb">dict</span><span class="p">]])</span><span class="o">-&gt;</span><span class="n">pa</span><span class="p">.</span><span class="n">array</span><span class="p">[</span><span class="nb">bytes</span><span class="p">]:</span>

	<span class="n">chunk</span> <span class="o">=</span> <span class="n">notes</span><span class="p">.</span><span class="n">to_pandas</span><span class="p">()</span>
    <span class="c1"># Load a VST3 or Audio Unit plugin from a known path on disk:
</span>    <span class="n">instrument</span> <span class="o">=</span> <span class="n">load_plugin</span><span class="p">(</span><span class="s">"../instruments/dexed-0.9.6-lnx/Dexed.vst3"</span><span class="p">)</span>
    <span class="n">samples</span> <span class="o">=</span> <span class="p">[]</span>
    <span class="n">t</span> <span class="o">=</span> <span class="n">tqdm</span><span class="p">()</span>
    <span class="k">for</span> <span class="n">notes</span> <span class="ow">in</span> <span class="nb">map</span><span class="p">(</span><span class="n">to_midi</span><span class="p">,</span> <span class="n">chunk</span><span class="p">):</span>
        
        <span class="n">x</span> <span class="o">=</span> <span class="n">instrument</span><span class="p">(</span>
        <span class="n">notes</span><span class="p">,</span>
        <span class="n">duration</span><span class="o">=</span><span class="mf">2.5</span><span class="p">,</span> <span class="c1"># seconds
</span>        <span class="n">sample_rate</span><span class="o">=</span><span class="n">SAMPLE_RATE</span><span class="p">,</span>
        <span class="p">)</span>

        <span class="n">x</span> <span class="o">=</span> <span class="n">pydub</span><span class="p">.</span><span class="n">AudioSegment</span><span class="p">(</span>
            <span class="n">x</span><span class="p">.</span><span class="n">tobytes</span><span class="p">(),</span>
            <span class="n">frame_rate</span><span class="o">=</span><span class="n">SAMPLE_RATE</span><span class="p">,</span>
            <span class="n">sample_width</span><span class="o">=</span><span class="n">x</span><span class="p">.</span><span class="n">dtype</span><span class="p">.</span><span class="n">itemsize</span><span class="p">,</span>
            <span class="n">channels</span><span class="o">=</span><span class="mi">2</span>
        <span class="p">)</span>
        <span class="k">with</span> <span class="n">NamedTemporaryFile</span><span class="p">(</span><span class="s">'rb+'</span><span class="p">)</span> <span class="k">as</span> <span class="n">f</span><span class="p">:</span>
            <span class="n">x</span> <span class="o">=</span> <span class="n">x</span><span class="p">.</span><span class="n">export</span><span class="p">(</span><span class="n">f</span><span class="p">.</span><span class="n">name</span><span class="p">,</span> <span class="nb">format</span><span class="o">=</span><span class="s">'flac'</span><span class="p">)</span>
            <span class="n">x</span> <span class="o">=</span> <span class="n">f</span><span class="p">.</span><span class="n">read</span><span class="p">()</span>
        <span class="n">samples</span><span class="p">.</span><span class="n">append</span><span class="p">(</span><span class="n">x</span><span class="p">)</span>
        <span class="n">t</span><span class="p">.</span><span class="n">update</span><span class="p">(</span><span class="mi">1</span><span class="p">)</span>

    <span class="k">return</span> <span class="n">pa</span><span class="p">.</span><span class="n">array</span><span class="p">(</span><span class="n">samples</span><span class="p">)</span>

<span class="k">def</span> <span class="nf">process_batch</span><span class="p">(</span><span class="n">batch</span><span class="p">:</span> <span class="n">pa</span><span class="p">.</span><span class="n">array</span><span class="p">[</span><span class="n">List</span><span class="p">[</span><span class="nb">dict</span><span class="p">]])</span><span class="o">-&gt;</span><span class="n">pa</span><span class="p">.</span><span class="n">array</span><span class="p">[</span><span class="nb">bytes</span><span class="p">]:</span>
    
    <span class="n">rows_per_batch</span><span class="o">=</span><span class="nb">max</span><span class="p">(</span><span class="mi">10</span><span class="p">,</span> <span class="n">batch</span><span class="p">.</span><span class="n">length</span><span class="p">()</span><span class="o">//</span><span class="mi">32</span><span class="p">)</span> <span class="c1"># max of size 64 batches @ 2048 sized vectors
</span>    <span class="n">chunks</span> <span class="o">=</span> <span class="p">[]</span>

    <span class="k">for</span> <span class="n">chunk_start</span> <span class="ow">in</span> <span class="nb">range</span><span class="p">(</span><span class="mi">0</span><span class="p">,</span> <span class="n">batch</span><span class="p">.</span><span class="n">length</span><span class="p">(),</span> <span class="n">rows_per_batch</span><span class="p">):</span>
        
        <span class="n">chunk</span> <span class="o">=</span> <span class="n">process_chunk</span><span class="p">.</span><span class="n">remote</span><span class="p">(</span><span class="n">batch</span><span class="p">.</span><span class="nb">slice</span><span class="p">(</span><span class="n">chunk_start</span><span class="p">,</span> <span class="n">rows_per_batch</span><span class="p">))</span>
        <span class="n">chunks</span><span class="p">.</span><span class="n">append</span><span class="p">(</span><span class="n">chunk</span><span class="p">)</span>

    <span class="k">return</span> <span class="n">pa</span><span class="p">.</span><span class="n">concat_arrays</span><span class="p">(</span><span class="n">ray</span><span class="p">.</span><span class="n">get</span><span class="p">(</span><span class="n">chunks</span><span class="p">))</span>
</code></pre></div></div>

<p>The function <code class="language-plaintext highlighter-rouge">render_notes_list</code> has been modified into <code class="language-plaintext highlighter-rouge">process_chunk</code> which is a <code class="language-plaintext highlighter-rouge">ray.remote</code> function, that takes a batch of 4 beat sections, initialises a single instrument and processes them each into FLAC bytes sequentially. And we’ve added a <code class="language-plaintext highlighter-rouge">procces_batch</code> function, this takes a pyarrow array that is the vector supplied by DuckDB and breaks it into discrete jobs that can be processed in parallel.</p>

<p>Ideally we pull this bit of logic into a module by itself and reference that within the Python DBT model, however this causes some weird issues with DBT so for now we will just include this code in the DBT model directly. So create a the file <code class="language-plaintext highlighter-rouge">raddd_dbt/models/render_midis.py</code> and add the functions in there.</p>
<h3 id="write-a-python-dbt-model">Write a Python DBT model</h3>
<p>To write a Python DBT model is very simple, you just create a function named <code class="language-plaintext highlighter-rouge">model</code> which takes two arguments that we will call <code class="language-plaintext highlighter-rouge">dbt</code> and <code class="language-plaintext highlighter-rouge">session</code>. The <code class="language-plaintext highlighter-rouge">dbt</code> argument allows us to configure or fetch various things with DBT itself and the <code class="language-plaintext highlighter-rouge">session</code> argument which is a DuckDB connection. The <code class="language-plaintext highlighter-rouge">dbt</code> object can also configure the DAG itself by way of the <code class="language-plaintext highlighter-rouge">dbt.ref</code> function which returns a <a href="https://duckdb.org/docs/api/python/relational_api.html" class="web-link"><code class="language-plaintext highlighter-rouge">duckdb.DuckDBPyRelation</code></a> object.</p>

<p>The first thing to do is pull a reference to the <code class="language-plaintext highlighter-rouge">4_beat_sections</code> model created earlier that will serve as input to the UDF, we use the <code class="language-plaintext highlighter-rouge">dbt.ref</code> function to do this.</p>

<p>Next we have to register the UDF into the DuckDB session, the <code class="language-plaintext highlighter-rouge">session.create_function</code> facilitates this, you supply a name for the function, a pointer to the function, the input types and the output types, additionally we set the <code class="language-plaintext highlighter-rouge">type</code>  to <code class="language-plaintext highlighter-rouge">arrow</code> so that DuckDB will give us a batch of 4 beat sections rather than just one.</p>

<p>All that’s left now is to run the query that will render the MIDI to FLAC, for that we use <code class="language-plaintext highlighter-rouge">session.query</code> which will produce a new DuckDB relation object, inside the query we run the <code class="language-plaintext highlighter-rouge">process_chunk</code> function that was created over the <code class="language-plaintext highlighter-rouge">notes</code> column and (with the magic of DuckDB) reference the <code class="language-plaintext highlighter-rouge">midi</code> object we pulled using <code class="language-plaintext highlighter-rouge">dbt.ref</code>.</p>

<p>With that done, we need to convert the <code class="language-plaintext highlighter-rouge">flacs</code> relation to an arrow table that will be the output of the table, ideally this wouldn’t have to happen but without it the <code class="language-plaintext highlighter-rouge">midi</code> variable goes out of scope and the DuckDB magic breaks.</p>

<p>Here’s the code so far, append it to <code class="language-plaintext highlighter-rouge">raddd_dbt/models/render_midis.py</code>;</p>
<div class="language-python highlighter-rouge"><div class="highlight"><pre class="highlight"><code><span class="k">def</span> <span class="nf">model</span><span class="p">(</span><span class="n">dbt</span><span class="p">,</span> <span class="n">session</span><span class="p">):</span>

    <span class="n">midi</span><span class="p">:</span> <span class="n">duckdb</span><span class="p">.</span><span class="n">DuckDBPyRelation</span> <span class="o">=</span> <span class="n">dbt</span><span class="p">.</span><span class="n">ref</span><span class="p">(</span><span class="s">"4_beat_sections"</span><span class="p">)</span>
    
    <span class="n">session</span><span class="p">.</span><span class="n">create_function</span><span class="p">(</span>
        <span class="s">'process_chunk'</span><span class="p">,</span>
        <span class="n">process_batch</span><span class="p">,</span>
        <span class="p">[</span><span class="n">duckdb</span><span class="p">.</span><span class="n">typing</span><span class="p">.</span><span class="n">DuckDBPyType</span><span class="p">(</span>
            <span class="nb">list</span><span class="p">[{</span>
                <span class="s">'start_time'</span><span class="p">:</span> <span class="nb">float</span><span class="p">,</span>
                <span class="s">'duration'</span><span class="p">:</span> <span class="nb">float</span><span class="p">,</span>
                <span class="s">'velocity'</span><span class="p">:</span> <span class="nb">int</span><span class="p">,</span>
                <span class="s">'note'</span><span class="p">:</span> <span class="nb">int</span><span class="p">,</span>
            <span class="p">}</span>
            <span class="p">]</span>    <span class="p">)],</span>
        <span class="n">duckdb</span><span class="p">.</span><span class="n">typing</span><span class="p">.</span><span class="n">DuckDBPyType</span><span class="p">(</span><span class="nb">bytes</span><span class="p">),</span>
        <span class="nb">type</span><span class="o">=</span><span class="s">'arrow'</span><span class="p">)</span>

    <span class="n">flacs</span> <span class="o">=</span> <span class="n">session</span><span class="p">.</span><span class="n">query</span><span class="p">(</span><span class="s">"""
    select track_id, bucket, process_chunk(notes) from 
		    (select * from midi limit 10)
    """</span><span class="p">)</span>
    
    <span class="k">return</span> <span class="n">flacs</span><span class="p">.</span><span class="n">to_arrow_table</span><span class="p">()</span>
</code></pre></div></div>
<p>Note 1: we limit the number of midis to render for now as it’s unlikely your poor little computer could render them all without running out of memory, we’ll come back in the next section to optimise that to allow us to produce the full results.
Note 2: Pylance complains about the input type with the error <code class="language-plaintext highlighter-rouge">Dictionary expression not allowed in type annotation</code> which results in some ugly red squiggles in my editor, but the code runs soo…ship it?</p>
<h3 id="configure-dagster">Configure Dagster</h3>

<p>In order to break the task up into multiple jobs, we must partition our source data and then run the DBT model over each partition. We could manage this manually however it is cumbersome and if a particular partition fails it may not be simple to know that if we just had a script to loop over all partitions. In comes Dagster that can help us orchestrate that. We will need to add the <code class="language-plaintext highlighter-rouge">dagster</code> library to facilitate that, as well as the <code class="language-plaintext highlighter-rouge">dagster-dbt</code> lib to allow it to talk to the DBT project, let’s install them.</p>

<div class="language-bash highlighter-rouge"><div class="highlight"><pre class="highlight"><code>pip <span class="nb">install </span>dagster dagster-dbt
</code></pre></div></div>

<p>Now we need to create the Dagster portion of the project, to do so we will create a module to contain the dagster code, in this example we’ll call it <code class="language-plaintext highlighter-rouge">raddd</code>. So <code class="language-plaintext highlighter-rouge">cd</code> to the root of the project and create the module like so;</p>
<div class="language-bash highlighter-rouge"><div class="highlight"><pre class="highlight"><code><span class="nb">mkdir </span>raddd
<span class="nb">touch </span>raddd/__init__.py
</code></pre></div></div>

<p>To get things going we will first just import the entire DBT DAG of assets all together, to do this we use the <code class="language-plaintext highlighter-rouge">dagster_dbt.load_assets_from_dbt_project</code> method, we need to give it the location of the DBT project as well as the profiles directory. To locate those dirs we’ll use pathlib and since there isn’t much code here we’ll just shove it all in the <code class="language-plaintext highlighter-rouge">__init__.py</code> and call it a day, here’s the code;</p>

<div class="language-python highlighter-rouge"><div class="highlight"><pre class="highlight"><code><span class="kn">from</span> <span class="nn">pathlib</span> <span class="kn">import</span> <span class="n">Path</span>
<span class="kn">from</span> <span class="nn">dagster_dbt</span> <span class="kn">import</span> <span class="n">load_assets_from_dbt_project</span>

<span class="n">project_root</span> <span class="o">=</span> <span class="n">Path</span><span class="p">(</span><span class="n">__file__</span><span class="p">).</span><span class="n">parent</span> <span class="o">/</span> <span class="s">'..'</span>
<span class="n">dbt_project</span> <span class="o">=</span> <span class="n">project_root</span> <span class="o">/</span> <span class="s">'raddd_dbt'</span>
<span class="n">assets</span> <span class="o">=</span> <span class="n">load_assets_from_dbt_project</span><span class="p">(</span>
    <span class="n">dbt_project</span><span class="p">.</span><span class="n">as_posix</span><span class="p">(),</span> 
    <span class="n">profiles_dir</span><span class="o">=</span><span class="n">dbt_project</span><span class="p">.</span><span class="n">as_posix</span><span class="p">(),</span> 
<span class="p">)</span>
</code></pre></div></div>

<p>Simple, with this all in place we should be able to finally run the project! To do that we’re going to need to launch the <code class="language-plaintext highlighter-rouge">dagster-webserver</code> (we will also need to install it), and we will use the <code class="language-plaintext highlighter-rouge">-m</code> flag to point it at the module we defined. So <code class="language-plaintext highlighter-rouge">cd</code> into the project root again and run the following command;</p>

<div class="language-bash highlighter-rouge"><div class="highlight"><pre class="highlight"><code>pip <span class="nb">install </span>dagster-webserver
dagster-webserver <span class="nt">-m</span> raddd
</code></pre></div></div>

<p>Then open up the Dagster frontend, usually found at <a href="http://localhost:3000" class="web-link">localhost:3000</a> and you should see the DAG you defined in DBT and that should look a little something like this;</p>

<p><img src="/assets/raddd-stack/dagster_pipeline.png" alt="dagster pipeline visualisation"></p>

<p>Note 1: Sorry, Dagit has no <a href="https://github.com/dagster-io/dagster/issues/1890" class="web-link">no dark mode</a> :( (or me :|)
Note 2: You can ignore the yellow triangle on <code class="language-plaintext highlighter-rouge">Deployment</code>, until you try to launch a <a href="https://docs.dagster.io/concepts/partitions-schedules-sensors/backfills" class="web-link">backfill</a></p>

<p>Great click <code class="language-plaintext highlighter-rouge">Materialize all</code> in the top right corner and it will kick of a run of the graph, first extracting all 4 bar sections of the source table and then rendering the first 10 sections from that table. OK but we could have done that with DBT directly*, so lets integrate a bit deeper with Dagster now so that we can render the whole dataset without running out of memory.</p>

<p>First we’re going to need to define a partition, in this case we will add a column to the <code class="language-plaintext highlighter-rouge">4_beat_sections</code>, we want the partitioning to match the in memory layout of the dataset, this will help increase the efficiency of the vectors in DuckDB (filters can occur per vector, if this happens you can have sparsely filled vectors which incurs extra memory access overheads). To do this we can use the <code class="language-plaintext highlighter-rouge">ntile</code> function of DuckDB, it takes an integer as input and then evenly distributes a value between 1 and that integer among the rows, finally order by that value and the requirements are met. We should materialise this table to take advantage of the memory savings, too. More on that later.</p>

<pre><code class="language-SQL">with note_dicts as (
	SELECT
		floor(e.start_time/4) bucket
		, e.track_id
		, {
			'start_time': round(e.start_time-bucket, 2)*0.5
			, 'duration': round(e.duration, 2)*0.5
			, 'velocity': e.velocity
			, 'note': e.note
		} note
	FROM {{ source('midi', 'detailed_notes') }} e
	order by e.track_id, e.start_time, e.note, e.duration, e.velocity asc
)
select 
	bucket
	, track_id
	, list(note) notes
	, ntile({{ var('n_partitions', 100) }}) over () as p
from note_dicts
group by bucket, track_id
order by p
</code></pre>

<p>Here we have created a DBT variable using <code class="language-plaintext highlighter-rouge">env_var</code> and given it a default value of 100, this will be the number of partitions, later we will use Dagster to set this variable.</p>

<p>Next is to update the <code class="language-plaintext highlighter-rouge">render_midis</code> model to only select the phrases in a particular partition, we use the same technique by referencing a <code class="language-plaintext highlighter-rouge">var</code> in DBT. Here’s the code;</p>
<div class="language-python highlighter-rouge"><div class="highlight"><pre class="highlight"><code><span class="k">def</span> <span class="nf">model</span><span class="p">(</span><span class="n">dbt</span><span class="p">,</span> <span class="n">session</span><span class="p">):</span>

    <span class="n">midi</span><span class="p">:</span> <span class="n">duckdb</span><span class="p">.</span><span class="n">DuckDBPyRelation</span> <span class="o">=</span> <span class="n">dbt</span><span class="p">.</span><span class="n">ref</span><span class="p">(</span><span class="s">"4_beat_sections"</span><span class="p">)</span>
    <span class="n">partition_n</span> <span class="o">=</span> <span class="n">dbt</span><span class="p">.</span><span class="n">config</span><span class="p">.</span><span class="n">get</span><span class="p">(</span><span class="s">'partition_n'</span><span class="p">,</span> <span class="mi">0</span><span class="p">)</span>
    
    <span class="k">if</span> <span class="n">partition_n</span> <span class="ow">is</span> <span class="bp">None</span><span class="p">:</span>
        <span class="k">raise</span> <span class="nb">ValueError</span><span class="p">(</span><span class="s">"Must configure 'partition_n' var"</span><span class="p">)</span>
    
    <span class="n">session</span><span class="p">.</span><span class="n">create_function</span><span class="p">(</span>
        <span class="s">'process_chunk'</span><span class="p">,</span>
        <span class="n">process_batch</span><span class="p">,</span>
        <span class="p">[</span><span class="n">duckdb</span><span class="p">.</span><span class="n">typing</span><span class="p">.</span><span class="n">DuckDBPyType</span><span class="p">(</span>
            <span class="nb">list</span><span class="p">[{</span>
                <span class="s">'start_time'</span><span class="p">:</span> <span class="nb">float</span><span class="p">,</span>
                <span class="s">'duration'</span><span class="p">:</span> <span class="nb">float</span><span class="p">,</span>
                <span class="s">'velocity'</span><span class="p">:</span> <span class="nb">int</span><span class="p">,</span>
                <span class="s">'note'</span><span class="p">:</span> <span class="nb">int</span><span class="p">,</span>
            <span class="p">}</span>
            <span class="p">]</span>    <span class="p">)],</span>
        <span class="n">duckdb</span><span class="p">.</span><span class="n">typing</span><span class="p">.</span><span class="n">DuckDBPyType</span><span class="p">(</span><span class="nb">bytes</span><span class="p">),</span>
        <span class="nb">type</span><span class="o">=</span><span class="s">'arrow'</span><span class="p">)</span>

    <span class="n">flacs</span> <span class="o">=</span> <span class="n">session</span><span class="p">.</span><span class="n">query</span><span class="p">(</span><span class="sa">f</span><span class="s">"""
    select track_id, bucket, process_chunk(notes) flac_bytes from 
		    (select * from midi where p=</span><span class="si">{</span><span class="n">partition_n</span><span class="si">}</span><span class="s">)
    """</span><span class="p">)</span>
    
    <span class="k">return</span> <span class="n">flacs</span><span class="p">.</span><span class="n">to_arrow_table</span><span class="p">()</span>
</code></pre></div></div>
<p>Note: the sub-select must be in brackets otherwise <code class="language-plaintext highlighter-rouge">process_chunk</code> is <a href="https://github.com/duckdb/duckdb/discussions/9607" class="web-link">run over everything</a> and only then filtered.</p>

<p>We now consume a variable named <code class="language-plaintext highlighter-rouge">partition_n</code> and use this to filter the MIDI phrases, if you materialize the the Dagster assets now you will get a very fast run, since we default to 0 for the <code class="language-plaintext highlighter-rouge">partition_n</code> and the <code class="language-plaintext highlighter-rouge">ntile</code> function from before starts at 1. At least we can make sure the code still runs!</p>

<p>Next we must modify Dagster to supply the correct variables for the correct partition. In order to achieve this we’re going to have to break the asset loading step into two stages, one for the partitioned asset, the other for the non-partitioned asset. Then we define a <code class="language-plaintext highlighter-rouge">StaticPartitionsDefinition</code>, to this we supply a list of all the possible partition values, somehow we must also make this line up with the <code class="language-plaintext highlighter-rouge">n_paritions</code> variable in the <code class="language-plaintext highlighter-rouge">4_bar_phrases</code> query. For this we will use an environment variable for lack of a better idea, it’s possible we could use the <code class="language-plaintext highlighter-rouge">DynamicPartitionsDefinition</code> but that’s left as an exercise to the reader.</p>

<p>Here’s the new code for <code class="language-plaintext highlighter-rouge">raddd/__init__.py</code>;</p>
<div class="language-python highlighter-rouge"><div class="highlight"><pre class="highlight"><code><span class="kn">from</span> <span class="nn">itertools</span> <span class="kn">import</span> <span class="n">chain</span>
<span class="kn">import</span> <span class="nn">os</span>
<span class="kn">from</span> <span class="nn">pathlib</span> <span class="kn">import</span> <span class="n">Path</span>
<span class="kn">from</span> <span class="nn">dagster</span> <span class="kn">import</span> <span class="n">Definitions</span><span class="p">,</span> <span class="n">StaticPartitionsDefinition</span><span class="p">,</span> <span class="n">with_resources</span><span class="p">,</span> <span class="n">configured</span><span class="p">,</span> <span class="n">AssetsDefinition</span>
<span class="kn">from</span> <span class="nn">dagster_dbt</span> <span class="kn">import</span> <span class="n">load_assets_from_dbt_project</span>
<span class="kn">from</span> <span class="nn">dagster_dbt</span> <span class="kn">import</span> <span class="n">dbt_cli_resource</span> <span class="k">as</span> <span class="n">dbt</span>

<span class="n">project_root</span> <span class="o">=</span> <span class="n">Path</span><span class="p">(</span><span class="n">__file__</span><span class="p">).</span><span class="n">parent</span> <span class="o">/</span> <span class="s">'..'</span>
<span class="n">dbt_project</span> <span class="o">=</span> <span class="p">(</span><span class="n">project_root</span> <span class="o">/</span> <span class="s">'raddd_dbt'</span><span class="p">).</span><span class="n">as_posix</span><span class="p">()</span>
<span class="n">N_PARTITIONS</span> <span class="o">=</span> <span class="n">os</span><span class="p">.</span><span class="n">environ</span><span class="p">.</span><span class="n">get</span><span class="p">(</span><span class="s">'N_PARTITIONS'</span><span class="p">,</span> <span class="mi">800</span><span class="p">)</span>

<span class="c1"># Load static assets
</span><span class="n">assets</span> <span class="o">=</span> <span class="n">load_assets_from_dbt_project</span><span class="p">(</span>
    <span class="n">dbt_project</span><span class="p">,</span>
    <span class="n">profiles_dir</span><span class="o">=</span><span class="n">dbt_project</span><span class="p">,</span>
    <span class="n">select</span><span class="o">=</span><span class="s">'4_beat_phrases'</span><span class="p">,</span>
<span class="p">)</span>


<span class="c1"># Load partitioned assets
</span><span class="k">def</span> <span class="nf">partition_f</span><span class="p">(</span><span class="n">partition</span><span class="p">):</span>
    <span class="k">return</span> <span class="p">{</span><span class="s">'partition_n'</span><span class="p">:</span> <span class="nb">int</span><span class="p">(</span><span class="n">partition</span><span class="p">)}</span>

<span class="k">def</span> <span class="nf">metadata_fn</span><span class="p">(</span><span class="n">x</span><span class="p">):</span>
    <span class="k">return</span> <span class="p">{</span><span class="s">"partition_expr"</span><span class="p">:</span> <span class="s">"p"</span><span class="p">}</span>

<span class="c1"># list of strings for each partition
</span><span class="n">partitions_def</span> <span class="o">=</span> <span class="n">StaticPartitionsDefinition</span><span class="p">(</span><span class="nb">list</span><span class="p">(</span><span class="nb">map</span><span class="p">(</span><span class="nb">str</span><span class="p">,</span> <span class="nb">range</span><span class="p">(</span><span class="mi">1</span><span class="p">,</span> <span class="mi">1</span><span class="o">+</span><span class="nb">int</span><span class="p">(</span><span class="n">N_PARTITIONS</span><span class="p">)))))</span>

<span class="n">partitioned_assets</span> <span class="o">=</span> <span class="n">load_assets_from_dbt_project</span><span class="p">(</span>
    <span class="n">dbt_project</span><span class="p">,</span>
    <span class="n">profiles_dir</span><span class="o">=</span><span class="n">dbt_project</span><span class="p">,</span>
    <span class="n">select</span><span class="o">=</span><span class="s">'render_midis'</span><span class="p">,</span>
    <span class="n">partitions_def</span><span class="o">=</span><span class="n">partitions_def</span><span class="p">,</span>
    <span class="n">partition_key_to_vars_fn</span><span class="o">=</span><span class="n">partition_f</span><span class="p">,</span>
    <span class="n">node_info_to_definition_metadata_fn</span><span class="o">=</span><span class="n">metadata_fn</span>
<span class="p">)</span>


<span class="n">assets</span> <span class="o">=</span> <span class="n">with_resources</span><span class="p">(</span>
    <span class="n">chain</span><span class="p">(</span><span class="n">assets</span><span class="p">,</span> <span class="n">partitioned_assets</span><span class="p">),</span>
    <span class="n">resource_defs</span><span class="o">=</span><span class="p">{</span>
        <span class="s">'dbt'</span><span class="p">:</span> <span class="n">dbt</span><span class="p">.</span><span class="n">configured</span><span class="p">({</span>
            <span class="s">'profiles_dir'</span><span class="p">:</span> <span class="n">dbt_project</span><span class="p">,</span>
            <span class="s">'project_dir'</span><span class="p">:</span> <span class="n">dbt_project</span><span class="p">,</span>
            <span class="s">'vars'</span><span class="p">:</span> <span class="p">{</span><span class="s">'n_partitions'</span><span class="p">:</span> <span class="n">N_PARTITIONS</span><span class="p">}</span>
        <span class="p">}),</span>
    <span class="p">}</span>
<span class="p">)</span>

<span class="n">defs</span> <span class="o">=</span> <span class="n">Definitions</span><span class="p">(</span>
    <span class="n">assets</span><span class="o">=</span><span class="n">assets</span><span class="p">,</span>
<span class="p">)</span>

</code></pre></div></div>

<p>In the partitioned section we define two extra functions, <code class="language-plaintext highlighter-rouge">partition_f</code> which figures out how to translate the Dagster partition element to config that will be supplied to DBT and the <code class="language-plaintext highlighter-rouge">metadata_fn</code> that tells Dagster which column to look at when loading the partitioned asset in downstream steps (not that we have any in this case).</p>

<p>The final thing to do is let DBT know not to delete the table on a rerun, to do this we must set the materialization strategy to <code class="language-plaintext highlighter-rouge">incremental</code>. While we are there we should also configure the <code class="language-plaintext highlighter-rouge">4_beat_phrases</code> model to build a table as by default it deploys as a view which would potentially interfere with the partitioning optimizations. You can also delete the <code class="language-plaintext highlighter-rouge">example</code> configuration created by the DBT templater. To do this we edit the <code class="language-plaintext highlighter-rouge">dbt_project.yml</code> file and modify the <code class="language-plaintext highlighter-rouge">models</code> key. It should look like this after the change;</p>

<div class="language-yaml highlighter-rouge"><div class="highlight"><pre class="highlight"><code><span class="na">models</span><span class="pi">:</span>
  <span class="na">raddd_dbt</span><span class="pi">:</span>
    <span class="na">+materialized</span><span class="pi">:</span> <span class="s">table</span>
    <span class="na">render_midis</span><span class="pi">:</span>
      <span class="na">+materialized</span><span class="pi">:</span> <span class="s">incremental</span>
</code></pre></div></div>

<p>And there we have it, partitioning fully implemented and if you wanted you could now materialise the full table using the Dagster UI, that is not reccomended without first configuring the <code class="language-plaintext highlighter-rouge">dagster-daemon</code> and limiting it to 1 concurrent run. For now though you can try to materialise a single partition to verify it’s working. Click the materialise button again and select a single partition in the popup that appears.</p>

<h2 id="improvements">Improvements</h2>
<ul>
  <li>Deduplicate the sequences</li>
  <li>Filter out drum sequences</li>
  <li>Allow passing in a sysex defining the DX7 patch settings</li>
  <li>At this RTF it’s probably viable to generate on the fly for ML pipelines</li>
  <li>Scale out with a Ray Cluster and run faster</li>
</ul>]]></content><author><name></name></author><category term="data-eng,music,dx7" /><summary type="html"><![CDATA[Today I will describe how to produce an all local data platform using the RADDD data stack (everyone’s talking about it, promise), the stack consists of 4 layers that work together to provide a fast, tunable platform that can scale to production seamlessly.]]></summary></entry><entry><title type="html">DBT Documentation Generator</title><link href="https://www.nintorac.dev/data-eng/2023/03/18/dbt-generator.html" rel="alternate" type="text/html" title="DBT Documentation Generator" /><published>2023-03-18T18:20:00+00:00</published><updated>2023-03-18T18:20:00+00:00</updated><id>https://www.nintorac.dev/data-eng/2023/03/18/dbt-generator</id><content type="html" xml:base="https://www.nintorac.dev/data-eng/2023/03/18/dbt-generator.html"><![CDATA[<p>This technical report explores the use of ChatGPT API to automatically document DBT projects. ChatGPT is a natural language processing API that can generate human-like responses to prompts. We will be using the Obsidian ChatGPT MD plugin for this project, which provides a workflow to develop prompts for our documentation.</p>

<p>Documentation is a crucial task for any data project. However, documentation tends to be time-consuming and tedious, taking away from the time and focus that could be spent on other aspects of the project. In this technical report, we explore the use of ChatGPT API and the ChatGPT MD plugin in Obsidian to provide a no-code solution to automatically document DBT projects. By automating the documentation process, we can save time and resources while still maintaining high-quality documentation for our DBT projects</p>

<h2 id="chatgpt-md-plugin">ChatGPT MD Plugin</h2>

<p>The ChatGPT MD plugin allows us to generate documentation by writing prompts directly along with a littlle custom formatting to indicate message types. The plugin then sends the prompts to the ChatGPT API, which generates a response that is inserted into the Markdown document. This allows us to quickly and easily generate documentation without having to spend time writing out each section manually. I mapped the <code class="language-plaintext highlighter-rouge">Chat</code> command to <code class="language-plaintext highlighter-rouge">ctrl + ⏎</code> to speed things up.</p>

<p>One fun side effect of this format over using the ChatGPT website is that you can modify the assistant replies in place which can help to fix small mistakes in real time while larger changes can be achieved via further conversation.</p>

<h2 id="example-usage">Example Usage</h2>

<p>Here is an example of how we can use ChatGPT to generate documentation for the tables in the MIMIM-IV ICU database. I chose this as it’s the only open source schema I knew where to find off the top of my head.</p>

<p>A brief explanation of how to interpet the below; the first section surrouded by <code class="language-plaintext highlighter-rouge">---</code> allows you to specify custom args to the OpenAI API. Next, the <code class="language-plaintext highlighter-rouge">role::system</code> line lets the plugin know that the following block is a system message and the <code class="language-plaintext highlighter-rouge">&lt;hr class="__chatgpt_plugin"&gt;</code> line lets the plugin know the end of the block. This works similarly for <code class="language-plaintext highlighter-rouge">role::user</code> and <code class="language-plaintext highlighter-rouge">role::assistant</code>.</p>

<div class="language-md highlighter-rouge"><div class="highlight"><pre class="highlight"><code><span class="nn">---</span>
<span class="na">max_tokens</span><span class="pi">:</span> <span class="m">1000</span>
<span class="na">model</span><span class="pi">:</span> <span class="s">gpt-3.5-turbo</span>
<span class="nn">---</span>
role::system

you are a dbt docs generator, you have the following objectives:
<span class="p">-</span> when you are told the tables reply "acknowledge" and nothing else
<span class="p">-</span> you must only output a single table at a time
<span class="p">-</span> your only responses will be in yaml codeblock
<span class="p">-</span> you expect the user to give you table descriptions and you will reply using the templates to follow
<span class="p">-</span> dont try to make up any information
<span class="p">-</span> If extra information is required from the user use <span class="sb">`&lt;CLARIFY&gt;`</span> inline to signify more should be added
<span class="p">-</span> If asked to document a database you will use the database template
<span class="p">-</span> if asked to document a table you will use the tables template

<span class="gu">## Database template</span>
<span class="p">```</span><span class="nl">yaml
</span><span class="na">version</span><span class="pi">:</span> <span class="m">2</span>

<span class="na">sources</span><span class="pi">:</span>
  <span class="pi">-</span> <span class="na">name</span><span class="pi">:</span> <span class="s">&lt;string&gt;</span> <span class="c1"># required</span>
    <span class="na">description</span><span class="pi">:</span> <span class="s">&lt;markdown_string&gt;</span>
    <span class="na">database</span><span class="pi">:</span> <span class="s">&lt;database_name&gt;</span>
    <span class="na">schema</span><span class="pi">:</span> <span class="s">&lt;schema_name&gt;</span>
    <span class="na">tags</span><span class="pi">:</span> <span class="pi">[</span><span class="nv">&lt;string&gt;</span><span class="pi">]</span>
<span class="p">```</span><span class="sb">


</span><span class="gu">## Tables template</span>

<span class="p">```</span><span class="nl">
</span>version: 2

sources:
  - name: &lt;string&gt; # required
    tables:
      - name: &lt;string&gt; #required
        description: &lt;markdown_string&gt;

        columns:
          - name: &lt;column_name&gt; # required
            description: &lt;markdown_string&gt;
            tests:
              - &lt;test&gt;
              - ... # declare additional tests
            tags: [&lt;string&gt;]
          - name: ... # declare properties of additional columns
<span class="p">```</span>

Out of the box, dbt ships with four generic tests already defined: unique, not_null, accepted_values and relationships. Here's a full example using those tests on an orders model:
<span class="p">```</span><span class="nl">
</span>version: 2

models:
  - name: orders
    columns:
      - name: order_id
        tests:
          - unique
          - not_null
      - name: status
        tests:
          - accepted_values:
              values: ['placed', 'shipped', 'completed', 'returned']
      - name: customer_id
        tests:
          - relationships:
              to: ref('customers')
              field: id
<span class="p">```</span>

In plain English, these tests translate to:<span class="sb">

    unique: the order_id column in the orders model should be unique
    not_null: the order_id column in the orders model should not contain null values
    accepted_values: the status column in the orders should be one of 'placed', 'shipped', 'completed', or 'returned'
    relationships: each customer_id in the orders model exists as an id in the customers table (also known as referential integrity)

</span><span class="nt">&lt;hr</span> <span class="na">class=</span><span class="s">"__chatgpt_plugin"</span><span class="nt">&gt;</span>
</code></pre></div></div>

<p>Next supply the table definitions, I’ve used DDL’s in this case and in all my experimentation but I imagine you should be able to use any format you’d like, even free text perhaps?</p>

<div class="language-plaintext highlighter-rouge"><div class="highlight"><pre class="highlight"><code>role::user
```
DROP TABLE IF EXISTS mimiciv_icu.caregiver;
CREATE TABLE mimiciv_icu.caregiver
(
  caregiver_id INTEGER NOT NULL
);
DROP TABLE IF EXISTS mimiciv_icu.chartevents;
CREATE TABLE mimiciv_icu.chartevents
(
  subject_id INTEGER NOT NULL,
  hadm_id INTEGER NOT NULL,
  stay_id INTEGER NOT NULL,
  caregiver_id INTEGER,
  charttime TIMESTAMP NOT NULL,
  storetime TIMESTAMP,
  itemid INTEGER NOT NULL,
  value VARCHAR(200),
  valuenum FLOAT,
  valueuom VARCHAR(20),
  warning SMALLINT
);
DROP TABLE IF EXISTS mimiciv_icu.datetimeevents;
CREATE TABLE mimiciv_icu.datetimeevents
(
  subject_id INTEGER NOT NULL,
  hadm_id INTEGER NOT NULL,
  stay_id INTEGER NOT NULL,
  caregiver_id INTEGER,
  charttime TIMESTAMP NOT NULL,
  storetime TIMESTAMP,
  itemid INTEGER NOT NULL,
  value TIMESTAMP NOT NULL,
  valueuom VARCHAR(20),
  warning SMALLINT
);
DROP TABLE IF EXISTS mimiciv_icu.d_items;
CREATE TABLE mimiciv_icu.d_items
(
  itemid INTEGER NOT NULL,
  label VARCHAR(100) NOT NULL,
  abbreviation VARCHAR(50) NOT NULL,
  linksto VARCHAR(30) NOT NULL,
  category VARCHAR(50) NOT NULL,
  unitname VARCHAR(50),
  param_type VARCHAR(20) NOT NULL,
  lownormalvalue FLOAT,
  highnormalvalue FLOAT
);
DROP TABLE IF EXISTS mimiciv_icu.icustays;
CREATE TABLE mimiciv_icu.icustays
(
  subject_id INTEGER NOT NULL,
  hadm_id INTEGER NOT NULL,
  stay_id INTEGER NOT NULL,
  first_careunit VARCHAR(255),
  last_careunit VARCHAR(255),
  intime TIMESTAMP,
  outtime TIMESTAMP,
  los FLOAT
);
DROP TABLE IF EXISTS mimiciv_icu.ingredientevents;
CREATE TABLE mimiciv_icu.ingredientevents(
  subject_id INTEGER NOT NULL,
  hadm_id INTEGER NOT NULL,
  stay_id INTEGER,
  caregiver_id INTEGER,
  starttime TIMESTAMP NOT NULL,
  endtime TIMESTAMP NOT NULL,
  storetime TIMESTAMP,
  itemid INTEGER NOT NULL,
  amount FLOAT,
  amountuom VARCHAR(20),
  rate FLOAT,
  rateuom VARCHAR(20),
  orderid INTEGER NOT NULL,
  linkorderid INTEGER,
  statusdescription VARCHAR(20),
  originalamount FLOAT,
  originalrate FLOAT
);
DROP TABLE IF EXISTS mimiciv_icu.inputevents;
CREATE TABLE mimiciv_icu.inputevents
(
  subject_id INTEGER NOT NULL,
  hadm_id INTEGER NOT NULL,
  stay_id INTEGER,
  caregiver_id INTEGER,
  starttime TIMESTAMP NOT NULL,
  endtime TIMESTAMP NOT NULL,
  storetime TIMESTAMP,
  itemid INTEGER NOT NULL,
  amount FLOAT,
  amountuom VARCHAR(20),
  rate FLOAT,
  rateuom VARCHAR(20),
  orderid INTEGER NOT NULL,
  linkorderid INTEGER,
  ordercategoryname VARCHAR(50),
  secondaryordercategoryname VARCHAR(50),
  ordercomponenttypedescription VARCHAR(100),
  ordercategorydescription VARCHAR(30),
  patientweight FLOAT,
  totalamount FLOAT,
  totalamountuom VARCHAR(50),
  isopenbag SMALLINT,
  continueinnextdept SMALLINT,
  statusdescription VARCHAR(20),
  originalamount FLOAT,
  originalrate FLOAT
);
DROP TABLE IF EXISTS mimiciv_icu.outputevents;
CREATE TABLE mimiciv_icu.outputevents
(
  subject_id INTEGER NOT NULL,
  hadm_id INTEGER NOT NULL,
  stay_id INTEGER NOT NULL,
  caregiver_id INTEGER,
  charttime TIMESTAMP NOT NULL,
  storetime TIMESTAMP NOT NULL,
  itemid INTEGER NOT NULL,
  value FLOAT NOT NULL,
  valueuom VARCHAR(20)
);
DROP TABLE IF EXISTS mimiciv_icu.procedureevents;
CREATE TABLE mimiciv_icu.procedureevents
(
  subject_id INTEGER NOT NULL,
  hadm_id INTEGER NOT NULL,
  stay_id INTEGER NOT NULL,
  caregiver_id INTEGER,
  starttime TIMESTAMP NOT NULL,
  endtime TIMESTAMP NOT NULL,
  storetime TIMESTAMP NOT NULL,
  itemid INTEGER NOT NULL,
  value FLOAT,
  valueuom VARCHAR(20),
  location VARCHAR(100),
  locationcategory VARCHAR(50),
  orderid INTEGER,
  linkorderid INTEGER,
  ordercategoryname VARCHAR(50),
  ordercategorydescription VARCHAR(30),
  patientweight FLOAT,
  isopenbag SMALLINT,
  continueinnextdept SMALLINT,
  statusdescription VARCHAR(20),
  originalamount FLOAT,
  originalrate FLOAT
);
```
&lt;hr class="__chatgpt_plugin"&gt;
role::assistant

acknowledge
&lt;hr class="__chatgpt_plugin"&gt;
</code></pre></div></div>

<p>Finally request the tables and database one at a time, from there  it’s up to the user to stitch this all together at the end…or maybe someone could write a library!</p>

<div class="language-plaintext highlighter-rouge"><div class="highlight"><pre class="highlight"><code>role::user

document the mimiciv_icu database


&lt;hr class="__chatgpt_plugin"&gt;

role::assistant

```
version: 2

sources:
  - name: mimiciv_icu
    description: This is the ICU database of MIMIC-IV, containing data from adult ICU stays.
    database: mimiciv_icu
    schema: public
    tags: [ICU, MIMIC-IV]
```


&lt;hr class="__chatgpt_plugin"&gt;

role::user

document the outputevents table

&lt;hr class="__chatgpt_plugin"&gt;

role::assistant

```
version: 2

sources:
  - name: mimiciv_icu
    tables:
      - name: outputevents
        description: This table contains information about output events (e.g. urine output) for patients in the ICU.
        columns:
          - name: subject_id
            description: The unique identifier for the patient.
            tests:
              - not_null
          - name: hadm_id
            description: The unique identifier for the patient's hospital admission.
            tests:
              - not_null
          - name: stay_id
            description: The unique identifier for the patient's ICU stay.
            tests:
              - not_null
          - name: caregiver_id
/docker-entrypoint.sh: Configuration complete; ready for start up the caregiver involved in the output event.
          - name: charttime
            description: The time at which the output event was charted.
            tests:
              - not_null
          - name: storetime
            description: The time at which the output event was stored.
          - name: itemid
            description: The identifier for the type of output event.
            tests:
              - not_null
          - name: value
            description: The value of the output event.
            tests:
              - not_null
          - name: valueuom
            description: The unit of measurement for the value of the output event.
```
</code></pre></div></div>

<p>Cool that we even get some tests as well!</p>

<h2 id="closing-thoughts">Closing thoughts</h2>

<p>For MIMIC there is plenty of information on the internet that the model could have memorised in order to make accurate descriptions. (To see what I mean try sending the system message and then the phrase <code class="language-plaintext highlighter-rouge">document icu_stays</code>). It would be interesting to see if more obscure schemas can be documented as accurately, I have had some anecdotal success with several applications.</p>

<p>One thing I have not noticed in any of my work on these prompts is any indication that the model would like some clarification. Even after explicity setting a clarify tag this output has not ocurred once for me.</p>

<p>Using ChatGPT API and the ChatGPT MD plugin in Obsidian provides a no-code solution to automatically document DBT projects. This allows us to save time and focus on other aspects of the project while still maintaining high-quality documentation. With all that saidm this is only meant as a first pass and results should be carefully reviewed by humans.</p>]]></content><author><name></name></author><category term="data-eng" /><summary type="html"><![CDATA[This technical report explores the use of ChatGPT API to automatically document DBT projects. ChatGPT is a natural language processing API that can generate human-like responses to prompts. We will be using the Obsidian ChatGPT MD plugin for this project, which provides a workflow to develop prompts for our documentation.]]></summary></entry><entry><title type="html">A case study on deploying an ML model in the cloud</title><link href="https://www.nintorac.dev/devops/2020/04/22/thiscartdoesnotexist.html" rel="alternate" type="text/html" title="A case study on deploying an ML model in the cloud" /><published>2020-04-22T04:22:56+00:00</published><updated>2020-04-22T04:22:56+00:00</updated><id>https://www.nintorac.dev/devops/2020/04/22/thiscartdoesnotexist</id><content type="html" xml:base="https://www.nintorac.dev/devops/2020/04/22/thiscartdoesnotexist.html"><![CDATA[<p>How a machine learning model was served to \(25,000\) users for only $2!</p>

<h2 id="introduction">Introduction</h2>

<p>This article will go over the tools and services used to deploy the website <a href="https://www.thisdx7cartdoesnotexist.com">www.thisdx7cartdoesnotexist.com</a>. The website was a first run at releasing to the world a machine learning model that was developed to generate patches for the Yamaha DX7, and while there won’t be details in this article about what that is or why it matters, there will be details about how the model was successfully served at scale and didn’t fall prey to the <a href="https://en.wikipedia.org/wiki/Slashdot_effect">slashdot effect</a> after reaching top three in <a href="https://news.ycombinator.com/item?id=23373730">Hacker News</a>!</p>

<p>There were two main goals of this deployment a) the site had to be fairly responsive, meaning preferably sub-second request times and b) everything had to be done as cheaply as possible, preferably for free.</p>

<h2 id="components">Components</h2>

<p>To motivate the deployment description we will first describe the separate parts required to facilitate</p>

<p>The website is fairly simple and is made up of three parts. The first is the frontend which greeted users and allowed them to generate novel and unique DX7 patches at the push of a button, as well as giving a little information about the how, what and the why. Second, the backend which is a simple one method Flask endpoint running a PyTorch model.</p>

<h3 id="frontend">Frontend</h3>

<p>The frontend was developed using <a href="https://jekyllrb.com/">Jeykll</a>, it’s main use is as a simple blogging platform, however using one of the many themes available it can take on a multitude of forms. In this case a theme was found that created a simple front-page that was then modified to include an FAQ section and spiced up with various CSS and HTML effects found around the internet to give it that 80’s vibe, inline with the subject of the site.</p>

<p>Jekyll was chosen as it compiles down to a simple static website which can be deployed super easily with minimal infrastructure and cost. Due to lack of frontend development experience this was probably the most painful part of the system to develop but the final product did the job. For those that haven’t seen it, here’s a screen cap.</p>

<p><img src="/assets/does-not-exist-case-study/site.jpg" alt="site screen capture" /></p>

<h3 id="backend">Backend</h3>

<p>The backend consists of a simple flask server with a single endpoint. Flask was chosen for two simple reasons; the model was written in PyTorch and the model was initially to be deployed using a <a href="https://cloud.google.com/functions">Google Cloud Functions</a>. More on these later.</p>

<p>The model itself was a feed-forward attention decoder, the model performed attention over \(155\) parameters and had 3 layers giving it a computational complexity of around \(\mathcal{O}(3\times155^2)\) which is simple enough to run on a CPU in around 200ms. A DX7 patch consists of 32 such parameters sets so the model needed to be run a total of \(32\) times to generate the full patch set, luckily the runtime doesn’t scale linearly due to PyTorch optimisations!</p>

<h2 id="deployment">Deployment</h2>

<h3 id="model-serving">Model Serving</h3>

<p>Now that the application has been motivated let’s get into the deployment. The initial plan was to run the model using Google Cloud Functions and the Jekyll app with a GCP bucket, at the time we only had a vague awareness of the products in this space and we were entirely unaware of their pros and cons. All we knew was that GCS was dirt cheap to run a static site through and Cloud Function’s were reasonably priced, charging only by the 100ms, and not requiring infrastructure maintenance.</p>

<p>Having already trained the model, the first item on the agenda was to create the cloud function to serve it. The code for that was really basic, just load the model, sample some latent values, generate the parameter values, pack it into a format that the DX7 can understand and send to the user. It looked a little like this.</p>

<div class="language-plaintext highlighter-rouge"><div class="highlight"><pre class="highlight"><code>def generate(request):
    """Patch generation function.
    Args:
        request (flask.Request): The request object.
        &lt;http://flask.pocoo.org/docs/1.0/api/#flask.Request&gt;
    Returns:
        The the syx patch file for a yamaha DX7
    """

    global model

    # load the model if this is a cold start
    if model is None:
        model = InferenceWorker('hasty-copper-dogfish', 'dx7-vae', with_data=False).model
    
    # sample latent from prior N(0,1)
    z = torch.randn(32, 8)

    # decode samples to logits
    p_x = model.generate(z)

    # Get most likely
    sample = p_x.logits.argmax(-1)

    # convert pytorch tensors to syx
    msg = dx7_bulk_pack(sample.numpy().tolist())

    # Write to file and send
    with NamedTemporaryFile('wb+', suffix='.syx') as f:
        mido.write_syx_file(f.name, [msg])

        # as_attachment in order to prompt for download
        # attachment filename to give it a better name
        # cache_timeout=-1 so the user gets a new patch each time
        return send_file(f.name, 
            as_attachment=True, 
            attachment_filename=f'dx7_{uuid()}.syx',
            cache_timeout=-1
        )
</code></pre></div></div>

<p>Since Cloud Functions can only package code and dependencies the model weights would need to be downloaded whenever the function was called from a cold start. The <code class="language-plaintext highlighter-rouge">InferenceWorker</code> class handles this automatically by downloading weights from a known location.</p>

<p>Originally this was planned to be a Google Cloud Storage bucket, however with a weights file totalling \(60\)Mb this would quickly rack up costs and although it wasn’t envisaged that there would be too much fervour over this work, horror stories like that of <a href="https://medium.com/@aidungeon/how-we-scaled-ai-dungeon-2-to-support-over-1-000-000-users-d207d5623de9">AI Dungeon 2</a> combined with the lack of 0’s in the bank prompted further research. In the end it was decided a separate <a href="https://github.com/Nintorac/NeuralDX7-weights">weights repository</a> would do the job for the wonderful price of FREE! Thanks Github!</p>

<p>With the cloud function in place and the weights being loaded from their repository everything was ready to move onto hosting the static frontend…except no, it was not quite that simple. With this setup the unfortunate side effect was that each invocation of the cloud function from a cold start would result in an 8-second delay as the function downloaded the weights, this was unacceptable as most users would assume something was broken after two and leave the site.</p>

<p>The initial idea for a workaround was to encode the weights into a Python list and then on each cold-start write this list to a file and load the file off disk, gross. Wanting to avoid that idea at all costs a little more research was conducted until finally <a href="https://cloud.google.com/run">Google Cloud Run</a> was discovered.</p>

<p>Cloud Run is pretty similar to Cloud Functions, i.e it charges by the 100ms and doesn’t require any manual scaling. However, instead of just uploading code and dependencies, a docker container is used instead. Great, so the weights could be baked into the Docker container and then as soon as the endpoint was hit the weights would be available. Even better, it was a chance to flex with Docker! The cloud run setup was a breeze, only a few small additions to the Cloud Function code were needed and after deployment everything was working perfectly. Additionally as a side bonus of using Cloud Run it was now possible to set a custom domain for the endpoint which was not so simple with functions!</p>

<h3 id="frontend-1">Frontend</h3>

<p>Originally it was planned that the frontend would be hosted using a Google Cloud Storage bucket as this seemed like the easiest option. After building the site in Jekyll and uploading the static content to a bucket it was time to link up the domain at which point everything would be ready to go. Linking the domain was simple enough using <a href="https://cloud.google.com/dns">Google Cloud DNS</a>. However, it was quickly discovered that buckets would not allow <code class="language-plaintext highlighter-rouge">https</code> access for custom domains and in this day and age that was a necessity. To tell the truth, it <a href="https://stackoverflow.com/questions/22759710/setting-up-ssl-for-google-cloud-storage-static-website">is possible</a>, unfortunately your average load balancer runs about \(\$20\) a month which flies in the face of the cheap.</p>

<p>The next idea was to have the flask server hosting the model also serve the Jekyll static content. Although this is probably technically possible the search results did not seem particularly helpful and so “we though na forget it, yo homes just use another container”, and so another container was <a href="https://daniel-azuma.com/blog/2019/07/01/deploying-my-blog-to-google-cloud-run">cooked up</a> (read stolen) that used Nginx to serve the content. Again this was hooked up to the DNS and everything was ready to go!</p>

<p><img src="/assets/does-not-exist-case-study/docker-prince.jpg" alt="we though na forget it, yo homes just use another container" /></p>

<h2 id="preparing-for-full-deployment">Preparing for full deployment</h2>

<p>At this point the site was live and anyone who wanted to access it could, but the robots were told <a href="https://www.robotstxt.org/robotstxt.html">not to look</a> because it wasn’t quite ready, and they didn’t, good robots.</p>

<p>Four things were required before public release and these were;</p>
<ol type="a">
  <li>Mitigate risk of a large infrastructure bill</li>
  <li>Stress test the site with simultaneous users</li>
  <li>Track the number of visitors</li>
  <li>Monetise the site</li>
</ol>

<h3 id="budgets">Budgets</h3>
<p>To avoid a large bill <a href="https://cloud.google.com/billing/docs/how-to/budgets">a budget</a> was created and set to $20 for the month. Then alarms were created that would send email alerts at 50%, 75%, 90% and 100% of the budget and a little peace of mind was enjoyed.</p>

<h3 id="stress-testing">Stress testing</h3>
<p>To stress-test the simplest method imaginable was used, the trusty terminal emulator <a href="https://terminator-gtk3.readthedocs.io/en/latest/">Terminator</a> was fired up, the screen was split many, many times, group broadcast was turned on to launch the requirest simultaneously  and the commands <code class="language-plaintext highlighter-rouge">wget https://www.thisdx7cartdoesnotexist.com/</code> and <code class="language-plaintext highlighter-rouge">wget https://generate.thisdx7cartdoesnotexist.com</code> were executed. Here is a dramatic reconstruction of the stress test.</p>

<p><a href="/assets/does-not-exist-case-study/stress-test.png" data-lightbox="image-1" data-title="Stress test dramatic reconstruction">
    <img src="/assets/does-not-exist-case-study/stress-test.png" alt="Stress test dramatic reconstruction" />
</a></p>

<p>There were memory errors in the containers so the memory limit was increased in the Cloud Run console. The test was re-run and everything ran successfully and completed in the sub \(2\) seconds mark.</p>

<p>Next, the maximum number of simultaneous instances of the generation endpoint was reduced and no further tests were run. This was a mistake.</p>

<h3 id="tracking">Tracking</h3>
<p>This was pretty easy, Google Analytics was added to the site which was accomplished by a simple setting provided by Jekyll. No worries!</p>

<h3 id="monetisation">Monetisation</h3>
<p>Next <a href="https://www.google.com/adsense/">AdSense</a> was applied for, and many times it failed with an error saying the site could not be reached. This was surprising as no matter what was tried, the site could always be reached. After a while, it was discovered that the AdSense bot was respecting the <code class="language-plaintext highlighter-rouge">robots.txt</code>.</p>

<p>After allowing robots, ad sense came back saying the site lacked content and after taking the insult on the chin it was decided that there would be no ads.. and everyone rejoiced!</p>

<h2 id="retrospective">Retrospective</h2>

<h3 id="going-live">Going Live</h3>

<p>One evening, once everything was in place the decision was made and the site was published on several subreddits. The analytics were obsessively followed and each new visitor was greeted with a little rush but after a few hours and less than 50 users the fear set in that no one liked the project and the last few weeks of toil had been for nought.</p>

<p>After waking up the next morning all those fears were allayed as there were currently over \(100\) active users. After a little digging, it was found that the site had been linked on Hacker News and had ranked quite nicely. The next week or so saw waves of new visitors as several articles were published. The analytics looks a little like this</p>

<p><a href="/assets/does-not-exist-case-study/users-count.png" data-lightbox="image-1" data-title="users">
    <img src="/assets/does-not-exist-case-study/users-count.png" alt="cost-cumulative" />
</a></p>

<h3 id="costs">Costs</h3>
<p>At the time of writing the site has had a total of \(25\)k users in total, this comes in at a total cost of around \(\$10\), of this \(60%\) was covered under Google Free Tier and so the remaining \(\$4\) ended up being the total cost for running the site for the last month. The following chart shows the cumulative total costs (including what does not need to be paid under Free Tier). Click the images to expand!</p>

<p><a href="/assets/does-not-exist-case-study/cost-cumulative.png" data-lightbox="image-1" data-title="cost-cumulative">
    <img src="/assets/does-not-exist-case-study/cost-cumulative.png" alt="cost-cumulative" />
</a></p>

<p>And here is the line by line breakdown of those costs
<a href="/assets/does-not-exist-case-study/cost-breakdown.png" data-lightbox="image-1" data-title="cost-breakdown">
    <img src="/assets/does-not-exist-case-study/cost-breakdown.png" alt="cost-breakdown" />
</a></p>

<p>Note: the above costs are for both the front and back end Cloud Run services.</p>

<h3 id="hindsight">Hindsight</h3>
<p>With hindsight there a few things that could be improved, first <a href="https://www.wandb.com/">Weights and Biases</a> seems like a much better place to host model weights than the somewhat hacky Github solution though further investigation is required into the feasibility of this.</p>

<p>Next, more stringent stress testing could have given a better indication of the performance of the site and might have led to optimising the generation endpoint. The average request time here was around 2 seconds which is a little longer than ideal but for the most part that hasn’t seemed to cause too much of an issue.</p>

<p>In the same vein of better operations management, iterating on the live deployment of the site was a bit of a hassle, so in the future it would be beneficial to set up a continuous integration system to handle that automatically, though maybe not worth it depending on the price point.</p>

<p>Finally, better monetisation techniques are needed that don’t rely on a robot deciding what is interesting. Luckily the <a href="https://cloud.google.com/free">Google Cloud free tier and credits</a> have absorbed all of this cost up to this point but when it comes down to it, this model was incredibly cheap to train due to its low parameter count and small data complexity but for more interesting projects with higher data and model complexity those costs are going to balloon.</p>

<p>If you would like to discuss anything talked about in this article we have started a <a href="https://www.reddit.com/r/nintoracaudio/">subreddit</a> and urge all questions and commentary to be directed that way.</p>

<p>Congratulations if you made it to this point and thanks for reading,
Stay creative from Nintorac Audio &lt;3</p>

<h2 id="press">Press</h2>

<p>Oh and thanks for all the press! These are the ones found so far if you know of any that have been missed swing an email!</p>

<p><a href="https://www.engadget.com/yamaha-dx7-ai-patches-155010833.html">Engadget</a></p>

<p><a href="https://www.synthtopia.com/content/2020/06/01/new-site-uses-artificial-intelligence-to-create-yamaha-dx7-synth-patches-so-you-dont-have-to/">Synthtopia</a></p>

<p><a href="https://www.musicradar.com/news/this-website-will-generate-free-dx7-synth-presets-with-a-single-click">Music Radar</a></p>

<p><a href="https://www.gearnews.com/endless-dx7-sounds-from-ai-driven-cartridge-generator/">Gear News</a></p>

<p><a href="https://www.musictech.net/news/ai-generated-fm-patches-free/">Music Tech</a></p>

<p>On a similar but not entirely related note, the patch endpoint was also included in <a href="https://www.mindlesstrx.com/post/volca-fm-editor-huge-update">this</a> Max Device, so cool!</p>]]></content><author><name></name></author><category term="devops" /><summary type="html"><![CDATA[How a machine learning model was served to \(25,000\) users for only $2!]]></summary></entry></feed>